How to Create a Gamified Pop-Up in Claspo and Add It to WordPress
How to Create a Gamified Pop-Up in Claspo and Add It to WordPress
Growing your email list and boosting conversions on your website doesn't have to be boring or complicated. With interactive gamified pop-ups, you can engage visitors in a fun and dynamic way while capturing valuable leads. In this comprehensive tutorial, I'll take you through the entire process of creating a gamified pop-up using Claspo’s Spin the Wheel widget and connecting it seamlessly to your WordPress site.
This step-by-step guide is perfect whether you're a blogger, an e-commerce brand, or a service provider. By the end, you'll have a fully customized, interactive pop-up that incentivizes visitors to subscribe or convert — all without writing a single line of code.
Let’s dive right in!
Step 1: Sign Up for a Free Claspo Account
The first thing you need to do is head over to claspo.io. Claspo offers a free plan, so you can start building and testing your pop-ups without any upfront cost. This is a great way to explore the features and see if it fits your website’s needs before upgrading.
Once you’re on the Claspo homepage, click the Sign Up button located in the upper right corner.

You’ll be presented with several sign-up options, including Google, Facebook, X (formerly Twitter), Shopify, or using your email address. For this tutorial, signing up with Google is quick and easy, but feel free to use whichever method suits you best.
After signing in, you’ll need to agree to Claspo’s terms of service and privacy policy by checking the first box. You can optionally opt-in to receive special offers and news from Claspo by checking the second box. Then click Next to continue.
Next, enter your website’s domain name. This tells Claspo where you’ll be deploying your widgets. After filling this in, hit the Finish Registration button.
Once registered, you’ll land on a welcome screen. Click the Start creating first widget button to begin building your lead generation pop-up.
Step 2: Choose a Gamified Template
Claspo simplifies the creation process by offering a library of templates designed for various goals. When prompted for your widget’s goal, select Generate Leads to focus on growing your email list.
For more options, click Explore all templates to access the full template library.
On the template library screen, you’ll find filters on the left sidebar for use cases, features, layouts, and more. To narrow down to gamified pop-ups, locate the Features section and check the box for Gamification. This will filter the templates to show interactive options like spin-to-win wheels and interactive forms that increase engagement while capturing leads.
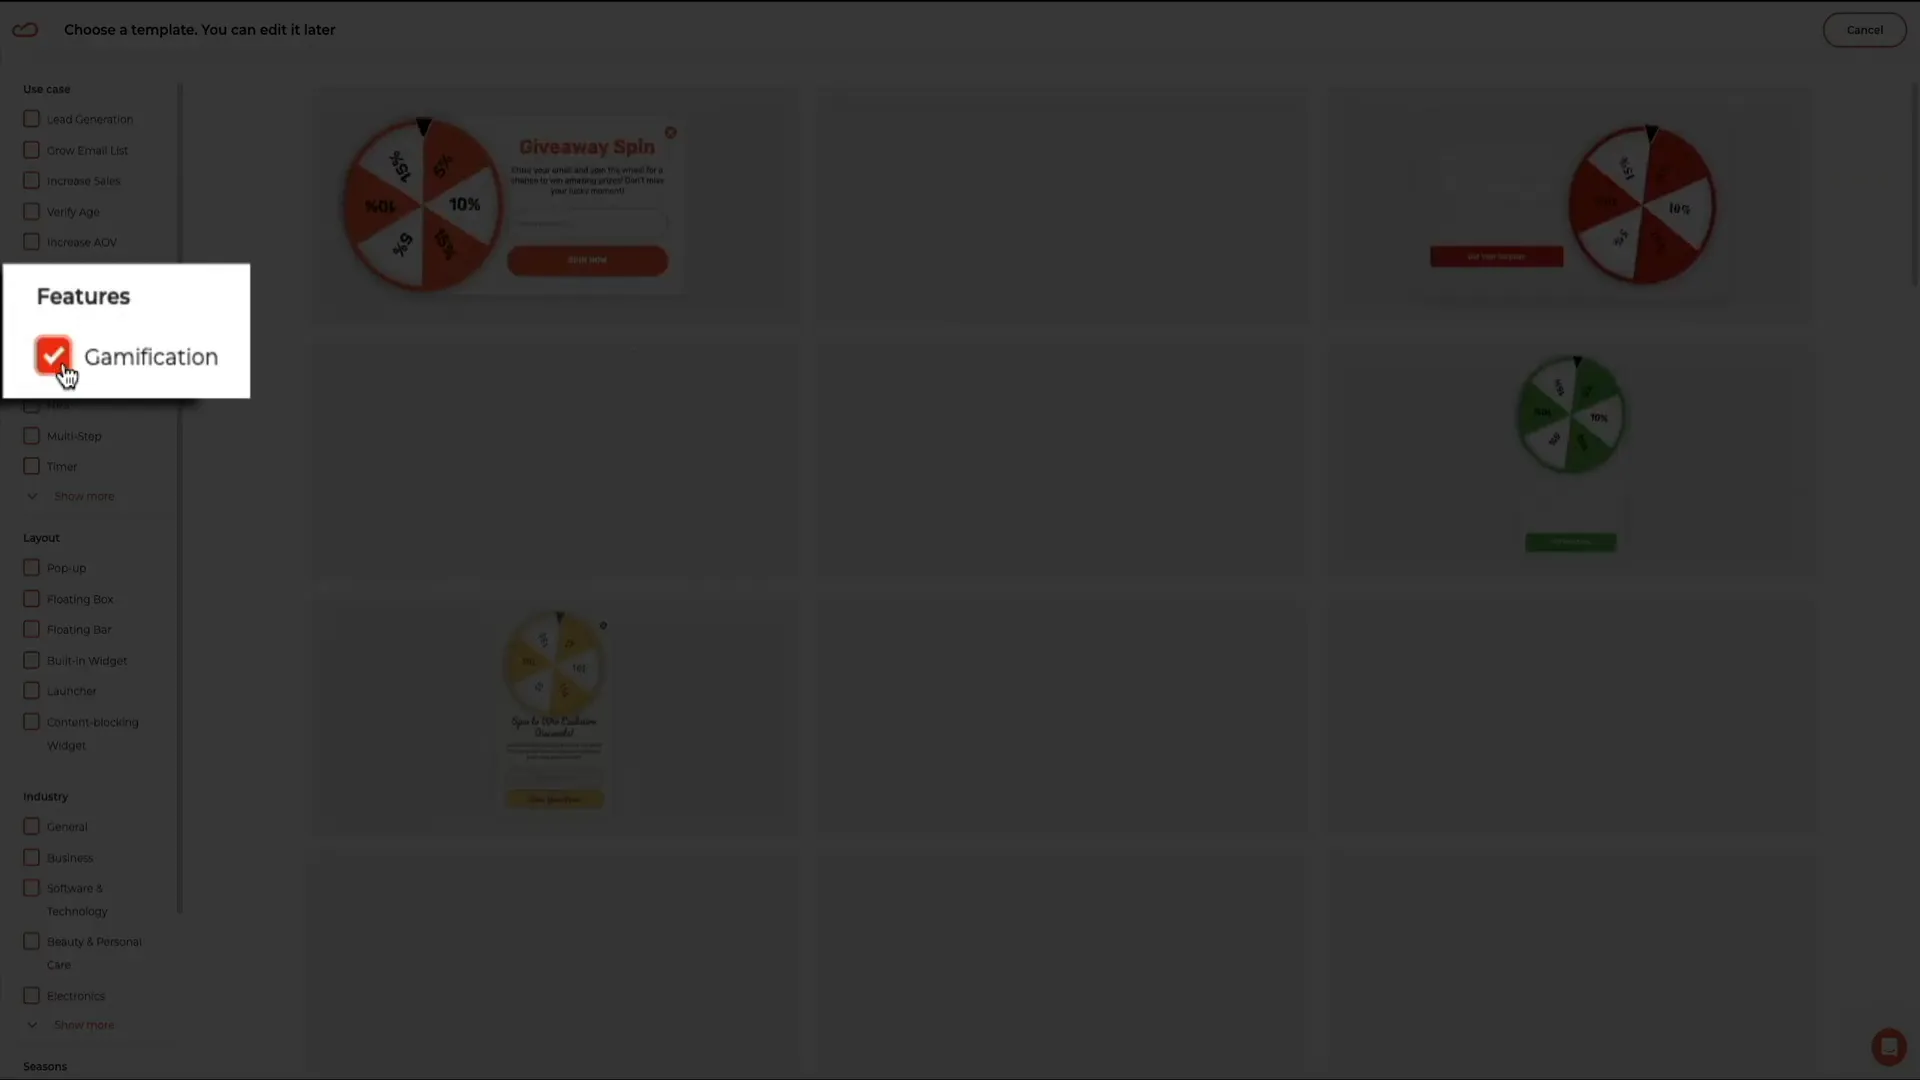
For this tutorial, I’m selecting the Win Cyber Discounts template. It features a spinning wheel that allows users to win discount codes in exchange for their email address. This template is visually appealing and designed to boost conversions effectively.
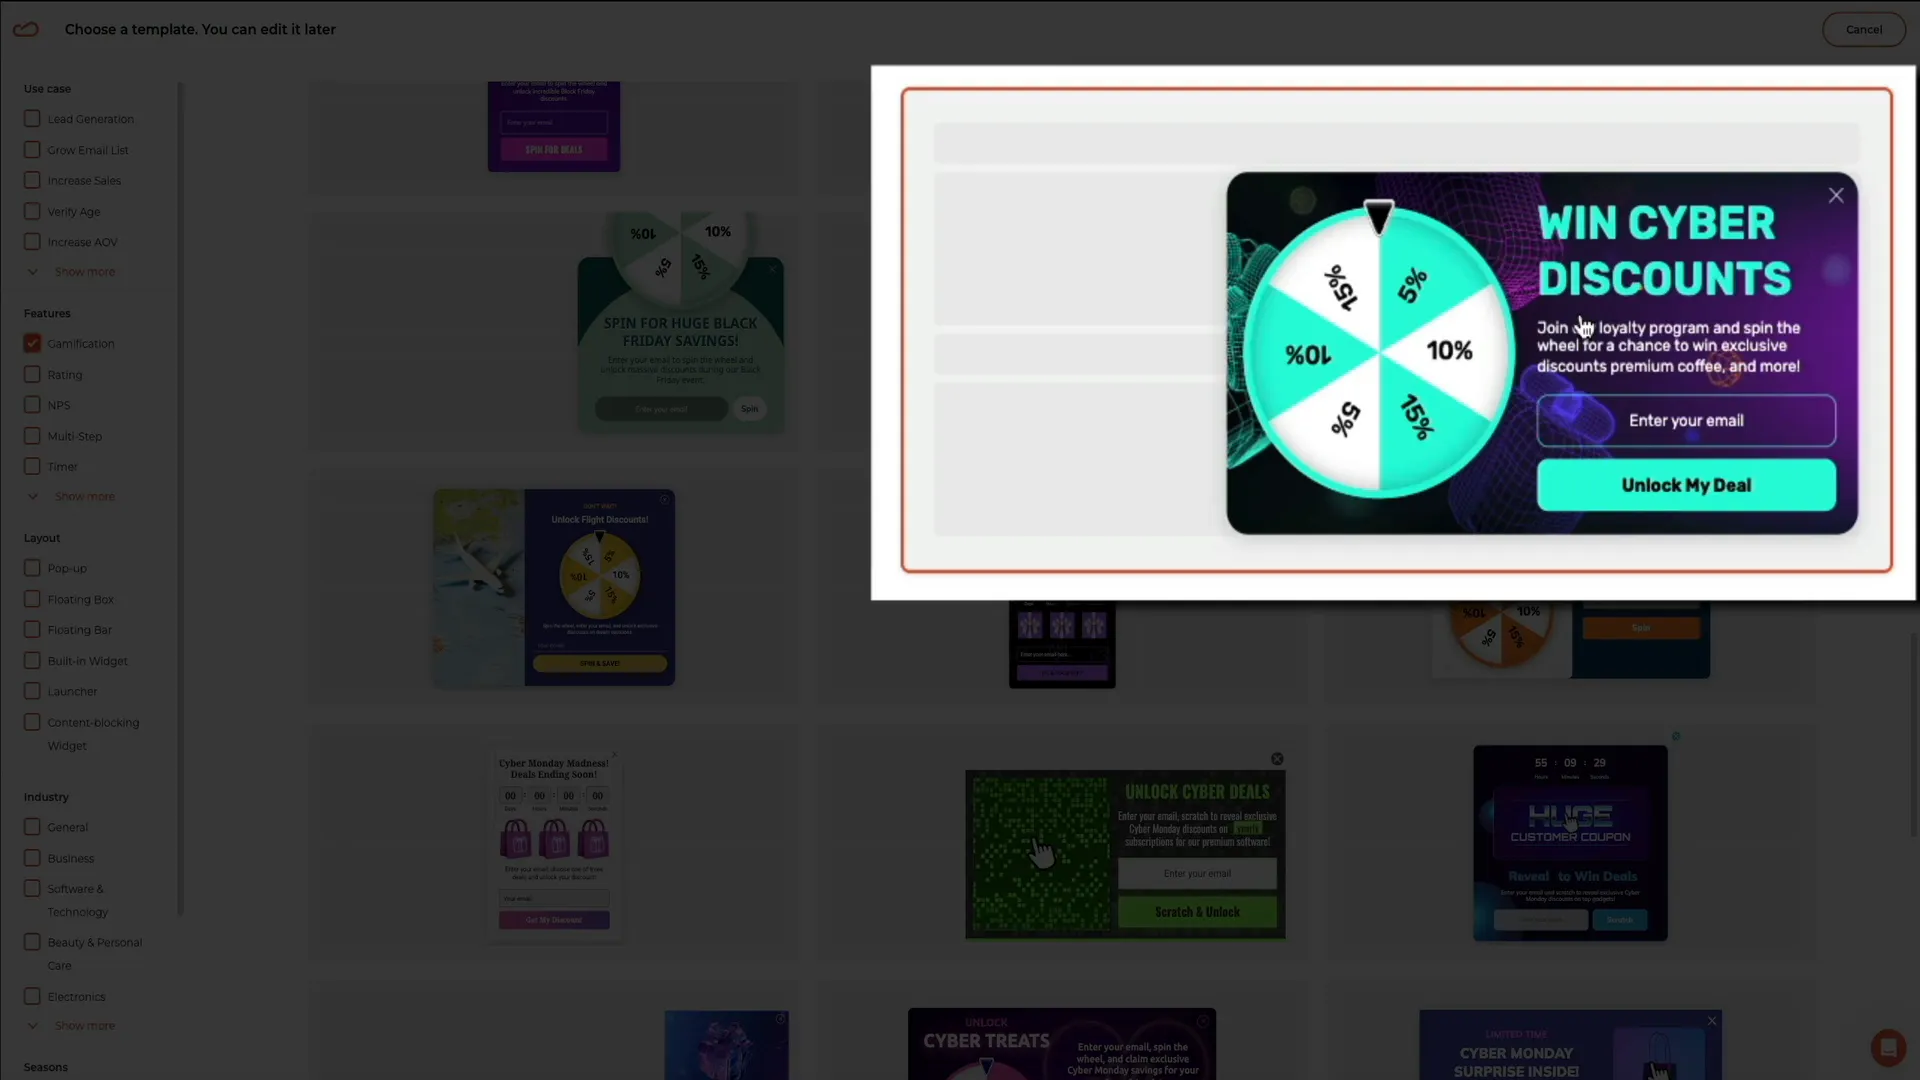
Once selected, you’ll be taken to the template details screen where you can preview the user experience across different interaction states.
Understanding the Widget Interaction States
- Signup View: This is the initial pop-up that users see. It includes the spinning wheel and a call to action inviting users to enter their email and unlock a deal.
- Success View: Displays after a user successfully enters their email and spins the wheel. Shows the discount code they’ve won.
- Existing View: Appears if a user tries to spin again with the same email, reminding them of the discount they already received.
- Error View: Displays if something goes wrong during submission, prompting the user to try again.
It’s important to note that every element in these views is fully customizable to match your branding and messaging.
Before moving on, toggle between desktop and mobile previews using the icons near the top right to ensure your pop-up looks great on all devices. Claspo automatically optimizes the mobile layout, preserving the spin-to-win functionality.
There’s also a launcher option that lets you add a floating button (labeled “Cyber Spin”) on your site so users can manually trigger the pop-up. For this tutorial, I’m setting it to display automatically without a launcher.
Once you’re happy with the template, click Use this template to proceed to customization.
Step 3: Customize Your Gamified Pop-Up Widget
Now comes the fun part — personalizing your widget to fit your brand and campaign.
Claspo’s web-based drag-and-drop editor is intuitive and powerful, allowing you to make real-time changes to your pop-up without any coding.
Editor Overview
- Center Preview: Shows a live preview of your pop-up, including all interaction states. You can click on any element to edit it.
- Right Sidebar: Displays configuration settings for the selected element, including fonts, colors, backgrounds, and behavior.
- Left Toolbox: Contains components like text, images, buttons, and form fields that you can drag onto your pop-up to extend functionality.
To edit text, simply click on the element in the preview. For example, I updated the main headline from “Win Cyber Discounts” to “Win Instant Discounts.” The change is reflected immediately across all interaction states, saving you from repetitive edits.
Next, I changed the button color and other teal-colored elements to a new shade of green to better match my brand. You can adjust colors using the color picker tool in the right sidebar.
Another great customization is adding extra form fields. I added a First Name input field below the email field to personalize follow-up emails or offers.
If you make a mistake or want to revert a change, Claspo includes an undo button in the top toolbar, or you can use the keyboard shortcut (Command-Z on Mac or Control-Z on Windows).
Configuring the Spin Wheel Rewards
The core gamified element is the spin wheel itself. Click on the wheel in the editor to open its settings.
By default, the wheel has three reward slices with different odds:
- 60% chance to win 5% off
- 30% chance to win 10% off
- 10% chance to win 15% off
You can edit these rewards by clicking the Edit Rewards button. This opens a detailed configuration screen where you can:
- Adjust the chance-to-win ratio for each reward
- Change the discount percentages
- Assign unique promo codes to each prize
- Add more slices to the wheel with custom prizes
Once you finish, click Done. Changes are saved instantly without needing to click a separate save button.

Preview and Mobile Optimization
Before publishing, it’s crucial to preview your pop-up on different screen sizes.
Toggle between desktop and mobile views at the top of the editor. Claspo automatically stacks components vertically in mobile view, but you can rearrange, resize, or hide elements if necessary.
To simulate the user experience, click the preview (eye) icon near the top right. This opens a live simulation where you can test the pop-up’s behavior on desktop and mobile.
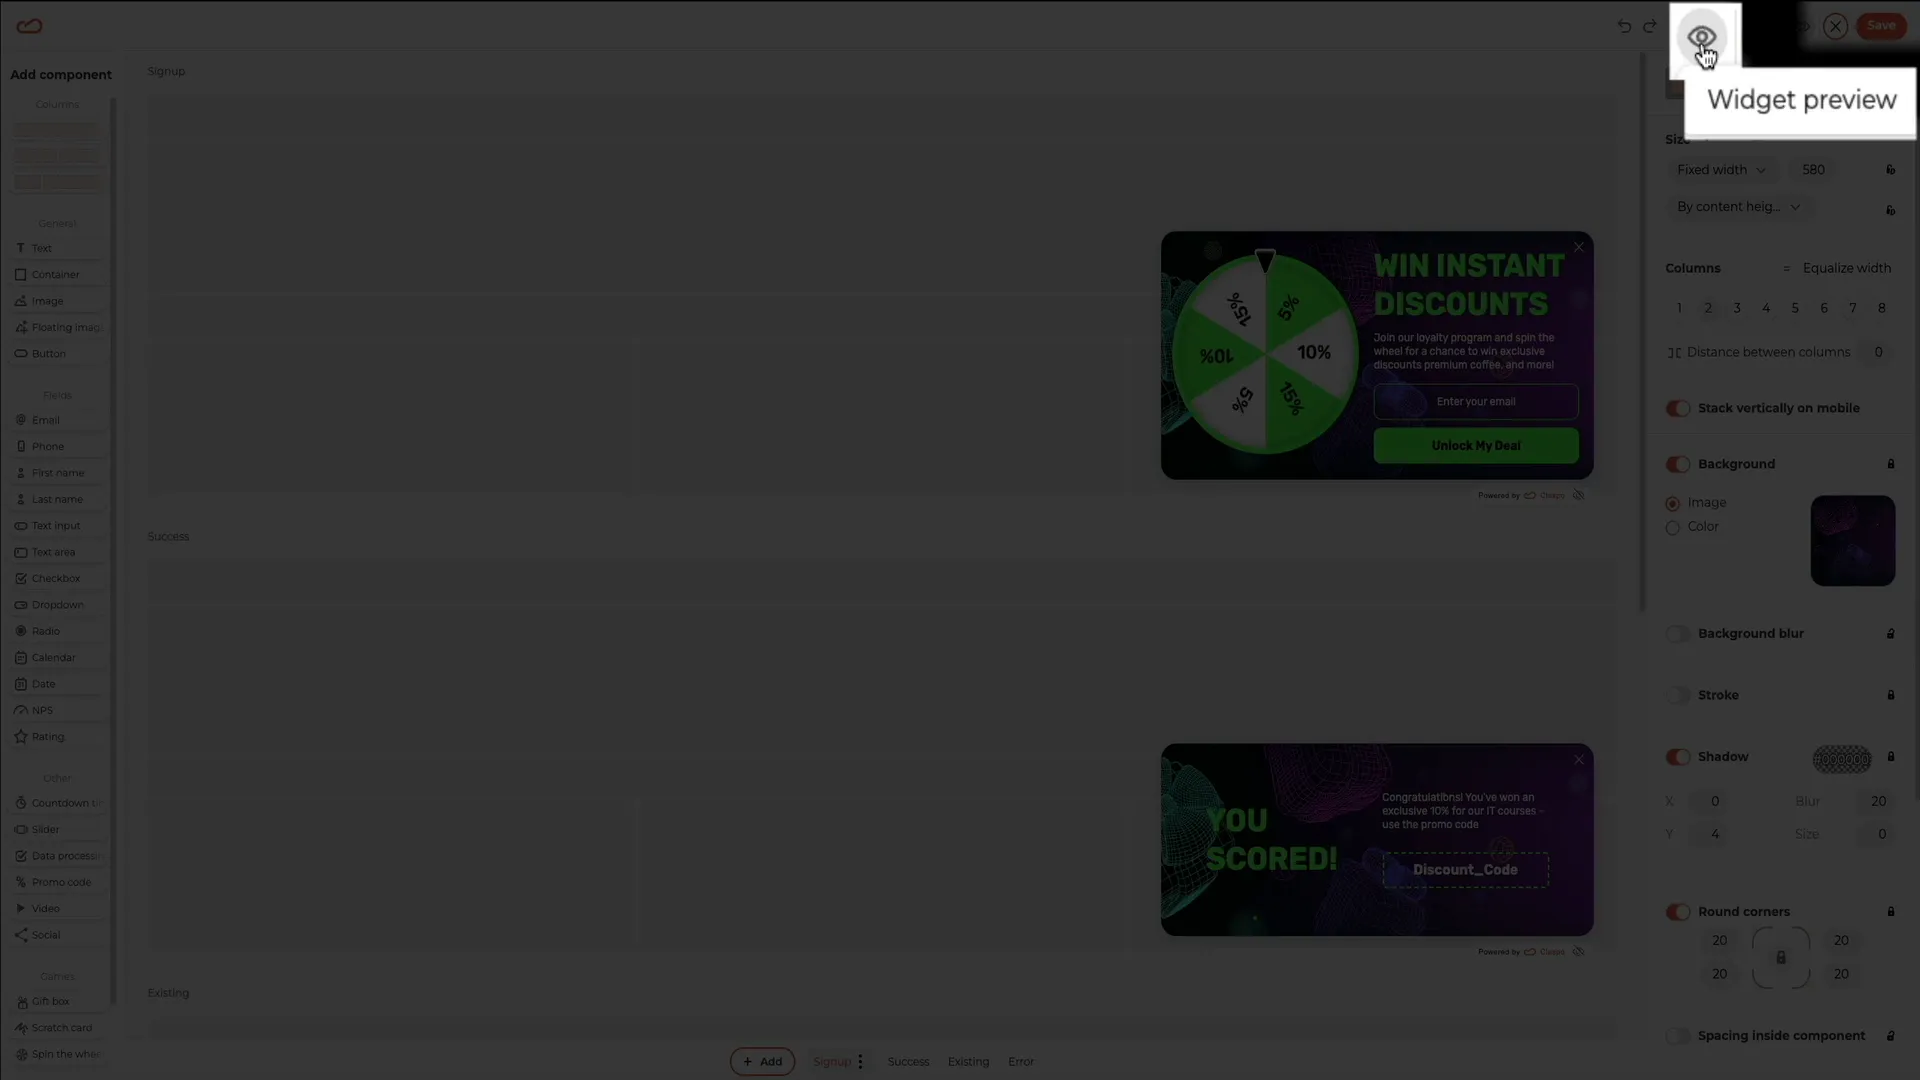
Make any final tweaks, then click Save to lock in your design.
Step 4: Set Up Widget Triggering Rules
Next, decide exactly when, where, and to whom your pop-up appears.
Claspo’s default rule-based triggering offers a flexible way to control your widget’s behavior:
- Display Frequency: Choose to show the pop-up once per session, per day, or with no limit.
- When to Display: Set conditions based on time on page, scroll depth, or exit intent.
- When to Stop Displaying: Auto-hide after a set number of seconds or after the visitor subscribes.
- To Whom: Target all visitors, new visitors only, or returning visitors.
For example, I chose to show the pop-up only to new visitors, which is ideal for first-time offers and avoids annoying returning users.
For advanced use cases, Claspo also supports:
- HTML Element Click-Based Triggering: Show the pop-up only when a visitor clicks a specific element like a button or link.
- API-Based Triggering: Developers can trigger the pop-up through custom logic and integrations.
For most users, the default rule-based options provide all the control you need.
Once your rules are set, click Next.
Step 5: Add Integrations to Collect Leads
To collect and manage the leads captured by your pop-up, you’ll want to configure integrations.
From your Claspo dashboard, click Integrations in the left sidebar. Here you can choose where to send the data collected by your widget.
By default, Claspo stores all leads internally using its built-in lead management system. This is a simple and effective solution if you want to keep everything in one place.
If you prefer, you can connect third-party services such as email marketing platforms or CRMs. Claspo supports many popular integrations and also offers a Zapier webhook for connecting hundreds of other tools through automated workflows.
If you use Google Analytics, you can enable the option to export widget events as custom actions in your analytics dashboard.
For this tutorial, I’m keeping things simple and using Claspo’s internal lead storage.
If you want to use a third-party integration, select it, authorize the connection, and follow the specific setup instructions. Claspo provides detailed guides for each integration, which you can find linked in their support documentation.
Step 6: Install the Claspo Script on Your WordPress Site
The Claspo script is a small piece of code that connects your WordPress site to the Claspo platform. It enables your pop-up widget to display, track interactions, and send lead data based on your configured settings.
Great news — you only need to install this script once. After that, any widget you create in Claspo will automatically appear on your site without any additional coding.
To install the script, go to your Claspo dashboard and click the Install Script button in the top right or select the Script menu item on the left.
Since we’re using WordPress, the easiest method is via the dedicated Claspo WordPress plugin.
Follow these steps:
- Click the Install button under the WordPress section.
- Ignore step 1 (it just takes you to the plugin download page).
- Copy your unique Script ID shown in step 2.
- Go to your WordPress admin dashboard.
- Navigate to Plugins > Add New.
- Search for “Claspo” and install the Claspo plugin.
- Activate the plugin.
- Paste your Script ID into the plugin’s settings and click Connect.
- Return to the Claspo dashboard to complete the setup by following the prompts.
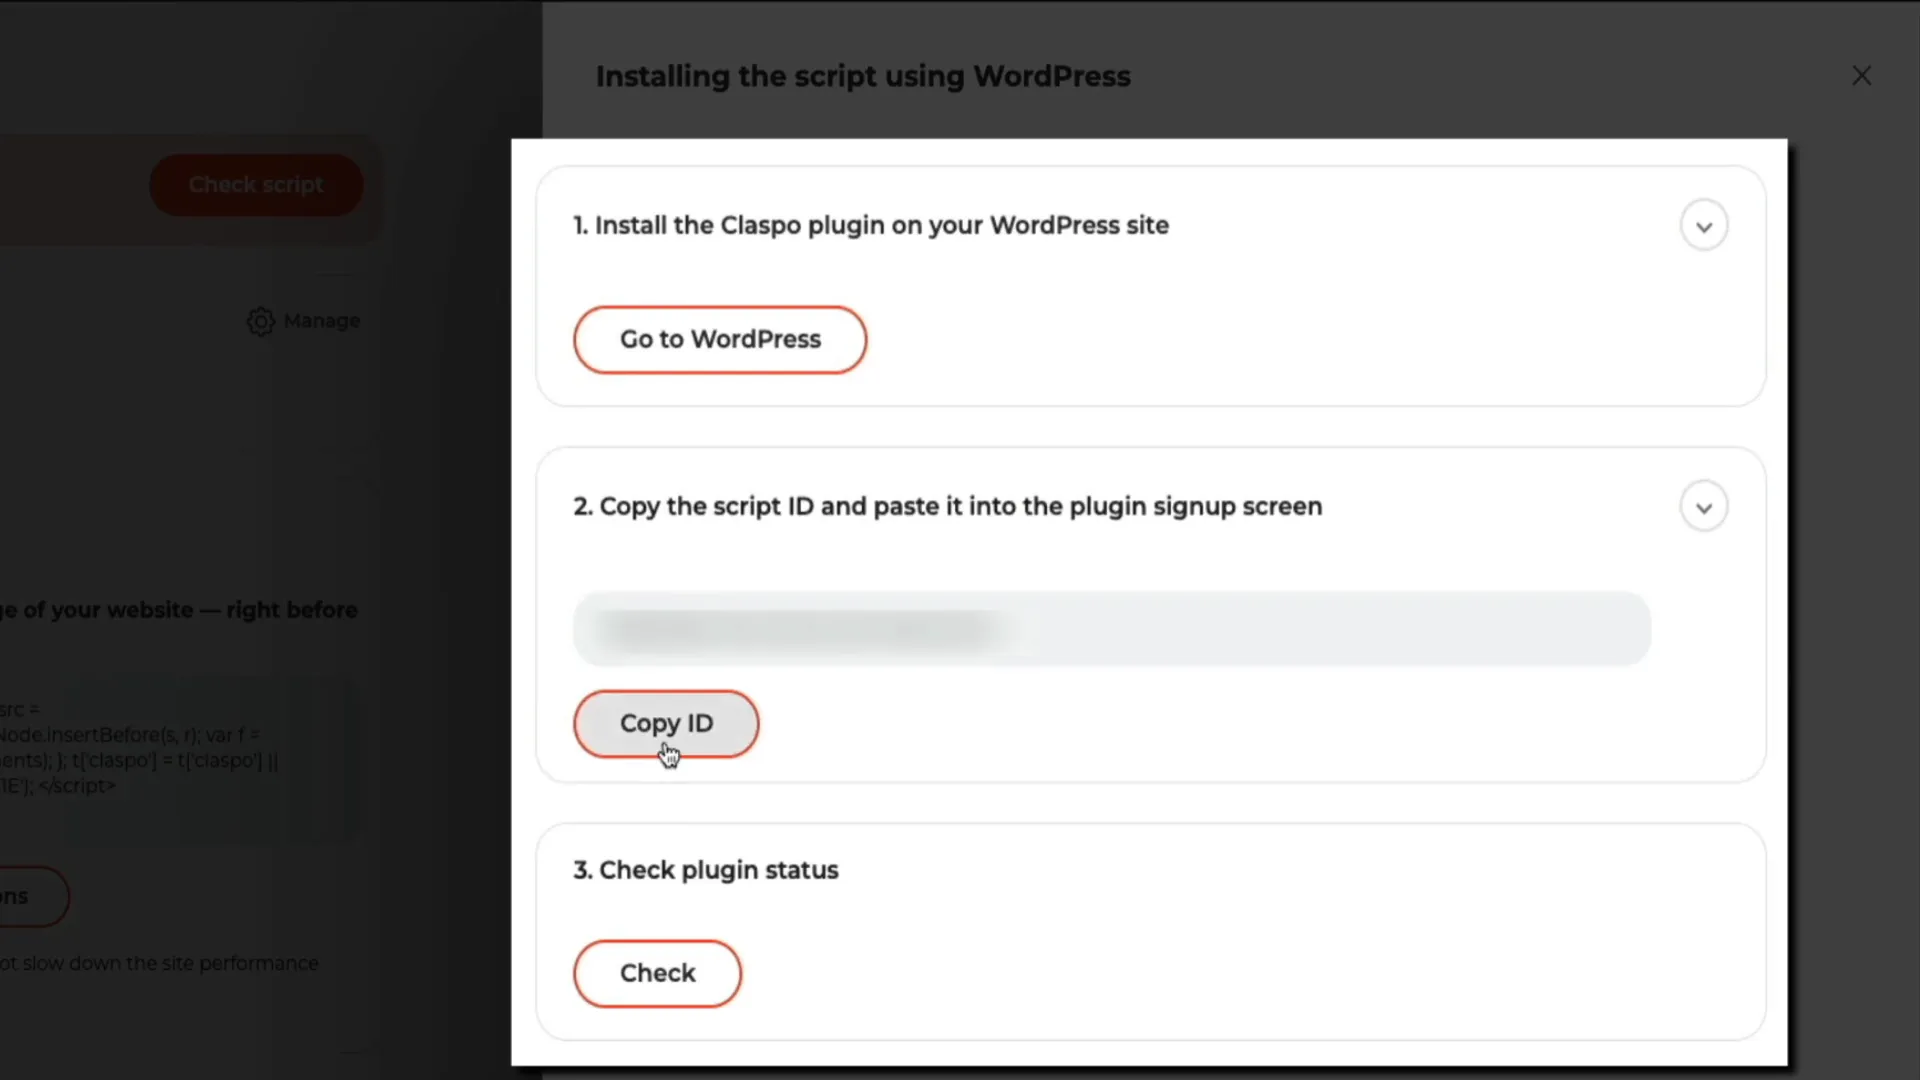
Once the script loads on your WordPress site, return to the Claspo dashboard and click the check button to verify installation. When successful, you’ll see a green status confirming the script is live.
Step 7: Publish Your Widget and Test It Live
Before your pop-up appears on your site, you need to publish it from the Claspo dashboard.
Go to the Widgets management page, find your widget, and change its status from unpublished to Publish.
Now, visit your WordPress site to test the pop-up in action. My widget was set to trigger after 20 seconds on the page, so after waiting, the spin-the-wheel pop-up appeared beautifully.
Enter an email address and hit submit. The wheel spins and lands on a discount percentage, then displays the promo code to use at checkout. This creates an engaging, incentive-driven experience that encourages visitors to subscribe and shop.
Back in the Claspo dashboard, under the Leads section, you can view and download the lead data as a CSV file for easy management and follow-up.
Conclusion
With Claspo’s gamified spin-the-wheel widget, you have a dynamic and easy-to-use solution to engage your website visitors, grow your email list, and boost conversions. The platform’s intuitive drag-and-drop editor, flexible triggering rules, and seamless WordPress integration make it accessible to anyone — no coding required.
Remember, you can get started for free at claspo.io and create your own gamified pop-up widget tailored to your brand and audience.
If you want to take your blog or website to the next level, combining gamification with personalized offers is a proven strategy to increase engagement and sales. This tutorial equips you with the tools and know-how to implement that strategy right away.
Happy converting!
Growing your email list and boosting conversions on your website doesn't have to be boring or complicated. With interactive gamified pop-ups, you can engage visitors in a fun and dynamic way while capturing valuable leads. In this comprehensive tutorial, I'll take you through the entire process of creating a gamified pop-up using Claspo’s Spin the Wheel widget and connecting it seamlessly to your WordPress site.
This step-by-step guide is perfect whether you're a blogger, an e-commerce brand, or a service provider. By the end, you'll have a fully customized, interactive pop-up that incentivizes visitors to subscribe or convert — all without writing a single line of code.
Let’s dive right in!
Step 1: Sign Up for a Free Claspo Account
The first thing you need to do is head over to claspo.io. Claspo offers a free plan, so you can start building and testing your pop-ups without any upfront cost. This is a great way to explore the features and see if it fits your website’s needs before upgrading.
Once you’re on the Claspo homepage, click the Sign Up button located in the upper right corner.
You’ll be presented with several sign-up options, including Google, Facebook, X (formerly Twitter), Shopify, or using your email address. For this tutorial, signing up with Google is quick and easy, but feel free to use whichever method suits you best.
After signing in, you’ll need to agree to Claspo’s terms of service and privacy policy by checking the first box. You can optionally opt-in to receive special offers and news from Claspo by checking the second box. Then click Next to continue.
Next, enter your website’s domain name. This tells Claspo where you’ll be deploying your widgets. After filling this in, hit the Finish Registration button.
Once registered, you’ll land on a welcome screen. Click the Start creating first widget button to begin building your lead generation pop-up.
Step 2: Choose a Gamified Template
Claspo simplifies the creation process by offering a library of templates designed for various goals. When prompted for your widget’s goal, select Generate Leads to focus on growing your email list.
For more options, click Explore all templates to access the full template library.
On the template library screen, you’ll find filters on the left sidebar for use cases, features, layouts, and more. To narrow down to gamified pop-ups, locate the Features section and check the box for Gamification. This will filter the templates to show interactive options like spin-to-win wheels and interactive forms that increase engagement while capturing leads.
For this tutorial, I’m selecting the Win Cyber Discounts template. It features a spinning wheel that allows users to win discount codes in exchange for their email address. This template is visually appealing and designed to boost conversions effectively.
Once selected, you’ll be taken to the template details screen where you can preview the user experience across different interaction states.
Understanding the Widget Interaction States
- Signup View: This is the initial pop-up that users see. It includes the spinning wheel and a call to action inviting users to enter their email and unlock a deal.
- Success View: Displays after a user successfully enters their email and spins the wheel. Shows the discount code they’ve won.
- Existing View: Appears if a user tries to spin again with the same email, reminding them of the discount they already received.
- Error View: Displays if something goes wrong during submission, prompting the user to try again.
It’s important to note that every element in these views is fully customizable to match your branding and messaging.
Before moving on, toggle between desktop and mobile previews using the icons near the top right to ensure your pop-up looks great on all devices. Claspo automatically optimizes the mobile layout, preserving the spin-to-win functionality.
There’s also a launcher option that lets you add a floating button (labeled “Cyber Spin”) on your site so users can manually trigger the pop-up. For this tutorial, I’m setting it to display automatically without a launcher.
Once you’re happy with the template, click Use this template to proceed to customization.
Step 3: Customize Your Gamified Pop-Up Widget
Now comes the fun part — personalizing your widget to fit your brand and campaign.
Claspo’s web-based drag-and-drop editor is intuitive and powerful, allowing you to make real-time changes to your pop-up without any coding.
Editor Overview
- Center Preview: Shows a live preview of your pop-up, including all interaction states. You can click on any element to edit it.
- Right Sidebar: Displays configuration settings for the selected element, including fonts, colors, backgrounds, and behavior.
- Left Toolbox: Contains components like text, images, buttons, and form fields that you can drag onto your pop-up to extend functionality.
To edit text, simply click on the element in the preview. For example, I updated the main headline from “Win Cyber Discounts” to “Win Instant Discounts.” The change is reflected immediately across all interaction states, saving you from repetitive edits.
Next, I changed the button color and other teal-colored elements to a new shade of green to better match my brand. You can adjust colors using the color picker tool in the right sidebar.
Another great customization is adding extra form fields. I added a First Name input field below the email field to personalize follow-up emails or offers.
If you make a mistake or want to revert a change, Claspo includes an undo button in the top toolbar, or you can use the keyboard shortcut (Command-Z on Mac or Control-Z on Windows).
Configuring the Spin Wheel Rewards
The core gamified element is the spin wheel itself. Click on the wheel in the editor to open its settings.
By default, the wheel has three reward slices with different odds:
- 60% chance to win 5% off
- 30% chance to win 10% off
- 10% chance to win 15% off
You can edit these rewards by clicking the Edit Rewards button. This opens a detailed configuration screen where you can:
- Adjust the chance-to-win ratio for each reward
- Change the discount percentages
- Assign unique promo codes to each prize
- Add more slices to the wheel with custom prizes
Once you finish, click Done. Changes are saved instantly without needing to click a separate save button.
Preview and Mobile Optimization
Before publishing, it’s crucial to preview your pop-up on different screen sizes.
Toggle between desktop and mobile views at the top of the editor. Claspo automatically stacks components vertically in mobile view, but you can rearrange, resize, or hide elements if necessary.
To simulate the user experience, click the preview (eye) icon near the top right. This opens a live simulation where you can test the pop-up’s behavior on desktop and mobile.
Make any final tweaks, then click Save to lock in your design.
Step 4: Set Up Widget Triggering Rules
Next, decide exactly when, where, and to whom your pop-up appears.
Claspo’s default rule-based triggering offers a flexible way to control your widget’s behavior:
- Display Frequency: Choose to show the pop-up once per session, per day, or with no limit.
- When to Display: Set conditions based on time on page, scroll depth, or exit intent.
- When to Stop Displaying: Auto-hide after a set number of seconds or after the visitor subscribes.
- To Whom: Target all visitors, new visitors only, or returning visitors.
For example, I chose to show the pop-up only to new visitors, which is ideal for first-time offers and avoids annoying returning users.
For advanced use cases, Claspo also supports:
- HTML Element Click-Based Triggering: Show the pop-up only when a visitor clicks a specific element like a button or link.
- API-Based Triggering: Developers can trigger the pop-up through custom logic and integrations.
For most users, the default rule-based options provide all the control you need.
Once your rules are set, click Next.
Step 5: Add Integrations to Collect Leads
To collect and manage the leads captured by your pop-up, you’ll want to configure integrations.
From your Claspo dashboard, click Integrations in the left sidebar. Here you can choose where to send the data collected by your widget.
By default, Claspo stores all leads internally using its built-in lead management system. This is a simple and effective solution if you want to keep everything in one place.
If you prefer, you can connect third-party services such as email marketing platforms or CRMs. Claspo supports many popular integrations and also offers a Zapier webhook for connecting hundreds of other tools through automated workflows.
If you use Google Analytics, you can enable the option to export widget events as custom actions in your analytics dashboard.
For this tutorial, I’m keeping things simple and using Claspo’s internal lead storage.
If you want to use a third-party integration, select it, authorize the connection, and follow the specific setup instructions. Claspo provides detailed guides for each integration, which you can find linked in their support documentation.
Step 6: Install the Claspo Script on Your WordPress Site
The Claspo script is a small piece of code that connects your WordPress site to the Claspo platform. It enables your pop-up widget to display, track interactions, and send lead data based on your configured settings.
Great news — you only need to install this script once. After that, any widget you create in Claspo will automatically appear on your site without any additional coding.
To install the script, go to your Claspo dashboard and click the Install Script button in the top right or select the Script menu item on the left.
Since we’re using WordPress, the easiest method is via the dedicated Claspo WordPress plugin.
Follow these steps:
- Click the Install button under the WordPress section.
- Ignore step 1 (it just takes you to the plugin download page).
- Copy your unique Script ID shown in step 2.
- Go to your WordPress admin dashboard.
- Navigate to Plugins > Add New.
- Search for “Claspo” and install the Claspo plugin.
- Activate the plugin.
- Paste your Script ID into the plugin’s settings and click Connect.
- Return to the Claspo dashboard to complete the setup by following the prompts.
Once the script loads on your WordPress site, return to the Claspo dashboard and click the check button to verify installation. When successful, you’ll see a green status confirming the script is live.
Step 7: Publish Your Widget and Test It Live
Before your pop-up appears on your site, you need to publish it from the Claspo dashboard.
Go to the Widgets management page, find your widget, and change its status from unpublished to Publish.
Now, visit your WordPress site to test the pop-up in action. My widget was set to trigger after 20 seconds on the page, so after waiting, the spin-the-wheel pop-up appeared beautifully.
Enter an email address and hit submit. The wheel spins and lands on a discount percentage, then displays the promo code to use at checkout. This creates an engaging, incentive-driven experience that encourages visitors to subscribe and shop.
Back in the Claspo dashboard, under the Leads section, you can view and download the lead data as a CSV file for easy management and follow-up.
Conclusion
With Claspo’s gamified spin-the-wheel widget, you have a dynamic and easy-to-use solution to engage your website visitors, grow your email list, and boost conversions. The platform’s intuitive drag-and-drop editor, flexible triggering rules, and seamless WordPress integration make it accessible to anyone — no coding required.
Remember, you can get started for free at claspo.io and create your own gamified pop-up widget tailored to your brand and audience.
If you want to take your blog or website to the next level, combining gamification with personalized offers is a proven strategy to increase engagement and sales. This tutorial equips you with the tools and know-how to implement that strategy right away.
Happy converting!

Written by Ben Cummings
Co-Founder of Sage Wave Media
Ben is the Co-Founder of Sage Wave Media, LLC which is the parent company of Blog With Ben. He enjoys teaching, blogging, startups, a hoppy IPA, and college basketball. Whenever he's not blogging, you can find him cruising around sunny San Diego with his amazing family.
0 Comments