Step-by-Step Guide to Adding a GDPR Privacy Policy on WordPress with Usercentrics
Step-by-Step Guide to Adding a GDPR Privacy Policy on WordPress with Usercentrics
Creating a privacy policy page for your website is not just a best practice—it's often a legal requirement that protects your users and your business. If you're running a blog, business site, or online store, having a clear, professional privacy policy is essential for transparency and compliance with regulations like the GDPR. Fortunately, you don't need to be a legal expert or a web developer to create one. In this comprehensive step-by-step guide, I'll walk you through how to generate a GDPR-compliant privacy policy for free using the Usercentrics Privacy Policy Generator and then add it directly to your WordPress website.
This tutorial covers everything from setting up your Usercentrics account to embedding the policy on your site, including how to customize the layout so it matches your website's design. Whether you prefer to use the automatic embed option or want to fully tailor the HTML to fit your style, you’ll find clear instructions and helpful tips throughout. By the end, you'll have a privacy policy page that looks great, is easy to manage, and keeps you compliant with European data protection laws.
Step 1: Create a Free Usercentrics Account
To begin, navigate to the official Usercentrics Privacy Policy Generator landing page. You can find the direct link in the video description or by searching for Usercentrics privacy policy generator online. Once on the page, click on the Start Free button to initiate the process.
Next, you’ll be prompted to create a free account. Usercentrics offers several sign-in options to make this quick and easy:
- Sign in with your Google account
- Sign in with your Microsoft account
- Manually enter your email address
If you don’t already have an account, you can click the Sign Up link at the bottom of the form to register. For convenience, signing in with Google or Microsoft is recommended as it speeds up the process.
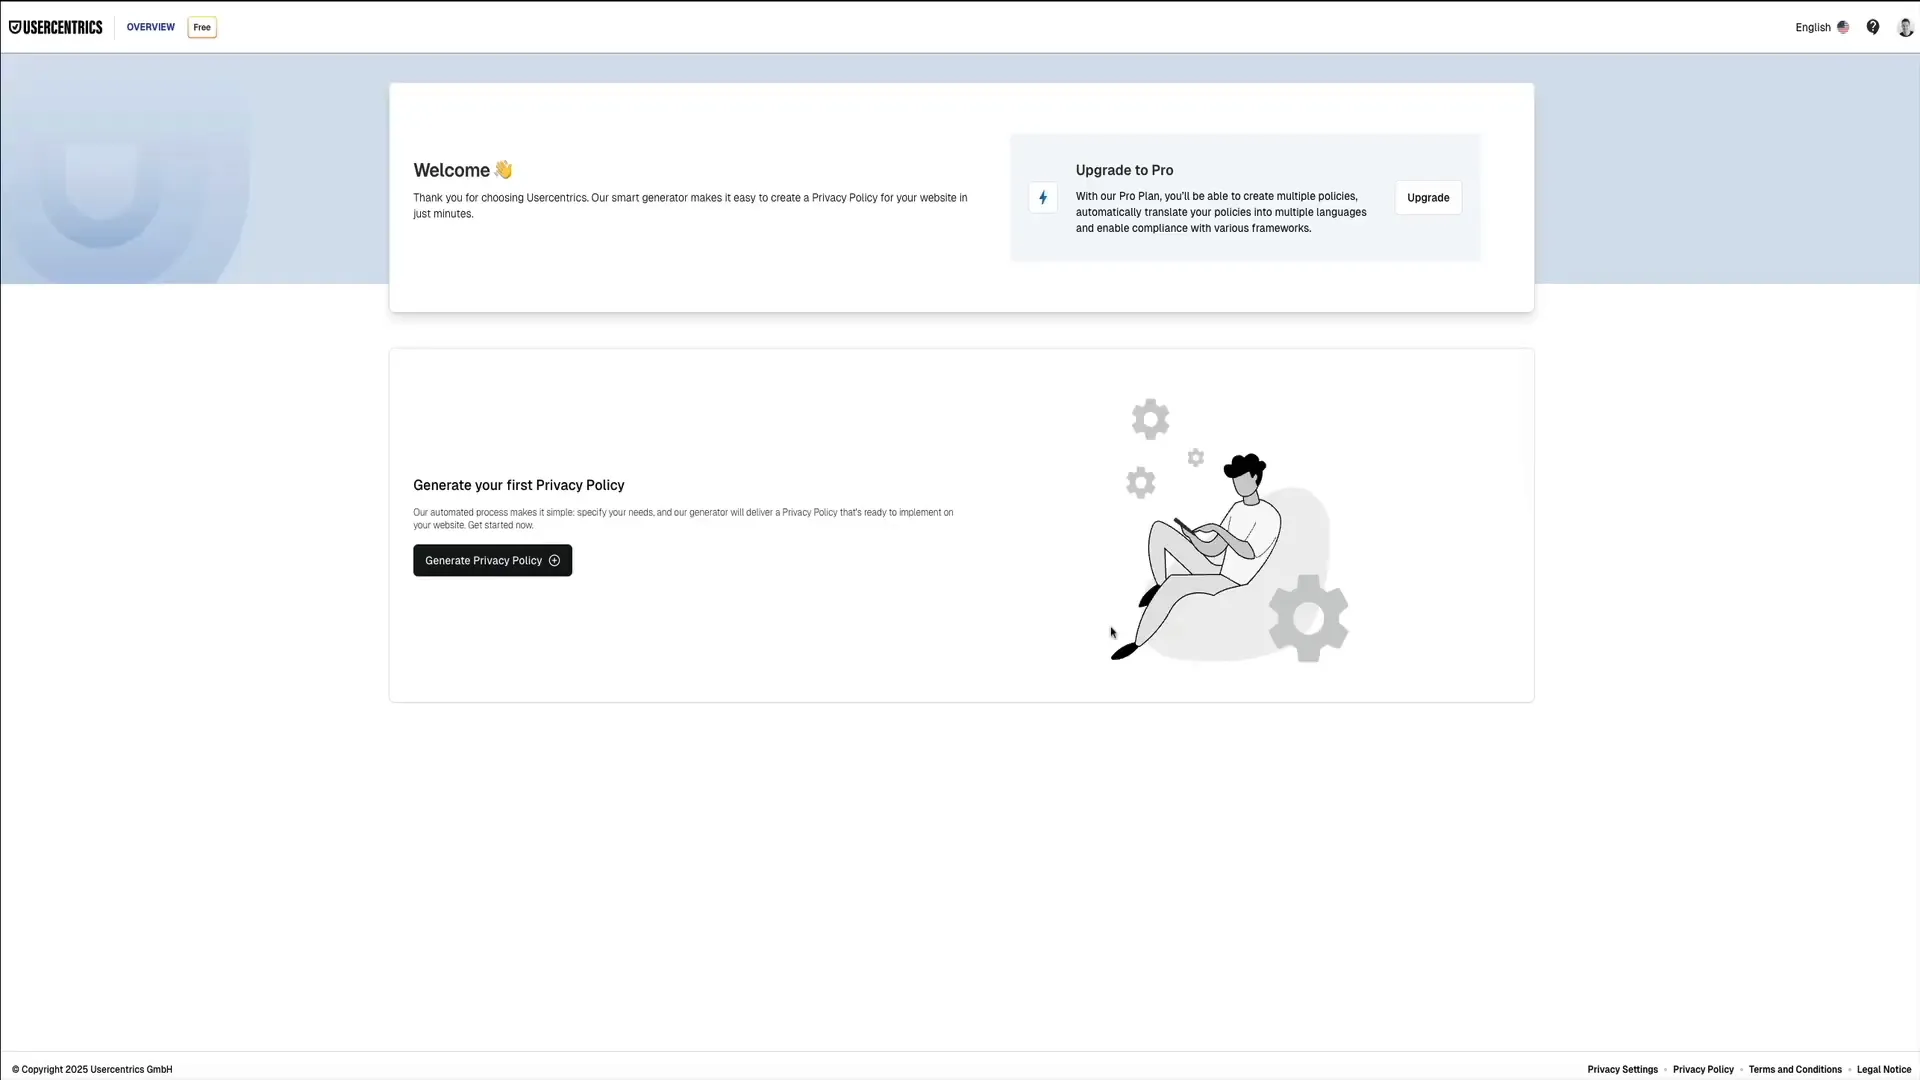
After logging in, you’ll be taken to your Usercentrics dashboard. Right in the center, you’ll see a prompt to Generate Your First Privacy Policy. Click the button to begin.
Step 2: Choose Your Privacy Policy Settings
Once you start the privacy policy setup, you’ll notice a progress bar at the top of the screen indicating three main steps:
- Welcome
- Company Information
- Data Handling Information
This clear layout helps you track your progress as you answer a few straightforward questions to tailor your privacy policy.
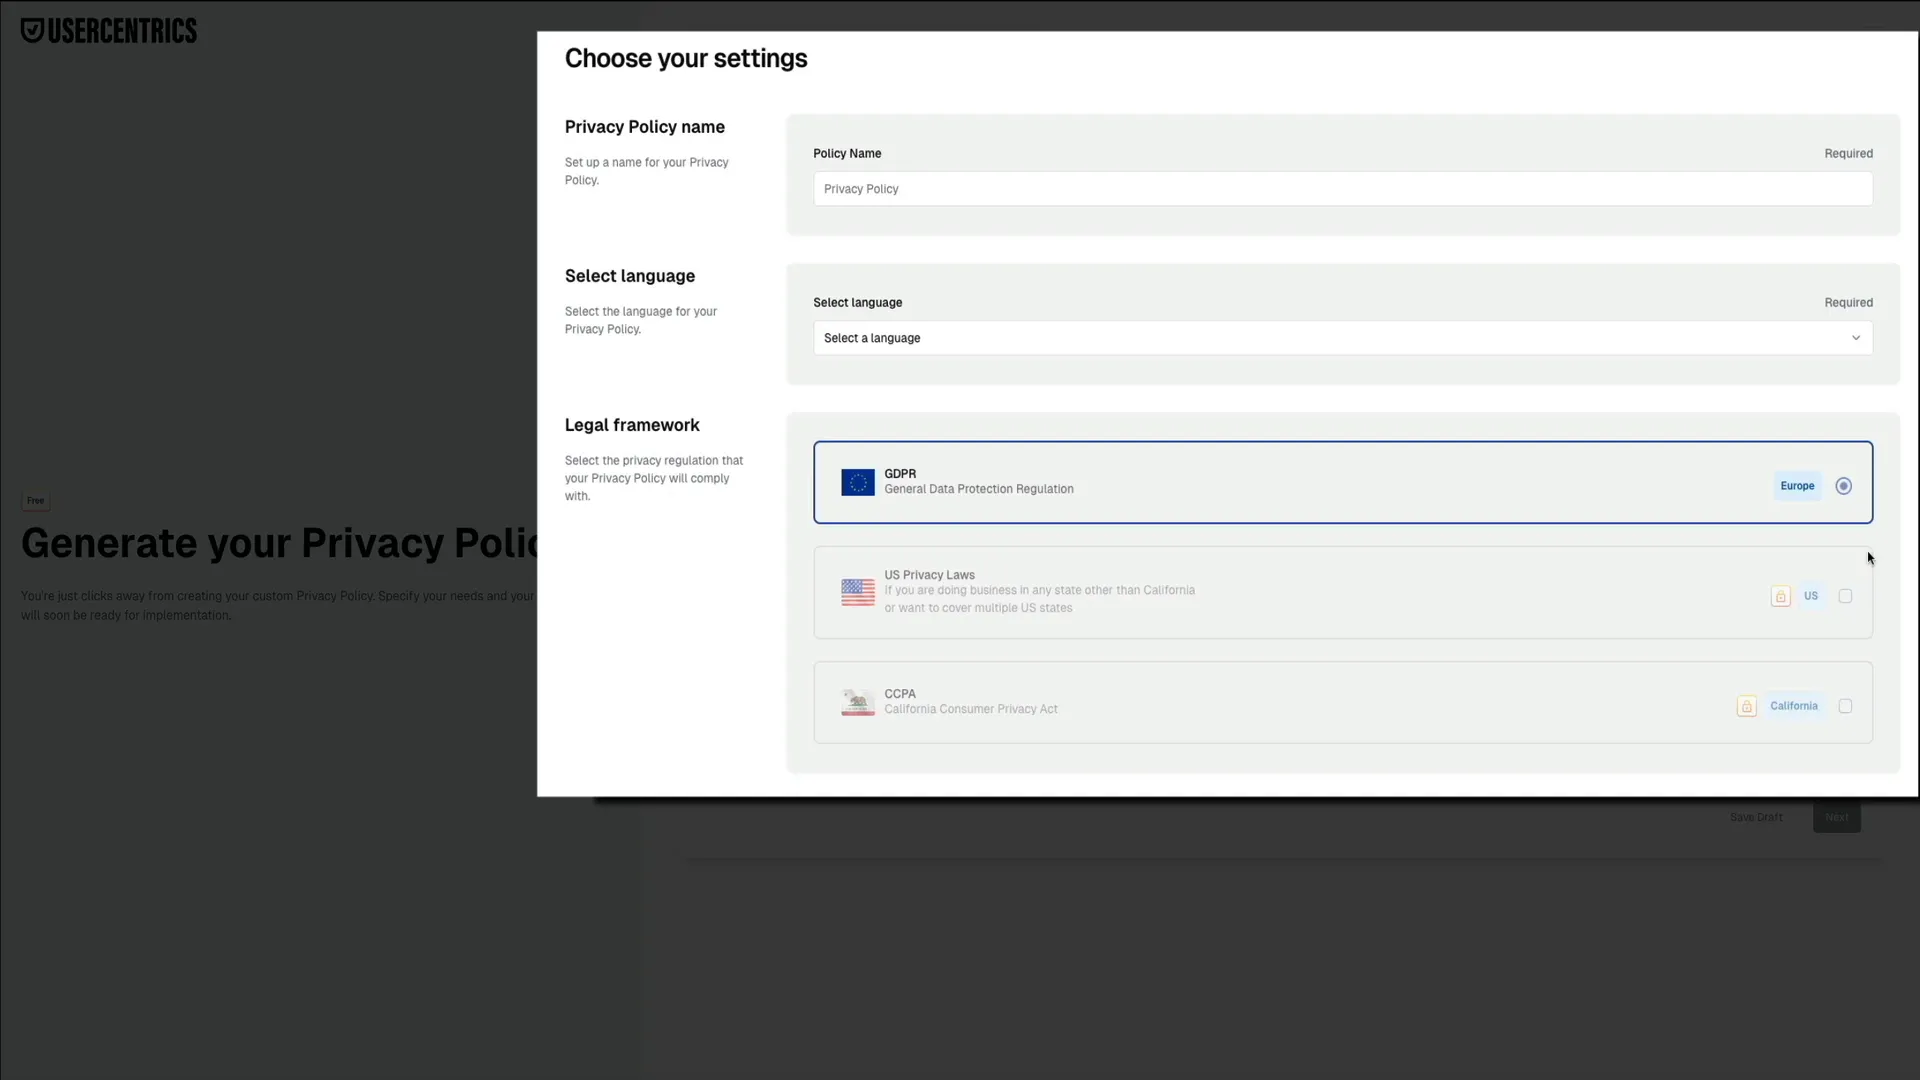
The first section is where you define the basic framework of your privacy policy:
- Privacy Policy Name: This is an internal label to help you stay organized within Usercentrics. It won’t be visible to your website visitors, so you can choose a name that makes sense for your brand or site.
- Language: Choose the language your policy will be written in. Usercentrics currently supports English, Italian, German, and Dutch. Select the language that best fits your audience or region.
- Legal Framework: Since we're using the free plan, GDPR (General Data Protection Regulation) is the only available option. Other frameworks like US privacy laws and California’s CCPA require a paid upgrade.
After filling in these fields, click Next to proceed to the next step.
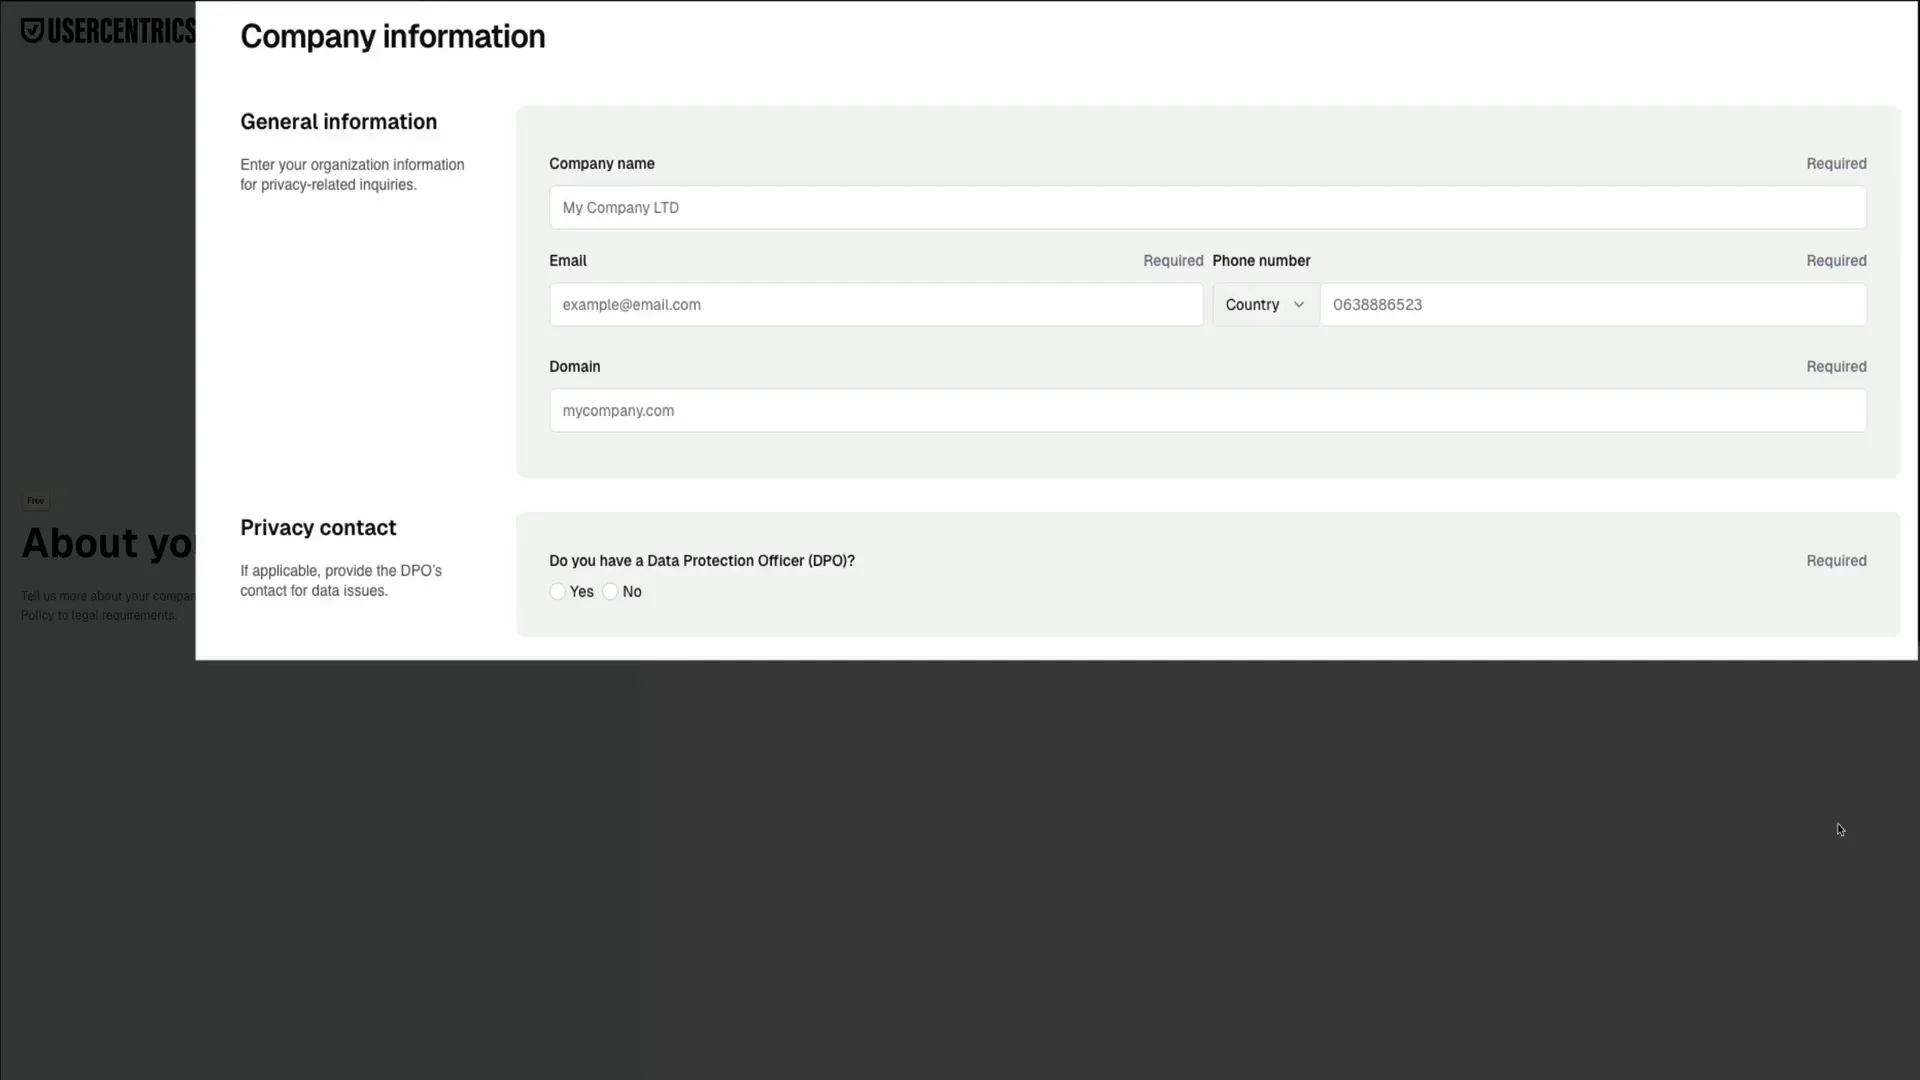
Step 3: Enter Your Company Information
The company information section is crucial because it provides the contact details that will appear in your privacy policy. Accurate information here ensures users and regulatory bodies know who to contact regarding privacy concerns.
Here’s what you need to provide:
- Company Name: Enter your business or organization’s legal name exactly as it appears officially.
- Email Address: Use a monitored email address where you can receive privacy-related inquiries.
- Phone Number: Select your country code from the dropdown and enter your phone number.
- Domain: Specify the main website domain where the privacy policy will be published.
Below this, you’ll be asked if your company has a Data Protection Officer (DPO). Most small businesses and personal websites won’t have one, so selecting No is usually appropriate unless you’re legally required to have a DPO.
Once all the fields are complete, click Next to move forward.
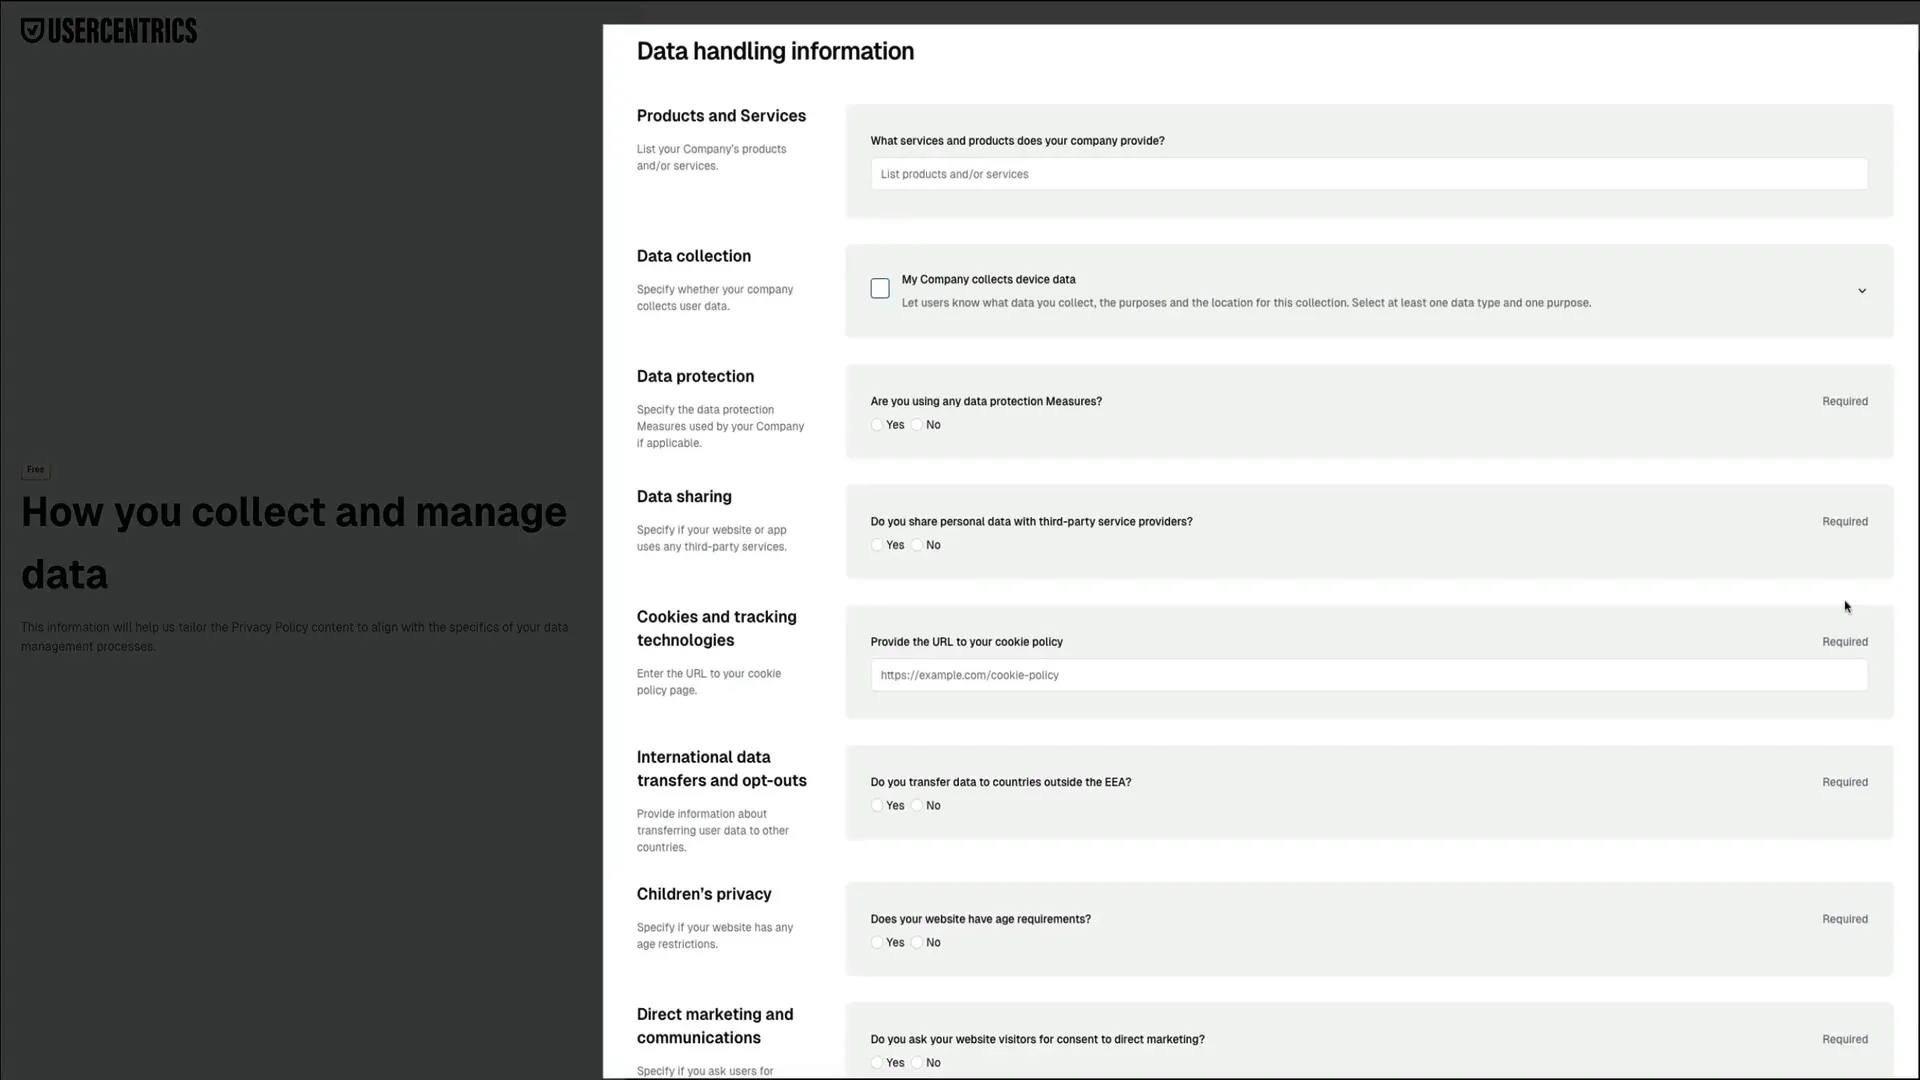
Step 4: Define Your Data Handling Practices
This section is where you describe how your organization collects, uses, and manages personal data. The answers you provide here directly shape the privacy policy to reflect your actual business practices. Accuracy is key—especially for compliance with GDPR.
Here’s what you need to consider for each subsection:
Products and Services
Write a brief description of your company’s offerings. For example, if you run a blog, you might say “educational content and tutorials.” This helps personalize your policy.
Data Collection
Indicate whether your website collects device data or any other user information. This includes analytics, contact forms, or advertising data. If you do collect data, specify what types and why.
Data Protection Measures
State if you use any specific protections like encryption or firewalls. If so, list them here to show your commitment to safeguarding user data.
Data Sharing
If you share user data with third parties such as email platforms, CRMs, or ad networks, select “Yes” and provide details.
Cookies and Tracking Technologies
Paste the URL of your cookie policy page here. This is required if you use cookie banners or tracking scripts on your site.
International Data Transfers
Specify whether you transfer data outside the European Economic Area (EEA). If you use third-party tools based in the US or elsewhere, this is important to disclose.
Children’s Privacy
Indicate if your site targets children or has age restrictions.
Direct Marketing and Communications
Answer whether you ask for user consent to send marketing messages and if your messages include an opt-out link.
Data Breach Notification Procedures
State if you have a formal process for responding to data breaches.
Policy Updates and Changes
Decide if you will notify users when the policy updates and whether you require users to opt-in to material changes.
After completing this section, click the Generate Privacy Policy button. Usercentrics will create your tailored privacy policy based on your inputs.
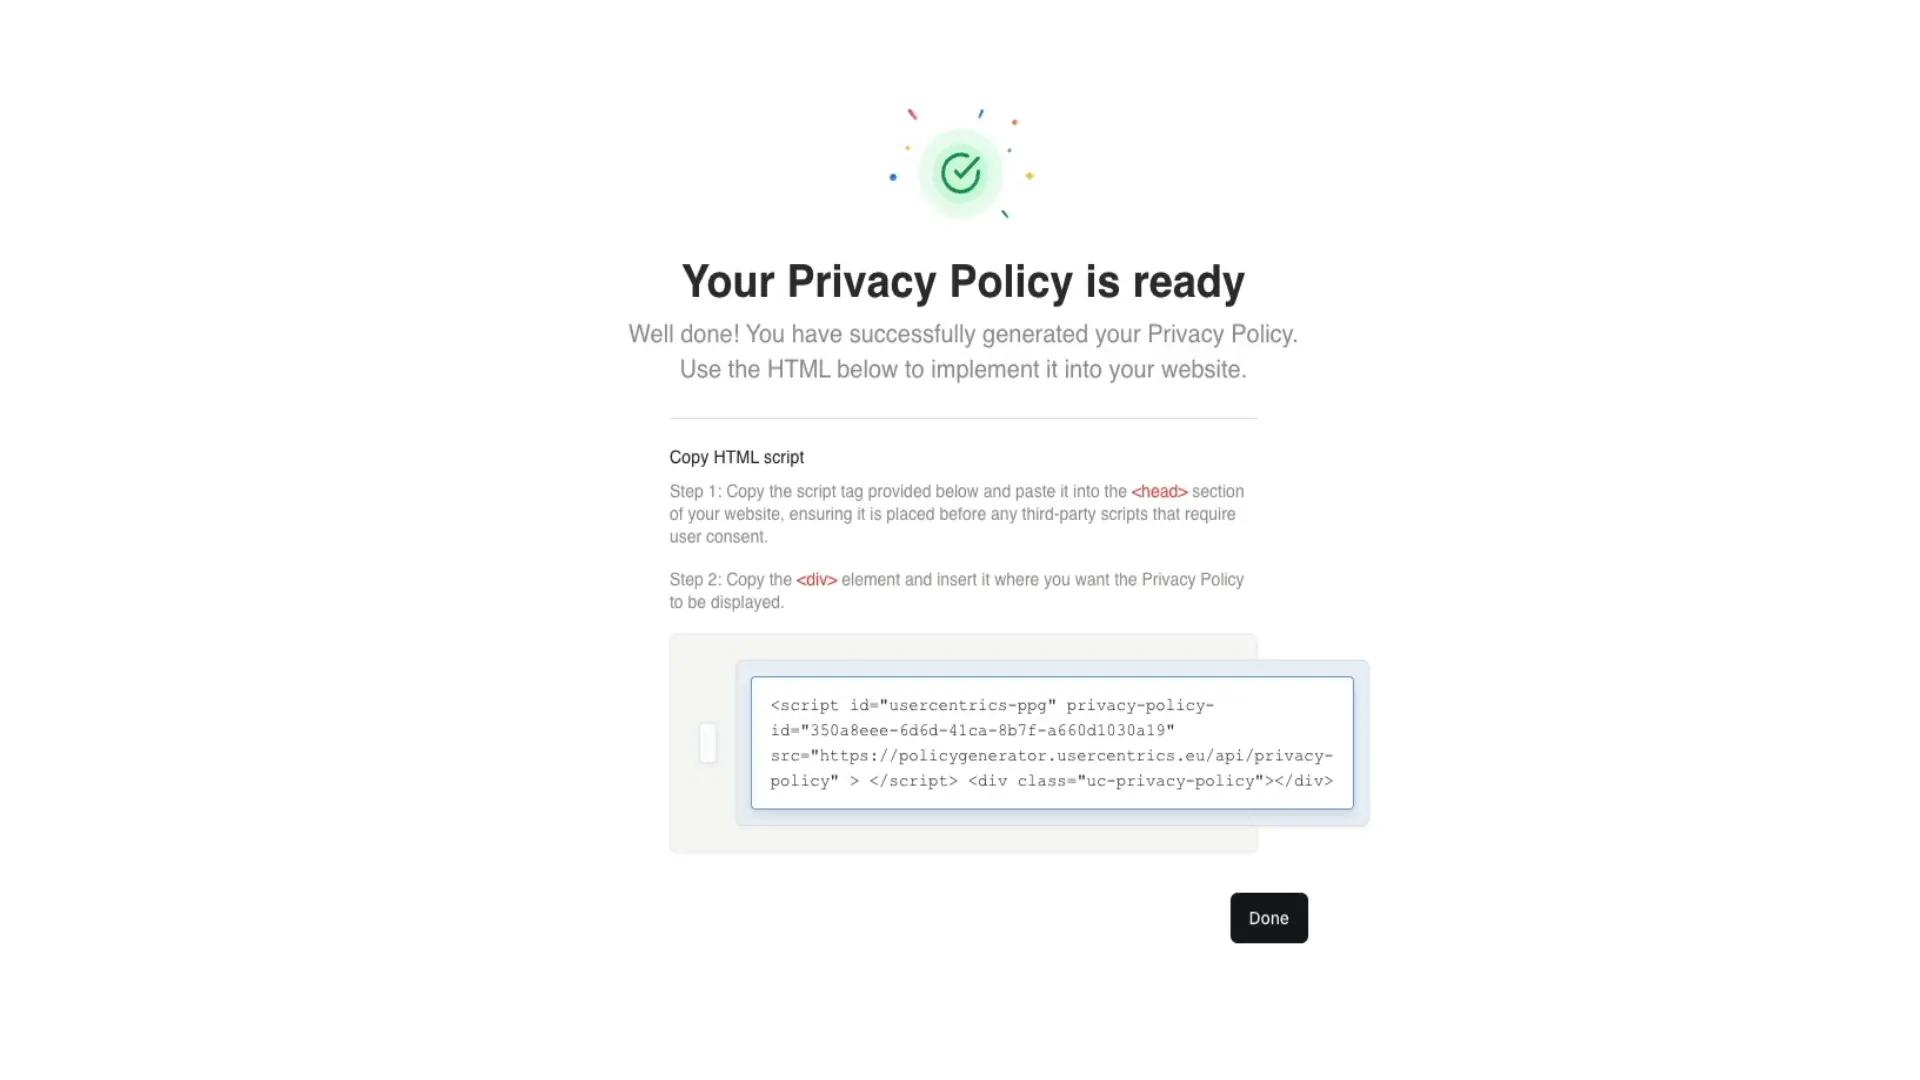
Step 5: Obtain and Implement Your Privacy Policy Code
Once your privacy policy is generated, you’ll see a confirmation screen with implementation instructions and a snippet of HTML code. This code is what loads your privacy policy onto your website.
Before proceeding, note that while this tutorial focuses on WordPress, the code can be implemented on any website platform. If you’re not comfortable making these changes yourself, you can forward the code to your developer or site administrator.
The implementation involves two main parts:
- Copying the script tag and pasting it into the section of your website. This ensures the privacy policy loads correctly.
- Copying the div element and placing it on the page where you want the privacy policy content to display, typically a dedicated privacy policy page.
Step 6: Add the Script Tag to Your WordPress Site Using WPCode Plugin
For WordPress users, I recommend using the free WPCode plugin, which simplifies adding scripts to your site without editing core files.
Here’s how to add the script tag:
- Install and activate the WPCode plugin from the WordPress plugin repository.
- In your WordPress dashboard, hover over Code Snippets in the sidebar and click Header and Footer.
- You’ll see three boxes labeled Header, Body, and Footer. Paste the script tag you copied from Usercentrics into the Header box. This is essential because your code must be inside the tag.
- Click Save Changes.
- If you use a caching plugin, clear your cache to ensure the changes take effect for all visitors.

Step 7: Create and Publish Your Privacy Policy Page in WordPress
Next, you’ll want to display your privacy policy on a live page:
- Go to the WordPress dashboard, hover over Pages, and click Add New.
- Title your page—for example, “Privacy Policy.”
- Click the blue plus button to add a new block, then search for and select the Custom HTML block.
- Return to Usercentrics and copy the second part of the code, the div element that displays the policy content.
- Paste this div element into the Custom HTML block on your new page.
- Publish the page and then view it live.
At this point, your privacy policy is live and viewable on your website. However, you might notice a couple of issues:
- The embedded content includes its own H1 heading, which duplicates the page title.
- The font and styling inside the embedded policy might not match your site’s theme, which can look inconsistent or distracting.
Step 8: Customize the Privacy Policy HTML for a Cleaner Look
If you want a more polished, professional appearance, consider using the full HTML version of your privacy policy instead of the embed code. This allows you to remove duplicate headings and style the content to match your site.
Here’s how:
- Go back to Usercentrics and click the Done button to access your privacy policy management screen.
- Locate the policy you created and click the download icon (middle icon) to get the full HTML file.
- Open the downloaded HTML file in a code editor of your choice. I use Sublime Text, but any editor will work.
- Remove the H1 tag that contains the “Privacy Policy” heading to avoid duplication on your WordPress page.
- Select and copy everything inside the main div element.
- Go back to your WordPress Custom HTML block where you previously pasted the embed div and replace it with this cleaned-up HTML code.
- Update and publish your page.
Now, when you view your privacy policy page, you’ll see only one heading, and the fonts and formatting will seamlessly match the rest of your site. This approach looks much cleaner and more professional.

Best Practices and Final Tips
Here are some additional tips to ensure your privacy policy page serves you well:
- Keep Your Information Accurate: Always answer questions about your data practices truthfully in the Usercentrics setup. This is critical for compliance.
- Notify Users of Policy Changes: While optional, it’s a good practice to let users know when your privacy policy updates, enhancing transparency.
- Use a Monitored Email: The contact email in your policy should be actively monitored to handle any privacy inquiries promptly.
- Clear Cache After Changes: If you use caching plugins, always clear caches after updating your policy code to ensure visitors see the latest version.
- Consult Legal Advice if Needed: While Usercentrics helps generate compliant policies, consult a legal professional if you have complex requirements or operate in multiple jurisdictions.
Conclusion
Adding a GDPR-compliant privacy policy to your WordPress website is straightforward with Usercentrics. This free tool guides you through creating a tailored policy based on your actual data handling practices and provides the code snippets you need to implement it seamlessly.
By following the steps outlined above, you’ll have a professional, legally sound privacy policy page live on your site in no time. Whether you choose the quick embed method or prefer the customized HTML approach for better styling, Usercentrics makes the process accessible even if you don’t have a technical background.
Maintaining transparency with your visitors not only builds trust but also keeps your website compliant with important data protection laws. So don’t wait—create your privacy policy today and safeguard your site and users.
If you’re ready to get started, simply sign up for a free Usercentrics account here and follow the steps outlined in this guide.
Thank you for reading, and here’s to your website’s success with a solid privacy foundation!
Creating a privacy policy page for your website is not just a best practice—it's often a legal requirement that protects your users and your business. If you're running a blog, business site, or online store, having a clear, professional privacy policy is essential for transparency and compliance with regulations like the GDPR. Fortunately, you don't need to be a legal expert or a web developer to create one. In this comprehensive step-by-step guide, I'll walk you through how to generate a GDPR-compliant privacy policy for free using the Usercentrics Privacy Policy Generator and then add it directly to your WordPress website.
This tutorial covers everything from setting up your Usercentrics account to embedding the policy on your site, including how to customize the layout so it matches your website's design. Whether you prefer to use the automatic embed option or want to fully tailor the HTML to fit your style, you’ll find clear instructions and helpful tips throughout. By the end, you'll have a privacy policy page that looks great, is easy to manage, and keeps you compliant with European data protection laws.
Step 1: Create a Free Usercentrics Account
To begin, navigate to the official Usercentrics Privacy Policy Generator landing page. You can find the direct link in the video description or by searching for Usercentrics privacy policy generator online. Once on the page, click on the Start Free button to initiate the process.
Next, you’ll be prompted to create a free account. Usercentrics offers several sign-in options to make this quick and easy:
- Sign in with your Google account
- Sign in with your Microsoft account
- Manually enter your email address
If you don’t already have an account, you can click the Sign Up link at the bottom of the form to register. For convenience, signing in with Google or Microsoft is recommended as it speeds up the process.
After logging in, you’ll be taken to your Usercentrics dashboard. Right in the center, you’ll see a prompt to Generate Your First Privacy Policy. Click the button to begin.
Step 2: Choose Your Privacy Policy Settings
Once you start the privacy policy setup, you’ll notice a progress bar at the top of the screen indicating three main steps:
- Welcome
- Company Information
- Data Handling Information
This clear layout helps you track your progress as you answer a few straightforward questions to tailor your privacy policy.
The first section is where you define the basic framework of your privacy policy:
- Privacy Policy Name: This is an internal label to help you stay organized within Usercentrics. It won’t be visible to your website visitors, so you can choose a name that makes sense for your brand or site.
- Language: Choose the language your policy will be written in. Usercentrics currently supports English, Italian, German, and Dutch. Select the language that best fits your audience or region.
- Legal Framework: Since we're using the free plan, GDPR (General Data Protection Regulation) is the only available option. Other frameworks like US privacy laws and California’s CCPA require a paid upgrade.
After filling in these fields, click Next to proceed to the next step.
Step 3: Enter Your Company Information
The company information section is crucial because it provides the contact details that will appear in your privacy policy. Accurate information here ensures users and regulatory bodies know who to contact regarding privacy concerns.
Here’s what you need to provide:
- Company Name: Enter your business or organization’s legal name exactly as it appears officially.
- Email Address: Use a monitored email address where you can receive privacy-related inquiries.
- Phone Number: Select your country code from the dropdown and enter your phone number.
- Domain: Specify the main website domain where the privacy policy will be published.
Below this, you’ll be asked if your company has a Data Protection Officer (DPO). Most small businesses and personal websites won’t have one, so selecting No is usually appropriate unless you’re legally required to have a DPO.
Once all the fields are complete, click Next to move forward.
Step 4: Define Your Data Handling Practices
This section is where you describe how your organization collects, uses, and manages personal data. The answers you provide here directly shape the privacy policy to reflect your actual business practices. Accuracy is key—especially for compliance with GDPR.
Here’s what you need to consider for each subsection:
Products and Services
Write a brief description of your company’s offerings. For example, if you run a blog, you might say “educational content and tutorials.” This helps personalize your policy.
Data Collection
Indicate whether your website collects device data or any other user information. This includes analytics, contact forms, or advertising data. If you do collect data, specify what types and why.
Data Protection Measures
State if you use any specific protections like encryption or firewalls. If so, list them here to show your commitment to safeguarding user data.
Data Sharing
If you share user data with third parties such as email platforms, CRMs, or ad networks, select “Yes” and provide details.
Cookies and Tracking Technologies
Paste the URL of your cookie policy page here. This is required if you use cookie banners or tracking scripts on your site.
International Data Transfers
Specify whether you transfer data outside the European Economic Area (EEA). If you use third-party tools based in the US or elsewhere, this is important to disclose.
Children’s Privacy
Indicate if your site targets children or has age restrictions.
Direct Marketing and Communications
Answer whether you ask for user consent to send marketing messages and if your messages include an opt-out link.
Data Breach Notification Procedures
State if you have a formal process for responding to data breaches.
Policy Updates and Changes
Decide if you will notify users when the policy updates and whether you require users to opt-in to material changes.
After completing this section, click the Generate Privacy Policy button. Usercentrics will create your tailored privacy policy based on your inputs.
Step 5: Obtain and Implement Your Privacy Policy Code
Once your privacy policy is generated, you’ll see a confirmation screen with implementation instructions and a snippet of HTML code. This code is what loads your privacy policy onto your website.
Before proceeding, note that while this tutorial focuses on WordPress, the code can be implemented on any website platform. If you’re not comfortable making these changes yourself, you can forward the code to your developer or site administrator.
The implementation involves two main parts:
- Copying the script tag and pasting it into the section of your website. This ensures the privacy policy loads correctly.
- Copying the div element and placing it on the page where you want the privacy policy content to display, typically a dedicated privacy policy page.
Step 6: Add the Script Tag to Your WordPress Site Using WPCode Plugin
For WordPress users, I recommend using the free WPCode plugin, which simplifies adding scripts to your site without editing core files.
Here’s how to add the script tag:
- Install and activate the WPCode plugin from the WordPress plugin repository.
- In your WordPress dashboard, hover over Code Snippets in the sidebar and click Header and Footer.
- You’ll see three boxes labeled Header, Body, and Footer. Paste the script tag you copied from Usercentrics into the Header box. This is essential because your code must be inside the tag.
- Click Save Changes.
- If you use a caching plugin, clear your cache to ensure the changes take effect for all visitors.
Step 7: Create and Publish Your Privacy Policy Page in WordPress
Next, you’ll want to display your privacy policy on a live page:
- Go to the WordPress dashboard, hover over Pages, and click Add New.
- Title your page—for example, “Privacy Policy.”
- Click the blue plus button to add a new block, then search for and select the Custom HTML block.
- Return to Usercentrics and copy the second part of the code, the div element that displays the policy content.
- Paste this div element into the Custom HTML block on your new page.
- Publish the page and then view it live.
At this point, your privacy policy is live and viewable on your website. However, you might notice a couple of issues:
- The embedded content includes its own H1 heading, which duplicates the page title.
- The font and styling inside the embedded policy might not match your site’s theme, which can look inconsistent or distracting.
Step 8: Customize the Privacy Policy HTML for a Cleaner Look
If you want a more polished, professional appearance, consider using the full HTML version of your privacy policy instead of the embed code. This allows you to remove duplicate headings and style the content to match your site.
Here’s how:
- Go back to Usercentrics and click the Done button to access your privacy policy management screen.
- Locate the policy you created and click the download icon (middle icon) to get the full HTML file.
- Open the downloaded HTML file in a code editor of your choice. I use Sublime Text, but any editor will work.
- Remove the H1 tag that contains the “Privacy Policy” heading to avoid duplication on your WordPress page.
- Select and copy everything inside the main div element.
- Go back to your WordPress Custom HTML block where you previously pasted the embed div and replace it with this cleaned-up HTML code.
- Update and publish your page.
Now, when you view your privacy policy page, you’ll see only one heading, and the fonts and formatting will seamlessly match the rest of your site. This approach looks much cleaner and more professional.
Best Practices and Final Tips
Here are some additional tips to ensure your privacy policy page serves you well:
- Keep Your Information Accurate: Always answer questions about your data practices truthfully in the Usercentrics setup. This is critical for compliance.
- Notify Users of Policy Changes: While optional, it’s a good practice to let users know when your privacy policy updates, enhancing transparency.
- Use a Monitored Email: The contact email in your policy should be actively monitored to handle any privacy inquiries promptly.
- Clear Cache After Changes: If you use caching plugins, always clear caches after updating your policy code to ensure visitors see the latest version.
- Consult Legal Advice if Needed: While Usercentrics helps generate compliant policies, consult a legal professional if you have complex requirements or operate in multiple jurisdictions.
Conclusion
Adding a GDPR-compliant privacy policy to your WordPress website is straightforward with Usercentrics. This free tool guides you through creating a tailored policy based on your actual data handling practices and provides the code snippets you need to implement it seamlessly.
By following the steps outlined above, you’ll have a professional, legally sound privacy policy page live on your site in no time. Whether you choose the quick embed method or prefer the customized HTML approach for better styling, Usercentrics makes the process accessible even if you don’t have a technical background.
Maintaining transparency with your visitors not only builds trust but also keeps your website compliant with important data protection laws. So don’t wait—create your privacy policy today and safeguard your site and users.
If you’re ready to get started, simply sign up for a free Usercentrics account here and follow the steps outlined in this guide.
Thank you for reading, and here’s to your website’s success with a solid privacy foundation!

Written by Ben Cummings
Co-Founder of Sage Wave Media
Ben is the Co-Founder of Sage Wave Media, LLC which is the parent company of Blog With Ben. He enjoys teaching, blogging, startups, a hoppy IPA, and college basketball. Whenever he's not blogging, you can find him cruising around sunny San Diego with his amazing family.
0 Comments