How To Start a YouTube Channel: A Beginner's Guide
How To Start a YouTube Channel: A Beginner's Guide
Are you looking to start your own YouTube channel but feel overwhelmed by the technical aspects? Don't worry, you're not alone! In this beginner-friendly guide, I'll walk you through the essential steps of creating and launching your YouTube channel. From setting up your account to monetizing your content through the YouTube Partner Program, I've got you covered.
Step 1: Setting Up Your YouTube Channel
Creating a Google Account
First things first, to start a YouTube channel, you need a Google account. If you don't have one already, head over to Google and sign up. Once your Google account is ready, navigate to YouTube and sign in.
Starting Your Channel
After signing in, you'll be prompted to create a channel using a personal name, or a custom name for your brand, as well as your channel handle.
Step 2: Designing Your Channel Profile and Banner
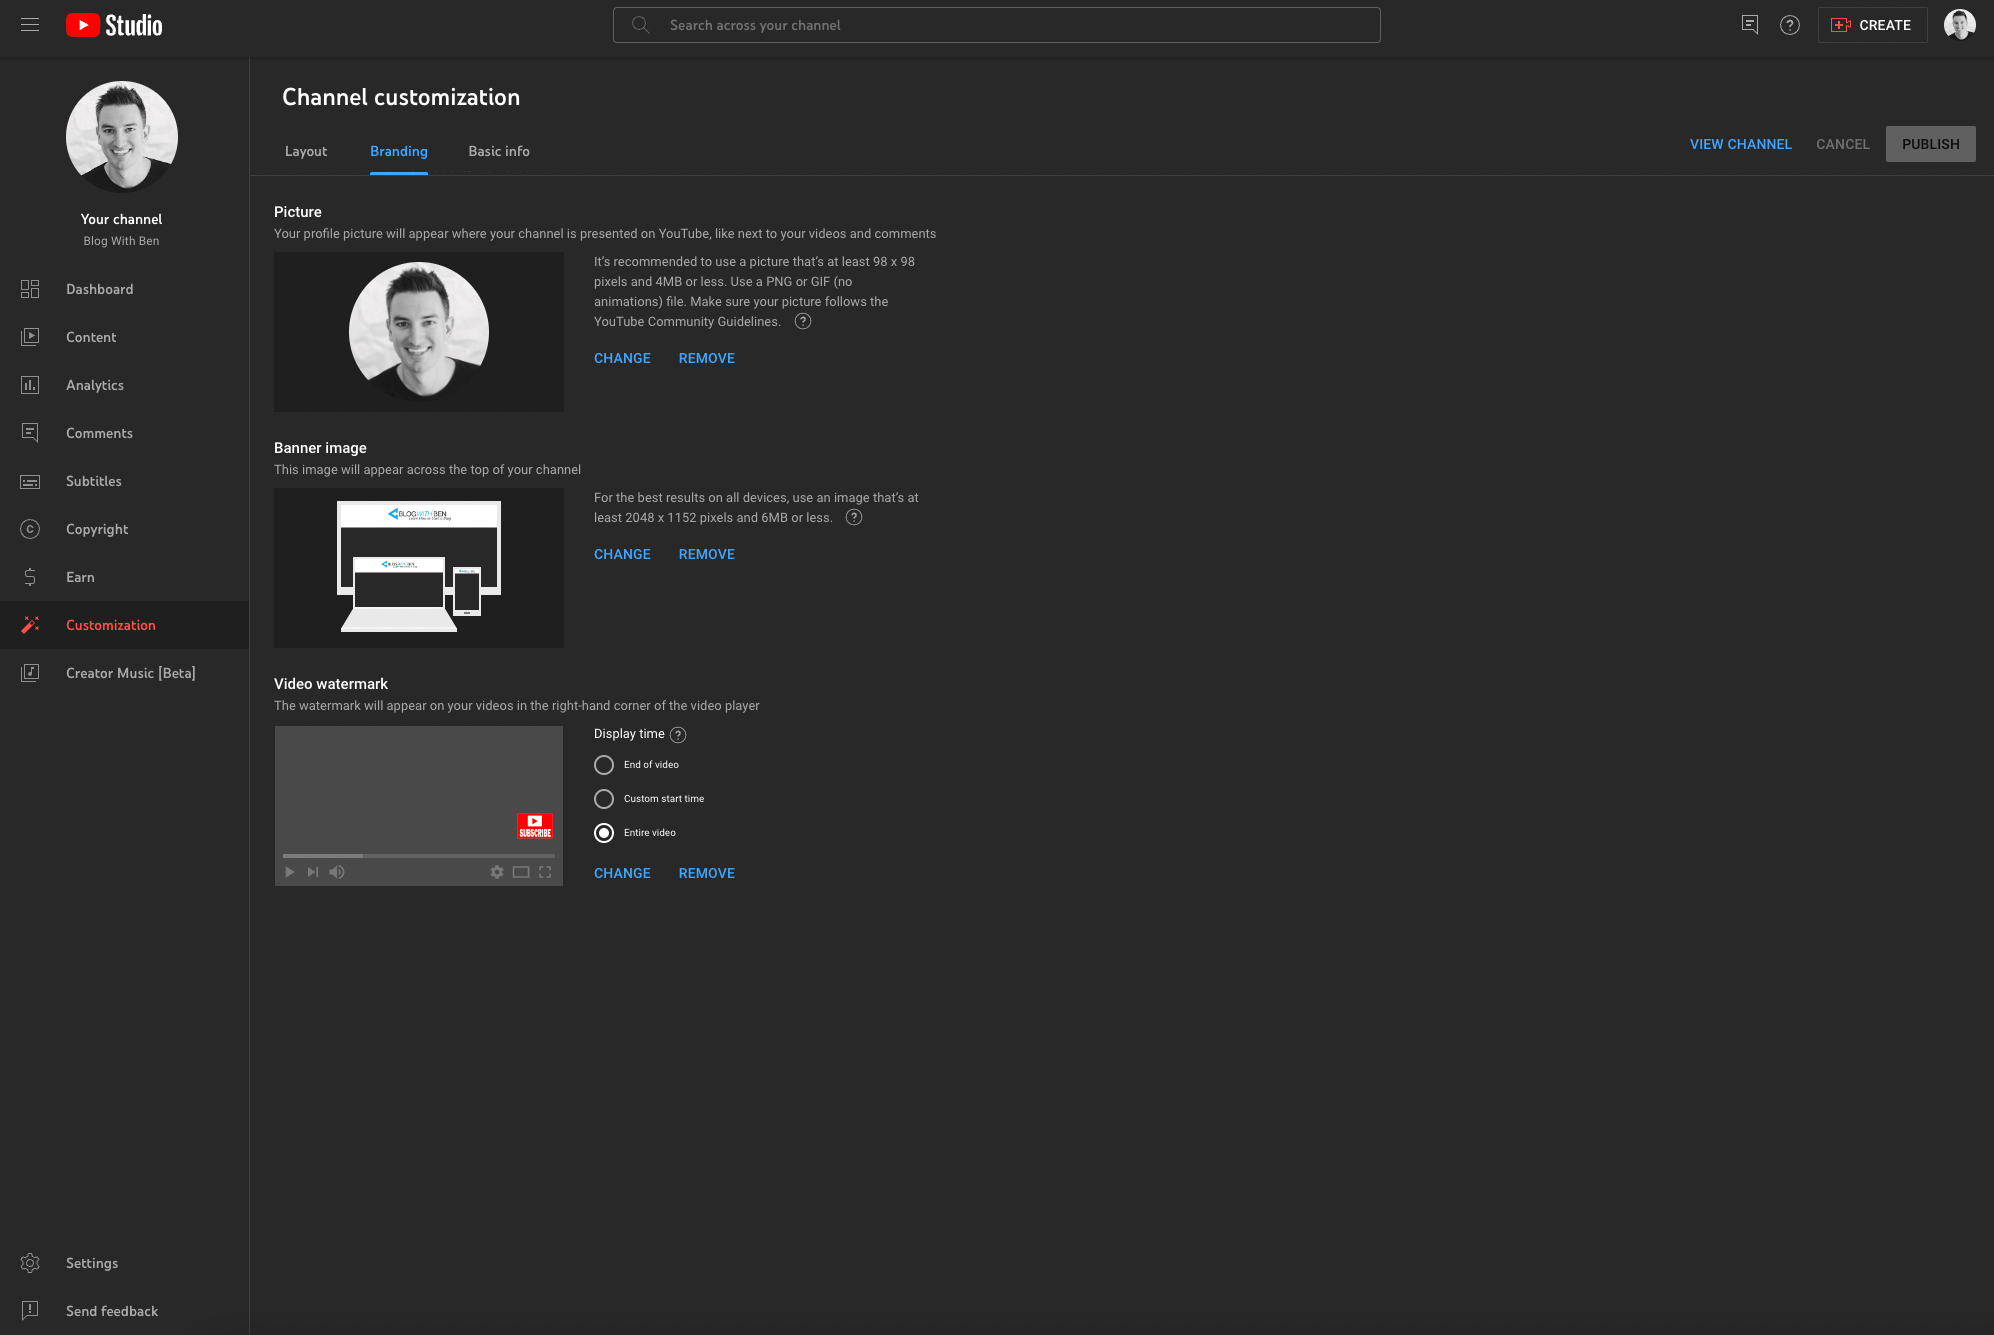
Crafting a Channel Profile Picture
Your profile picture is the face of your channel. It should represent you or your brand effectively. Use a clear, high-resolution image. If you're not confident in your design skills, I highly recommend Canva. Their free design tools can help you create a professional-looking profile picture.
Creating a Channel Banner
The channel banner is the large image at the top of your channel page. This is a great space to convey the essence of your channel. The ideal size for a YouTube banner is 2560 x 1440 pixels. Keep in mind that your banner will look different on various devices, so place your key information in the center to ensure it's always visible. And just like your profile picture, I highly recommend using Canva to create your banner. They have a ton of awesome templates to get you going.
Step 3: Using ChatGPT for Your Channel Description
A compelling channel description is crucial for attracting viewers. ChatGPT can be a great tool to craft a unique and engaging description. Simply input key information about your channel, such as the topics you'll cover, your upload schedule, and what makes your content special. ChatGPT can help generate a well-written description that captures the essence of your channel.
Once you've crafted your channel descrption, add it to the Description Box within your Basic info Customization Settings.
Step 4: Navigating Channel Settings

After setting up your channel's visual elements, it's time to dive into the channel settings. Here, you can adjust channel settings, upload defaults, and more. Some key settings to consider include:
- General: Choose the currency unit you would want to see in YouTube Studio. This does not change the payout currency which is set in your Google AdSense Account.
- Channel: This includes Basic Info, Advanced settings, and Feature Eligibility.
- Basic Info: Set your country of residence and add keywords related to your channel with this setting.
- Advanced Settings: Set your audience (for kids or not for kids), link your GoogleAds account, turn on automatic captions, and more.
- Feature Eligibility: You can manage your access to more features here. Intermediate and advanced features require additional verification which helps us keep the YouTube community safe for everyone.
- Upload Defaults: Set default settings for your uploads, including title, description, and visibility (public, private, or unlisted).
- Permissions: This area allows you to manage who has access to your YouTube channel and what level of access they have. It's particularly useful if you work with a team or have someone helping with your channel.
- Community: Set up moderators, approved users, and hidden users.
- Creator Demographics: Take a quick survey about your demographics. YouTube uses the data collected to evaluate how YouTube works for the channels of creators and artists who represent different communities.
- Promotions: If YouTube offers promotional tools or collaborations, they would typically be managed here. This section might not be heavily featured on all channels but can be an asset for marketing and partnerships.
- Agreements: If there are any other legal agreements between you and YouTube concerning your channel, they would be found here.
Step 5: Uploading and Publishing Your First Video
Uploading Your Video
To upload your first video, click the camera icon with a “+” at the top of the YouTube page and select “Upload video.” Then, drag and drop your video file or select it from your computer.
Optimizing Video Details
After uploading, add a title, description, and tags. Use relevant keywords to help your video show up in search results. Write a clear, descriptive title and a detailed description that includes what your video is about and any relevant links or social media handles.
I highly reocmmned leveraging ChatGPT to help create your video descrption. It will save you a ton of time in the long run. Also, check out my Video Description Prompt Template. This will help guide the AI when creating a video description.
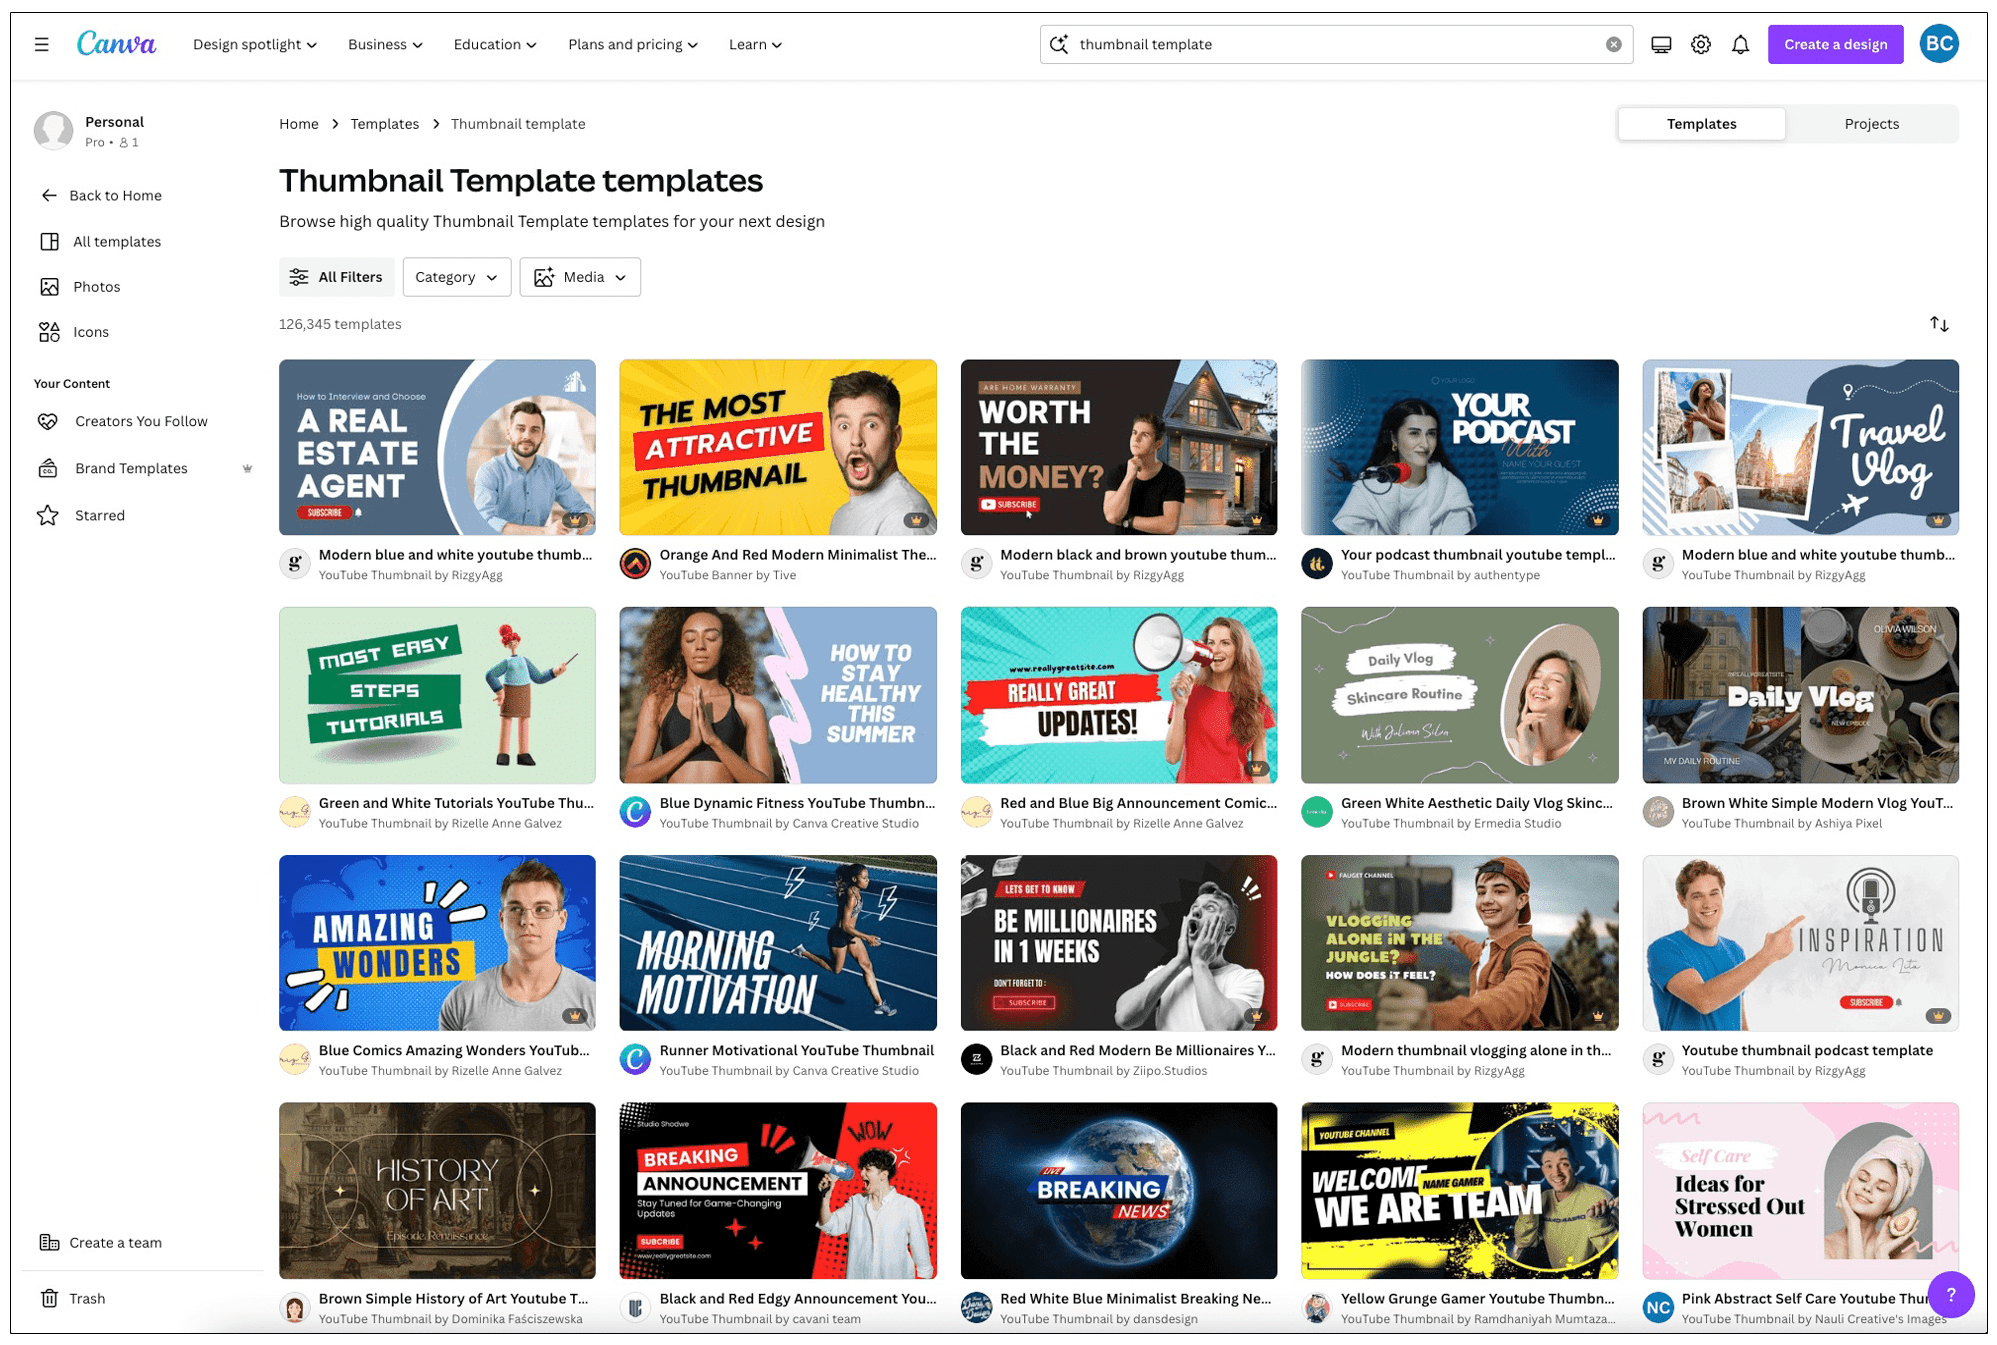
Thumbnail and Publishing
Create a thumbnail that stands out and accurately represents your video content. Again, I recommend using Canva to create a custom thumbnail. They have a ton of free templates to help get your started. Once everything is set, choose whether to publish immediately, schedule for later, or keep it private.
Step 6: Monetizing Your Channel with the YouTube Partner Program
Eligibility for Monetization
To start earning money from your YouTube content, you must meet the criteria for the YouTube Partner Program (YPP). This includes having at least 1,000 subscribers and 4,000 watch hours over the past 12 months.
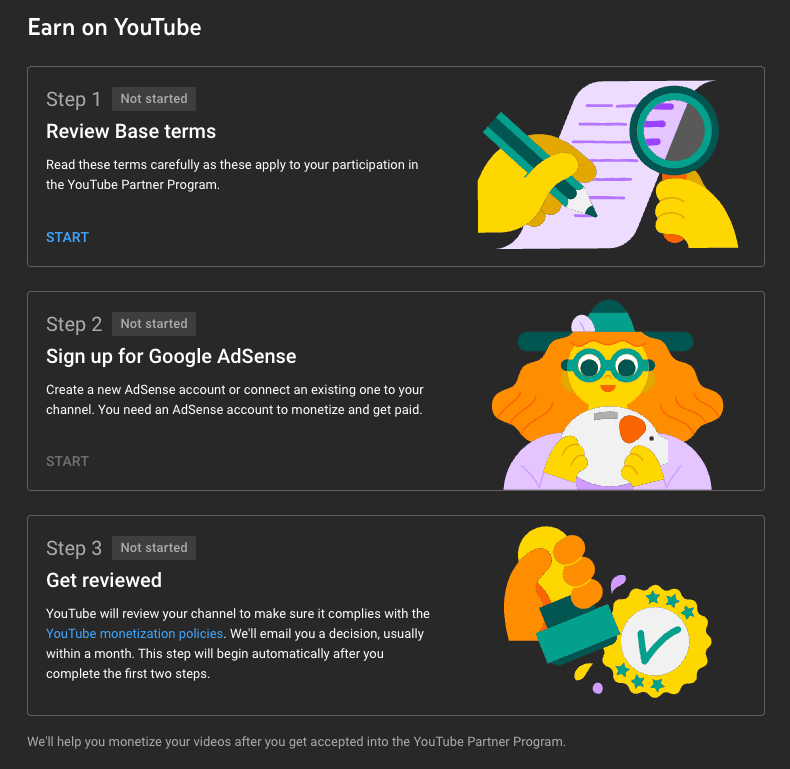
Applying to the YouTube Partner Program
Once you meet the criteria, you can apply for the YPP through your YouTube account. You'll need to agree to the terms and conditions, set up an AdSense account, and then submit your application for review.
Monetizing Your Videos
Once accepted, you can start monetizing your videos through ads, channel memberships, merchandise shelves, and more. Remember, content quality and viewer engagement are key to maximizing your earnings.
Conclusion
Starting a YouTube channel can seem daunting, but by following these simple steps, you'll be well on your way to creating an engaging and successful channel. Remember, consistency and creativity are key.
Feel free to reach out in the comments here or on YouTube. I'd be more than happy to help in any way that I can. Best of luck to you and have fun with your new YouTube channel!
Are you looking to start your own YouTube channel but feel overwhelmed by the technical aspects? Don't worry, you're not alone! In this beginner-friendly guide, I'll walk you through the essential steps of creating and launching your YouTube channel. From setting up your account to monetizing your content through the YouTube Partner Program, I've got you covered.
Step 1: Setting Up Your YouTube Channel
Creating a Google Account
First things first, to start a YouTube channel, you need a Google account. If you don't have one already, head over to Google and sign up. Once your Google account is ready, navigate to YouTube and sign in.
Starting Your Channel
After signing in, you'll be prompted to create a channel using a personal name, or a custom name for your brand, as well as your channel handle.
Step 2: Designing Your Channel Profile and Banner
Crafting a Channel Profile Picture
Your profile picture is the face of your channel. It should represent you or your brand effectively. Use a clear, high-resolution image. If you're not confident in your design skills, I highly recommend Canva. Their free design tools can help you create a professional-looking profile picture.
Creating a Channel Banner
The channel banner is the large image at the top of your channel page. This is a great space to convey the essence of your channel. The ideal size for a YouTube banner is 2560 x 1440 pixels. Keep in mind that your banner will look different on various devices, so place your key information in the center to ensure it's always visible. And just like your profile picture, I highly recommend using Canva to create your banner. They have a ton of awesome templates to get you going.
Step 3: Using ChatGPT for Your Channel Description
A compelling channel description is crucial for attracting viewers. ChatGPT can be a great tool to craft a unique and engaging description. Simply input key information about your channel, such as the topics you'll cover, your upload schedule, and what makes your content special. ChatGPT can help generate a well-written description that captures the essence of your channel.
Once you've crafted your channel descrption, add it to the Description Box within your Basic info Customization Settings.
Step 4: Navigating Channel Settings
After setting up your channel's visual elements, it's time to dive into the channel settings. Here, you can adjust channel settings, upload defaults, and more. Some key settings to consider include:
- General: Choose the currency unit you would want to see in YouTube Studio. This does not change the payout currency which is set in your Google AdSense Account.
- Channel: This includes Basic Info, Advanced settings, and Feature Eligibility.
- Basic Info: Set your country of residence and add keywords related to your channel with this setting.
- Advanced Settings: Set your audience (for kids or not for kids), link your GoogleAds account, turn on automatic captions, and more.
- Feature Eligibility: You can manage your access to more features here. Intermediate and advanced features require additional verification which helps us keep the YouTube community safe for everyone.
- Upload Defaults: Set default settings for your uploads, including title, description, and visibility (public, private, or unlisted).
- Permissions: This area allows you to manage who has access to your YouTube channel and what level of access they have. It's particularly useful if you work with a team or have someone helping with your channel.
- Community: Set up moderators, approved users, and hidden users.
- Creator Demographics: Take a quick survey about your demographics. YouTube uses the data collected to evaluate how YouTube works for the channels of creators and artists who represent different communities.
- Promotions: If YouTube offers promotional tools or collaborations, they would typically be managed here. This section might not be heavily featured on all channels but can be an asset for marketing and partnerships.
- Agreements: If there are any other legal agreements between you and YouTube concerning your channel, they would be found here.
Step 5: Uploading and Publishing Your First Video
Uploading Your Video
To upload your first video, click the camera icon with a “+” at the top of the YouTube page and select “Upload video.” Then, drag and drop your video file or select it from your computer.
Optimizing Video Details
After uploading, add a title, description, and tags. Use relevant keywords to help your video show up in search results. Write a clear, descriptive title and a detailed description that includes what your video is about and any relevant links or social media handles.
I highly reocmmned leveraging ChatGPT to help create your video descrption. It will save you a ton of time in the long run. Also, check out my Video Description Prompt Template. This will help guide the AI when creating a video description.
Thumbnail and Publishing
Create a thumbnail that stands out and accurately represents your video content. Again, I recommend using Canva to create a custom thumbnail. They have a ton of free templates to help get your started. Once everything is set, choose whether to publish immediately, schedule for later, or keep it private.
Step 6: Monetizing Your Channel with the YouTube Partner Program
Eligibility for Monetization
To start earning money from your YouTube content, you must meet the criteria for the YouTube Partner Program (YPP). This includes having at least 1,000 subscribers and 4,000 watch hours over the past 12 months.
Applying to the YouTube Partner Program
Once you meet the criteria, you can apply for the YPP through your YouTube account. You'll need to agree to the terms and conditions, set up an AdSense account, and then submit your application for review.
Monetizing Your Videos
Once accepted, you can start monetizing your videos through ads, channel memberships, merchandise shelves, and more. Remember, content quality and viewer engagement are key to maximizing your earnings.
Conclusion
Starting a YouTube channel can seem daunting, but by following these simple steps, you'll be well on your way to creating an engaging and successful channel. Remember, consistency and creativity are key.
Feel free to reach out in the comments here or on YouTube. I'd be more than happy to help in any way that I can. Best of luck to you and have fun with your new YouTube channel!

Written by Ben Cummings
Cofounder of Sage Wave Media
Ben is the Cofounder of Sage Wave Media, LLC which is the parent company of Blog With Ben. He enjoys teaching, blogging, startups, a hoppy IPA, and college basketball. Whenever he's not blogging, you can find him cruising around sunny San Diego with his amazing family.
Ben, this is an incredibly thorough beginner's guide! The step-by-step approach makes what can feel overwhelming much more manageable. I particularly love your emphasis on using ChatGPT for channel descriptions and video optimization – that's a game-changer for creators who struggle with copywriting. The Canva recommendation for thumbnails is spot-on too; I've been using it for months and it's saved me hours. One thing I learned the hard way that I'd add to your guide: before investing time in channel setup and content creation, validate that your chosen niche actually has audience demand. I spent three months creating content in a niche I thought was “underserved,” only to realize there was no search volume. Tools like YouTubeNiches.com helped me pivot to a niche with proven demand and manageable competition. Your section on monetization requirements is realistic and honest – too many guides oversell how quickly you can start earning. The 1,000 subs / 4,000 watch hours threshold is real, and it takes most creators 6-12 months to hit it. Excellent resource!