
UltaHost for Bloggers: How to Set Up and Launch Your First Blog
UltaHost for Bloggers: How to Set Up and Launch Your First Blog
Starting a blog can feel overwhelming, especially if you're new to WordPress or the technical aspects of website creation. But with the right tools and guidance, launching your blog can be a smooth and exciting journey. In this comprehensive tutorial, I'll walk you through how to set up your blog using ultahost wordpress hosting, a managed WordPress hosting service tailored for bloggers. Whether you're building a personal blog, a niche website, or an online brand, this step-by-step guide will help you get your WordPress blog live quickly and confidently.
From choosing your hosting plan and registering your domain to installing WordPress, activating your SSL certificate, customizing your theme, installing plugins, and publishing your first post, every essential step is covered. Let’s dive right in!
Step 1: Choose Your UltaHost WordPress Hosting Plan and Register Your Domain
Your blogging journey begins with selecting the right hosting plan and domain name. UltaHost offers a variety of hosting plans designed to meet different needs, but for most new bloggers, the Ulta WordPress plan is an ideal and budget-friendly starting point.
To get started, visit the UltaHost website by following the link provided in your resources or searching for UltaHost. Once on the homepage, navigate to the WordPress hosting section:
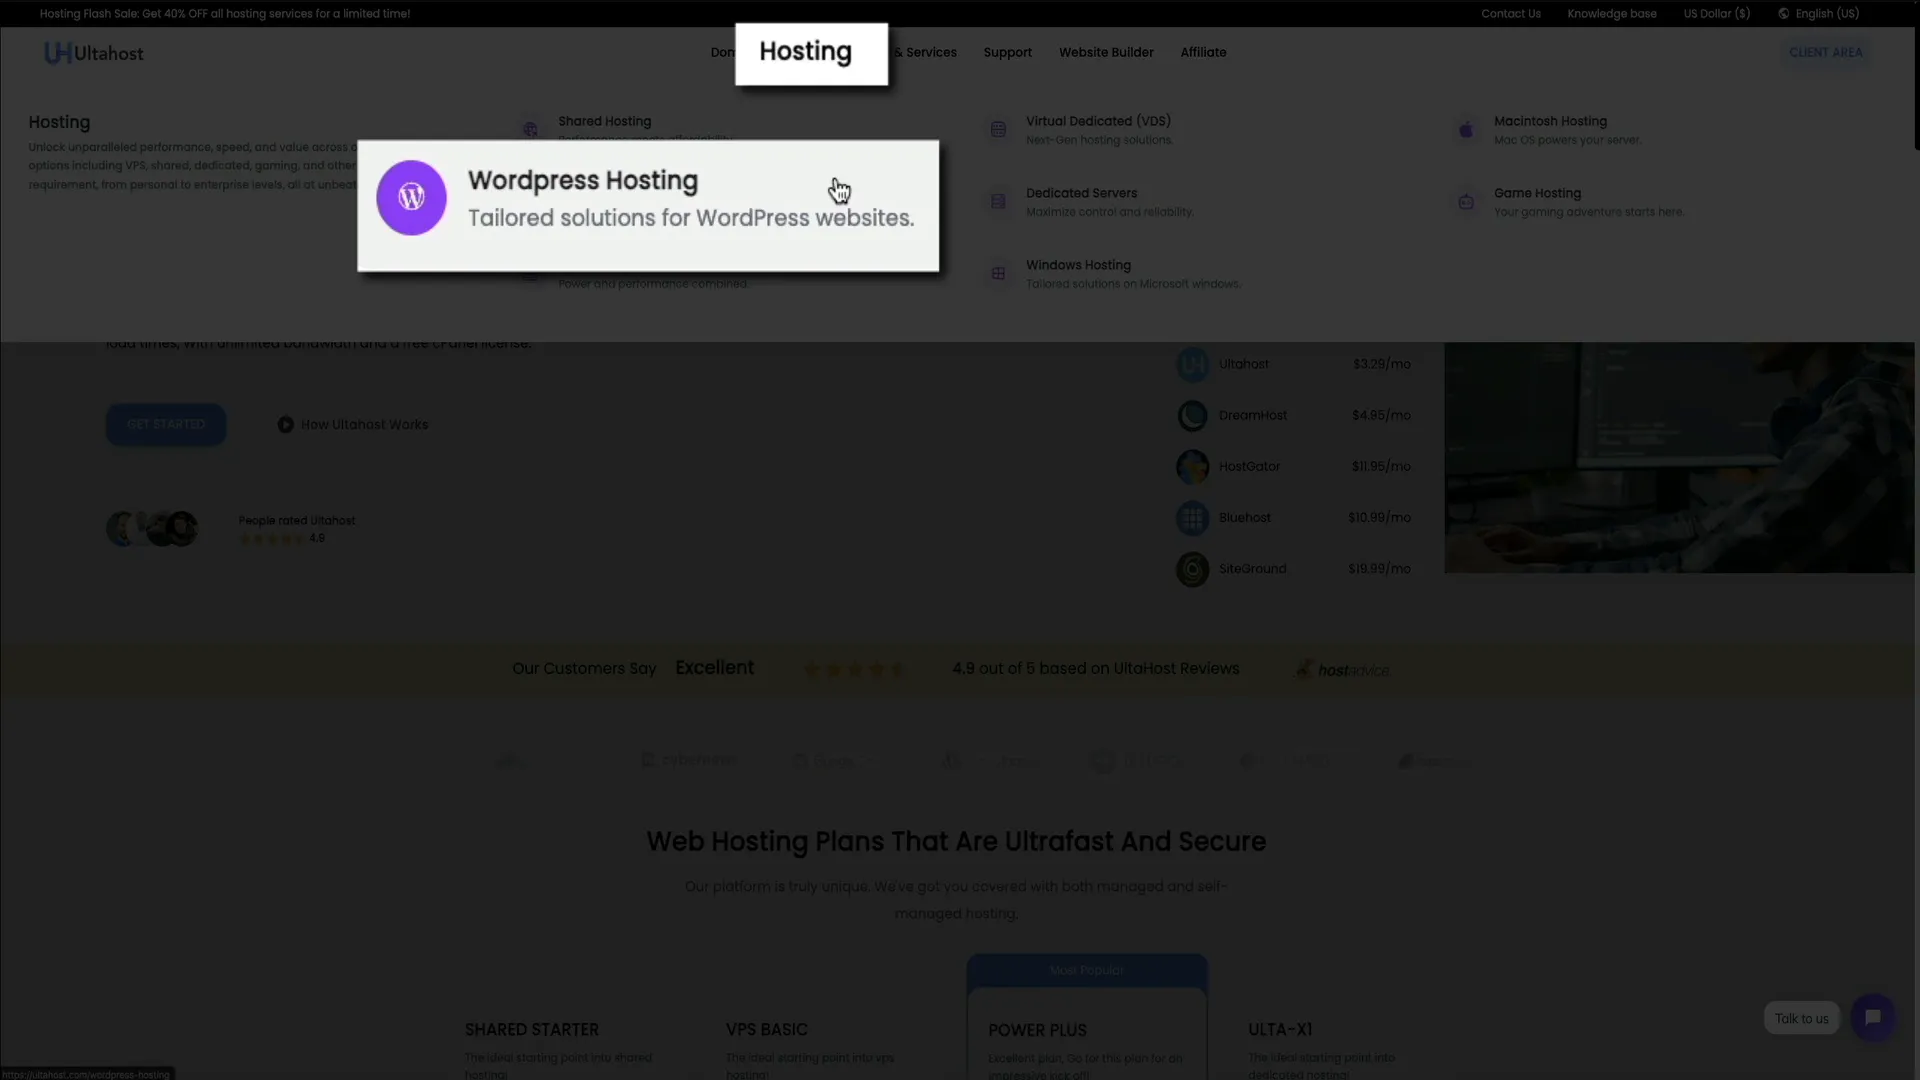
- Hover over the “Hosting” menu at the top of the page.
- Click on “WordPress Hosting” to view plans tailored specifically for WordPress users.
UltaHost offers four main plans:
- Ulta WordPress: Best for beginners and budget-conscious bloggers.
- WordPress Starter: For slightly larger sites with more traffic.
- Business WordPress: For growing blogs and small businesses.
- VPS WordPress: For high-traffic and complex sites needing dedicated resources.
For new bloggers, the Ulta WordPress plan is perfect. It provides:
- One website hosting
- 30 GB of SSD storage
- 10,000 monthly visits
- Unlimited bandwidth
- One email account
- A free WordPress manager
- A free SSL certificate
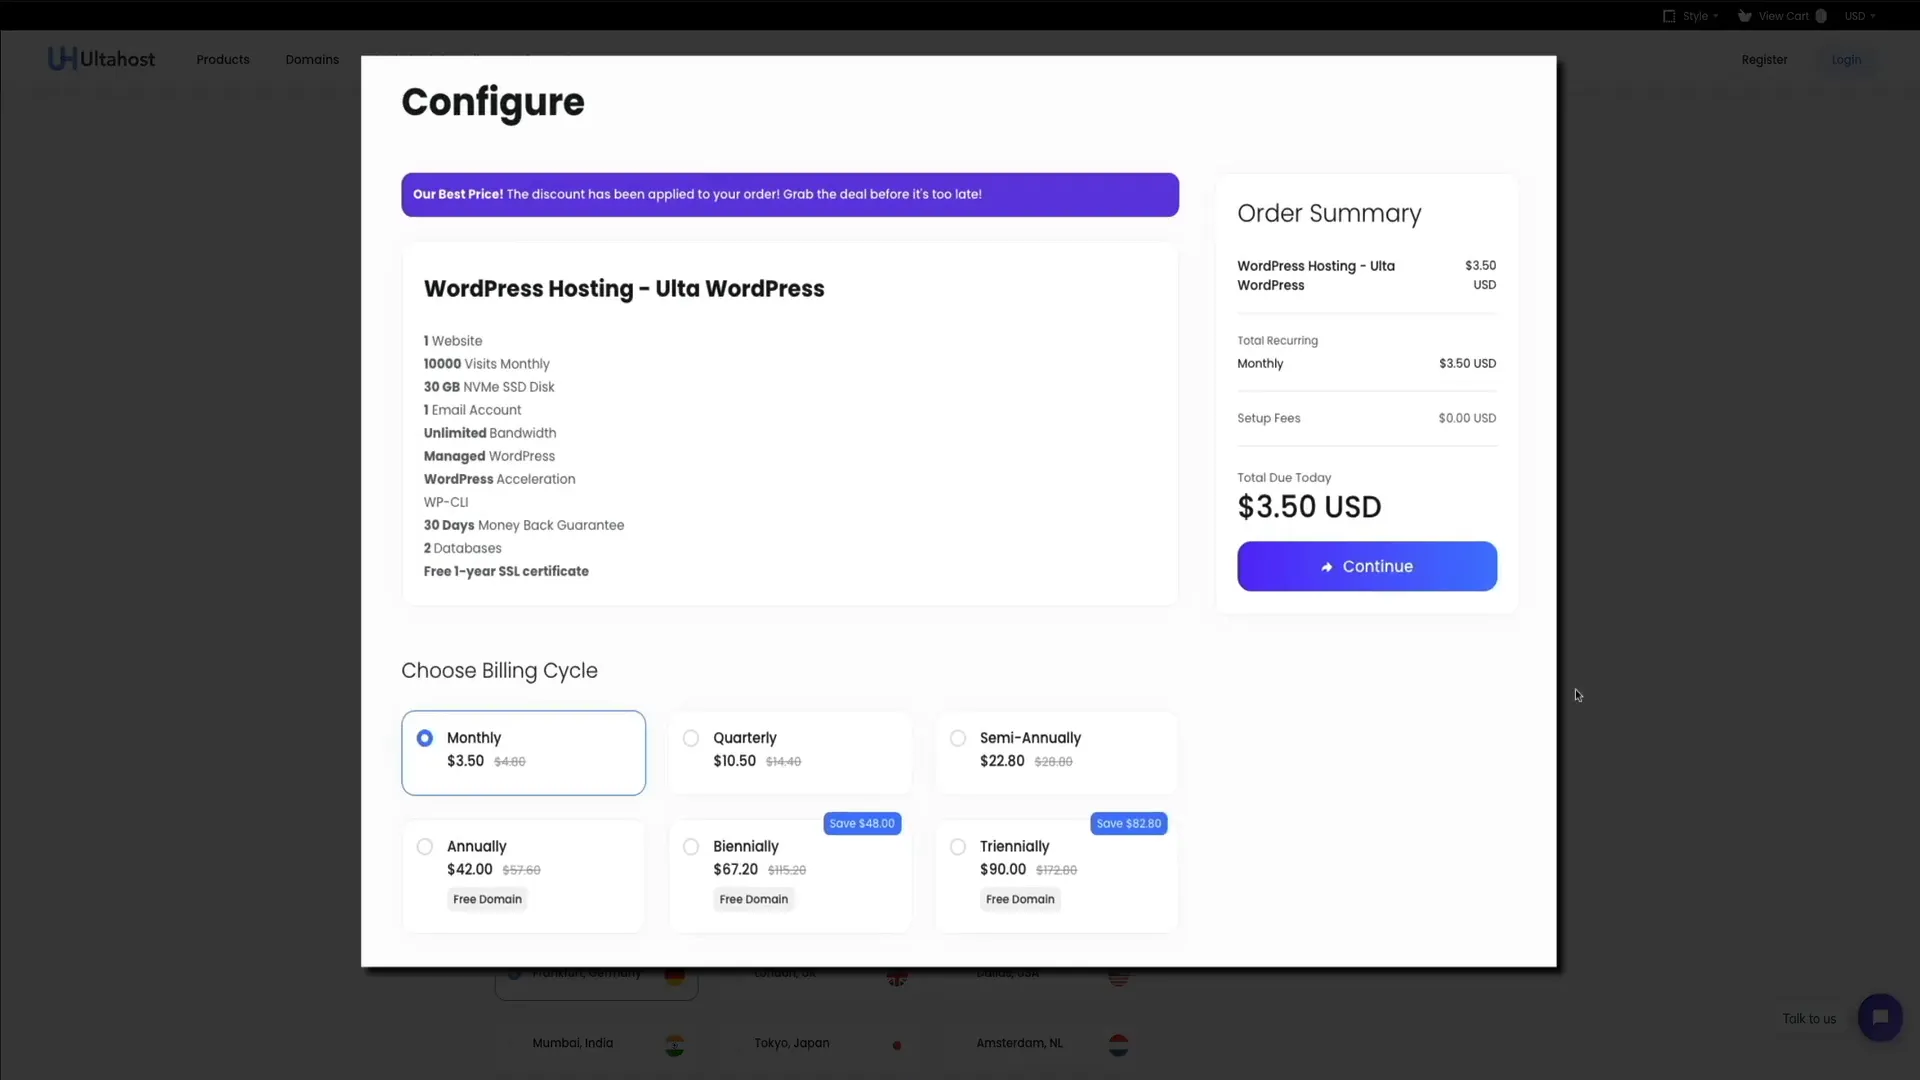
UltaHost also offers flexible billing cycles. You can choose monthly, yearly, two-year, or three-year plans. Longer commitments give bigger discounts, but if you’re just starting, monthly billing at $3.50 per month is a great, low-risk option.
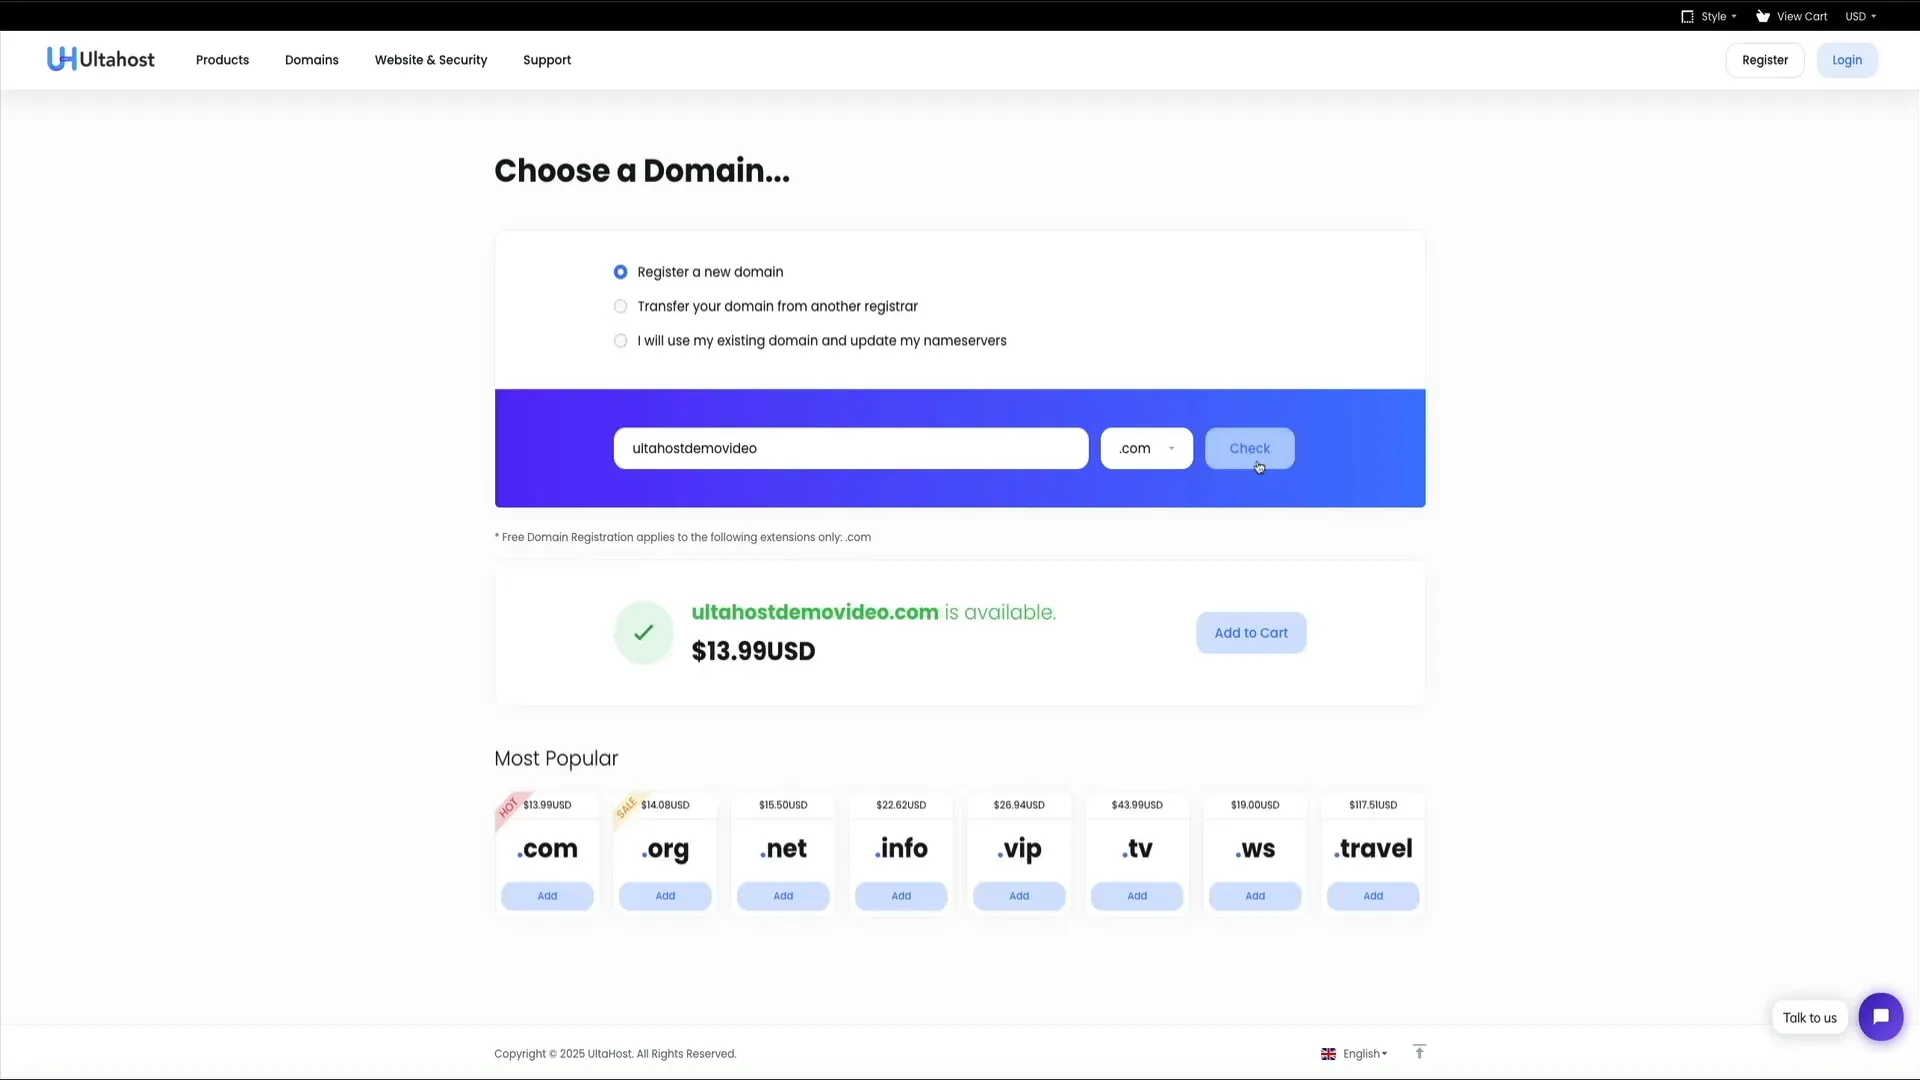
Once you've selected your plan, click the “Order” button below it to proceed to domain setup. Here, you have three choices:
- Register a new domain
- Transfer an existing domain from another registrar
- Use an existing domain by updating your name servers
If you’re starting fresh, choose to register a new domain. Enter your desired domain name and select the extension (.com, .net, etc.). UltaHost will check availability and show you the price, typically around $13.99 per year.
Add the domain to your cart and continue to the configuration page, where you’ll review your hosting plan, domain registration, and extras. Here you can choose your server location. Pick a data center near your target audience to optimize site speed. For example, if you’re in Southern California, selecting the Los Angeles server is ideal.
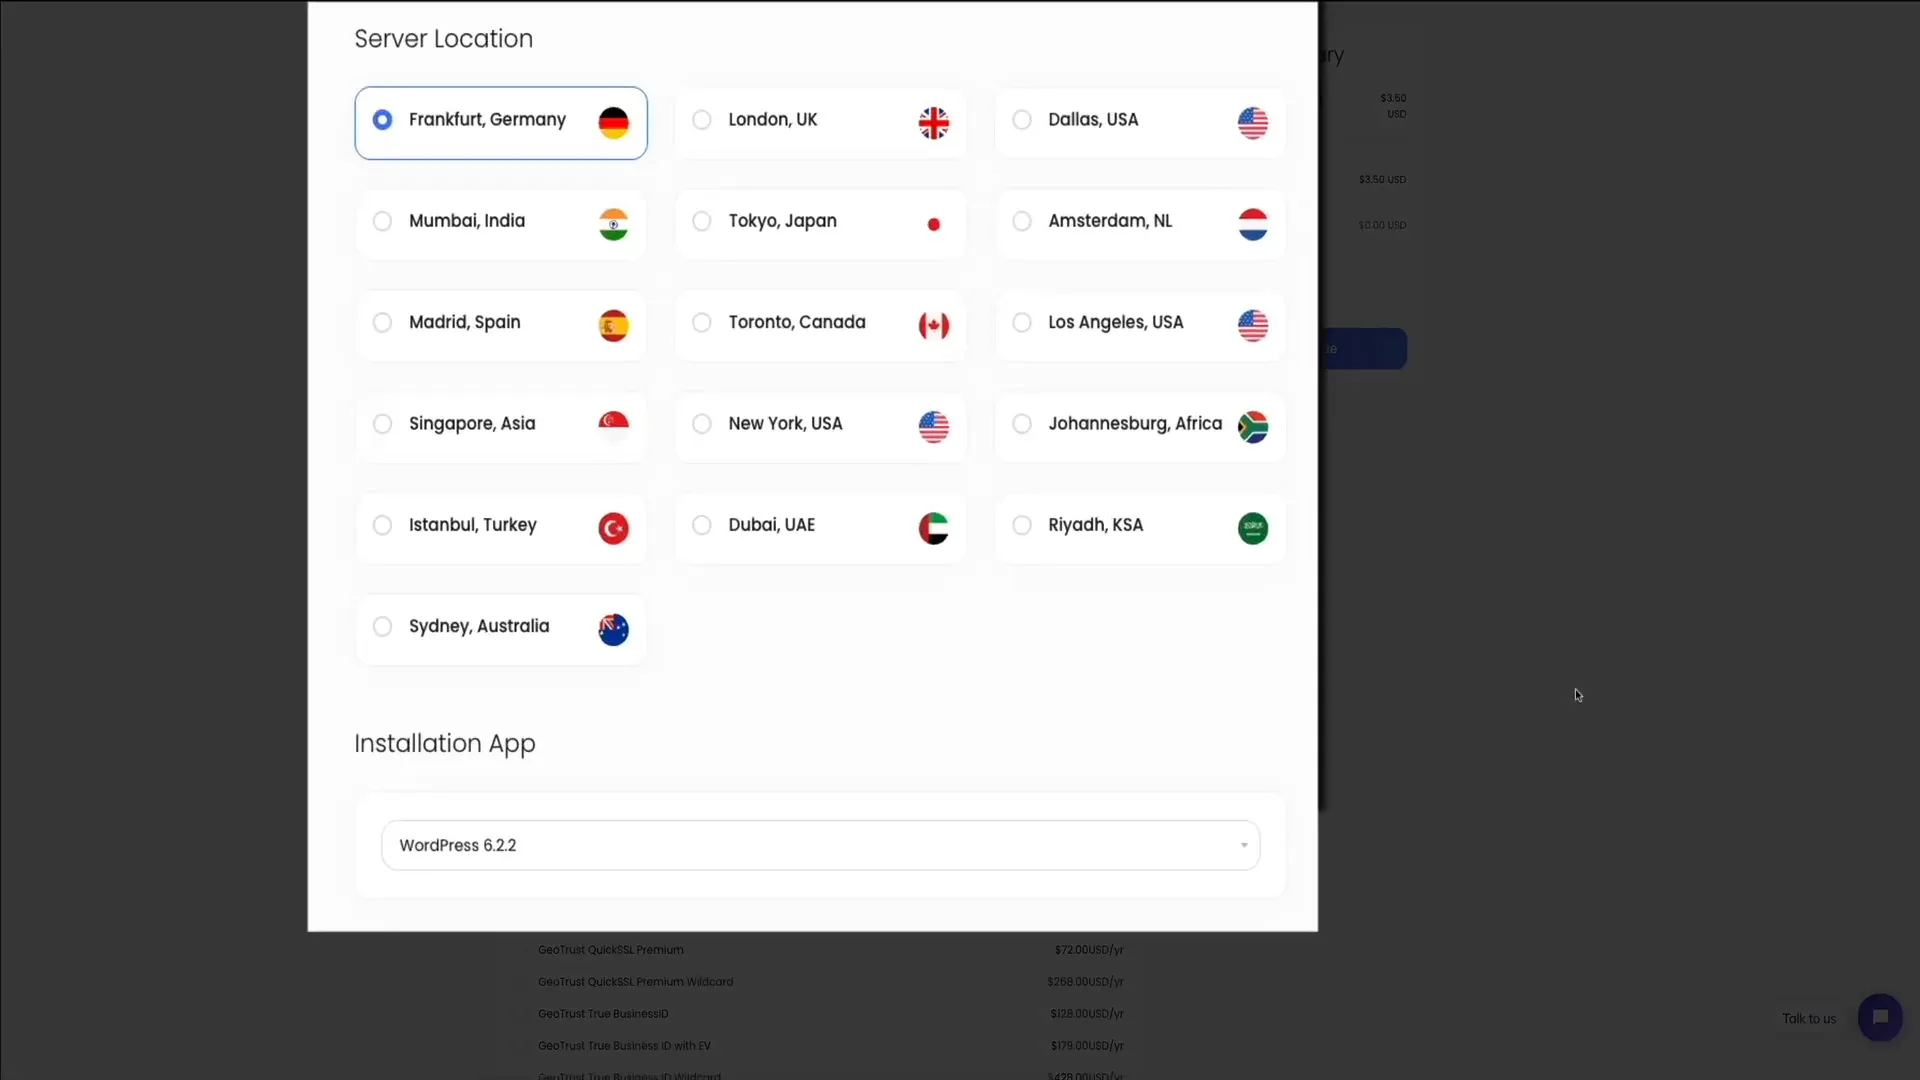
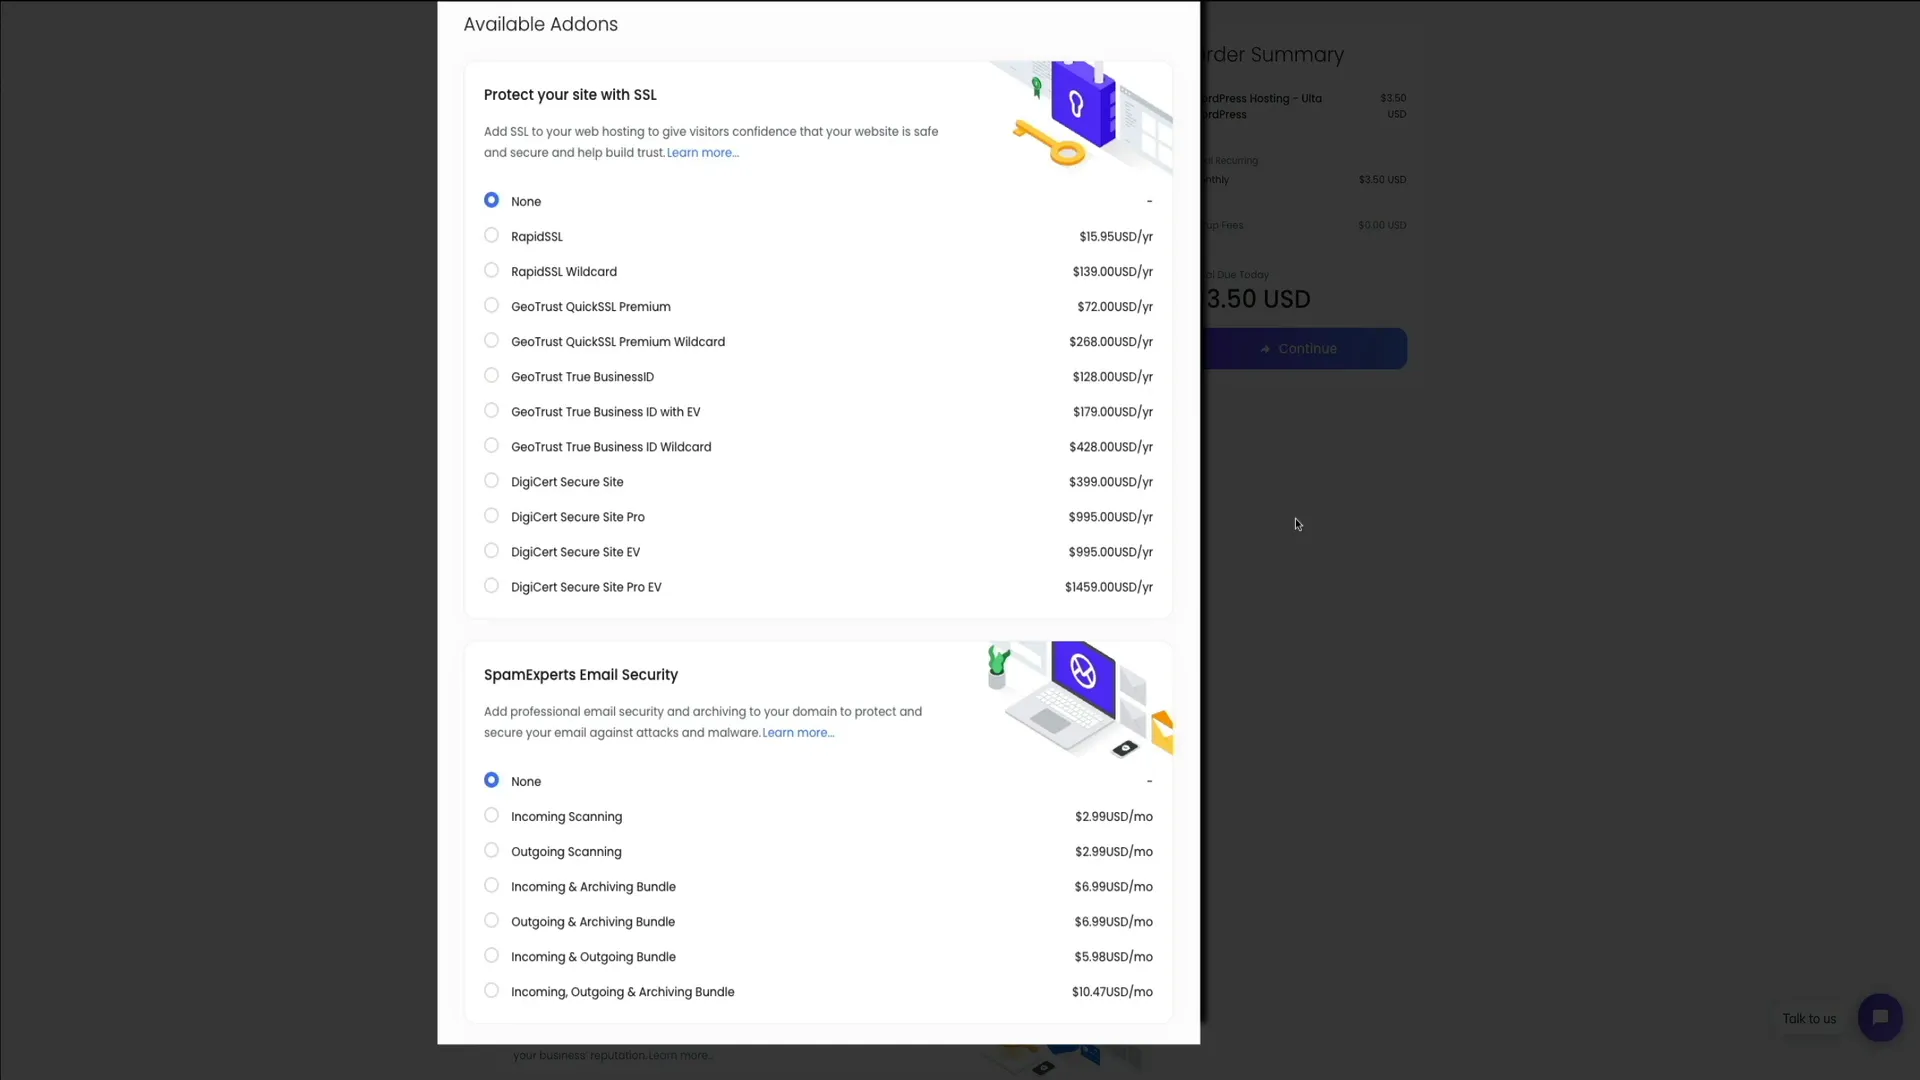
UltaHost also offers optional add-ons like premium SSL certificates, email security, site backups, and SEO tools. Since the Ulta WordPress plan already includes a free SSL certificate, you can skip these extras for now.
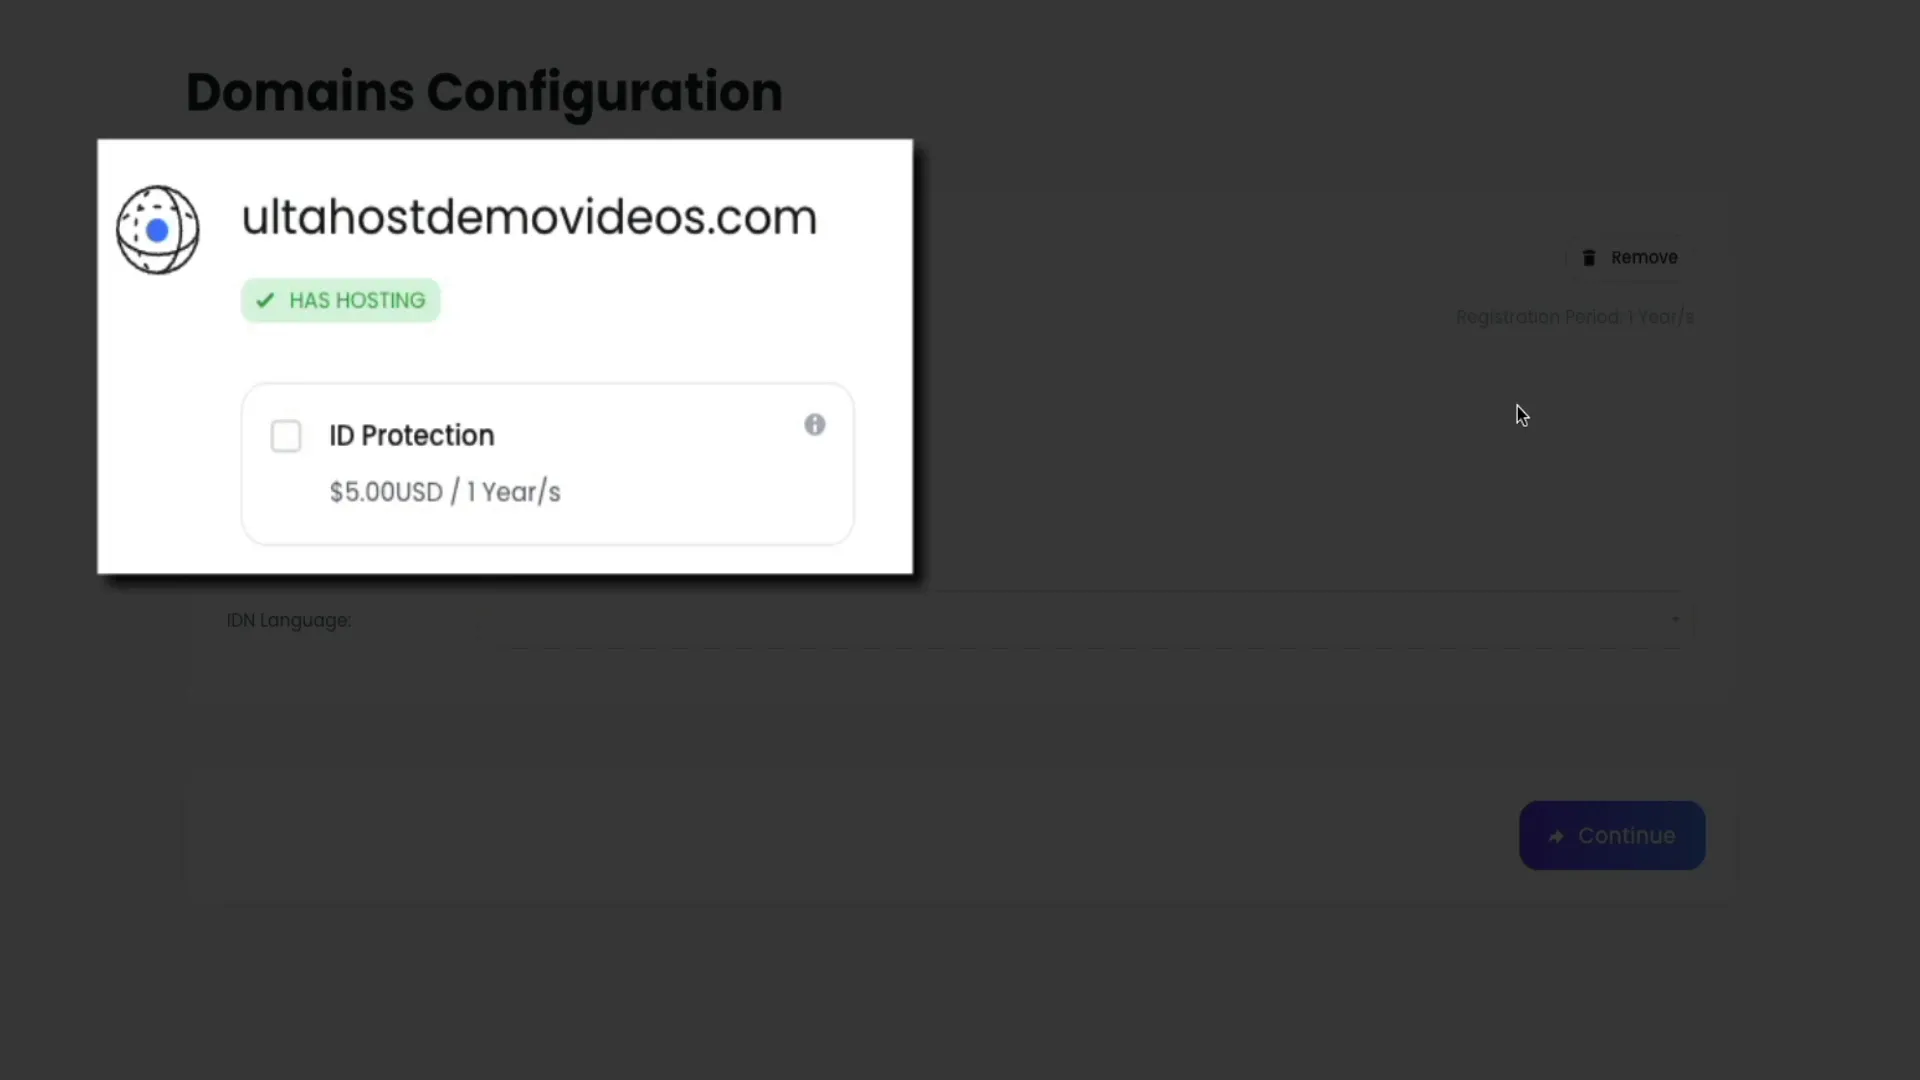
Before checkout, add domain ID protection to keep your personal information private in the public domain registry. This small additional cost helps secure your privacy.
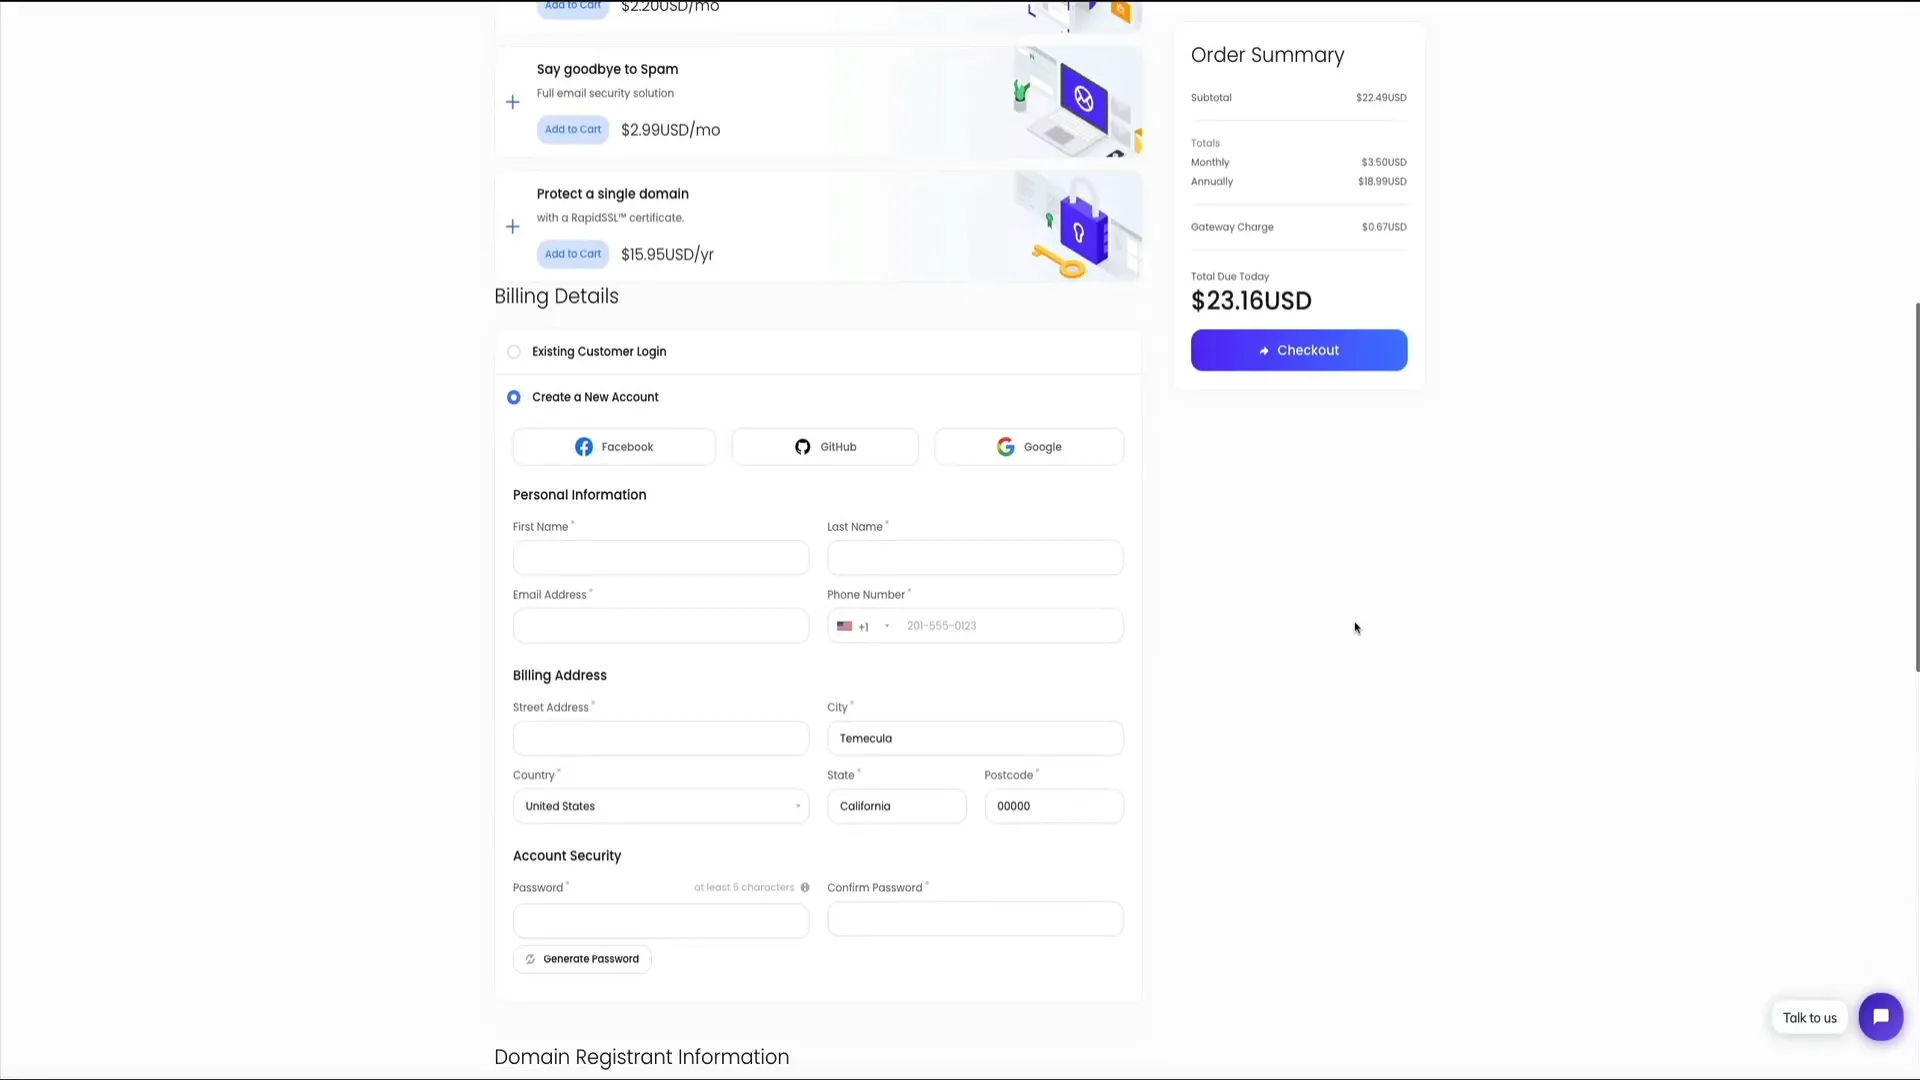
Finally, review your entire order, enter any promo codes if available, and create your UltaHost account. You can sign up using Facebook, GitHub, Google, or by entering your personal details manually. Choose your payment method—credit card, PayPal, crypto, or bank transfer—and complete the purchase.
Step 2: Explore the UltaHost Dashboard
After completing your order, you’ll be directed to the UltaHost dashboard, your central hub for managing your hosting, domains, billing, and support.
The dashboard features:
- A high-level overview of your active services, domains, support tickets, and unpaid invoices.
- Your active products/services section, showing your WordPress hosting plan status.
- A navigation panel on the left for quick access to domains, services, billing, security, support, and affiliate features.
- Your account profile sidebar with contact info, support pin, and shortcuts for common actions like ordering new services or registering domains.
- Recent support tickets and latest news from UltaHost.
- Live chat support via the “Talk to Us” button at the bottom right for quick assistance.
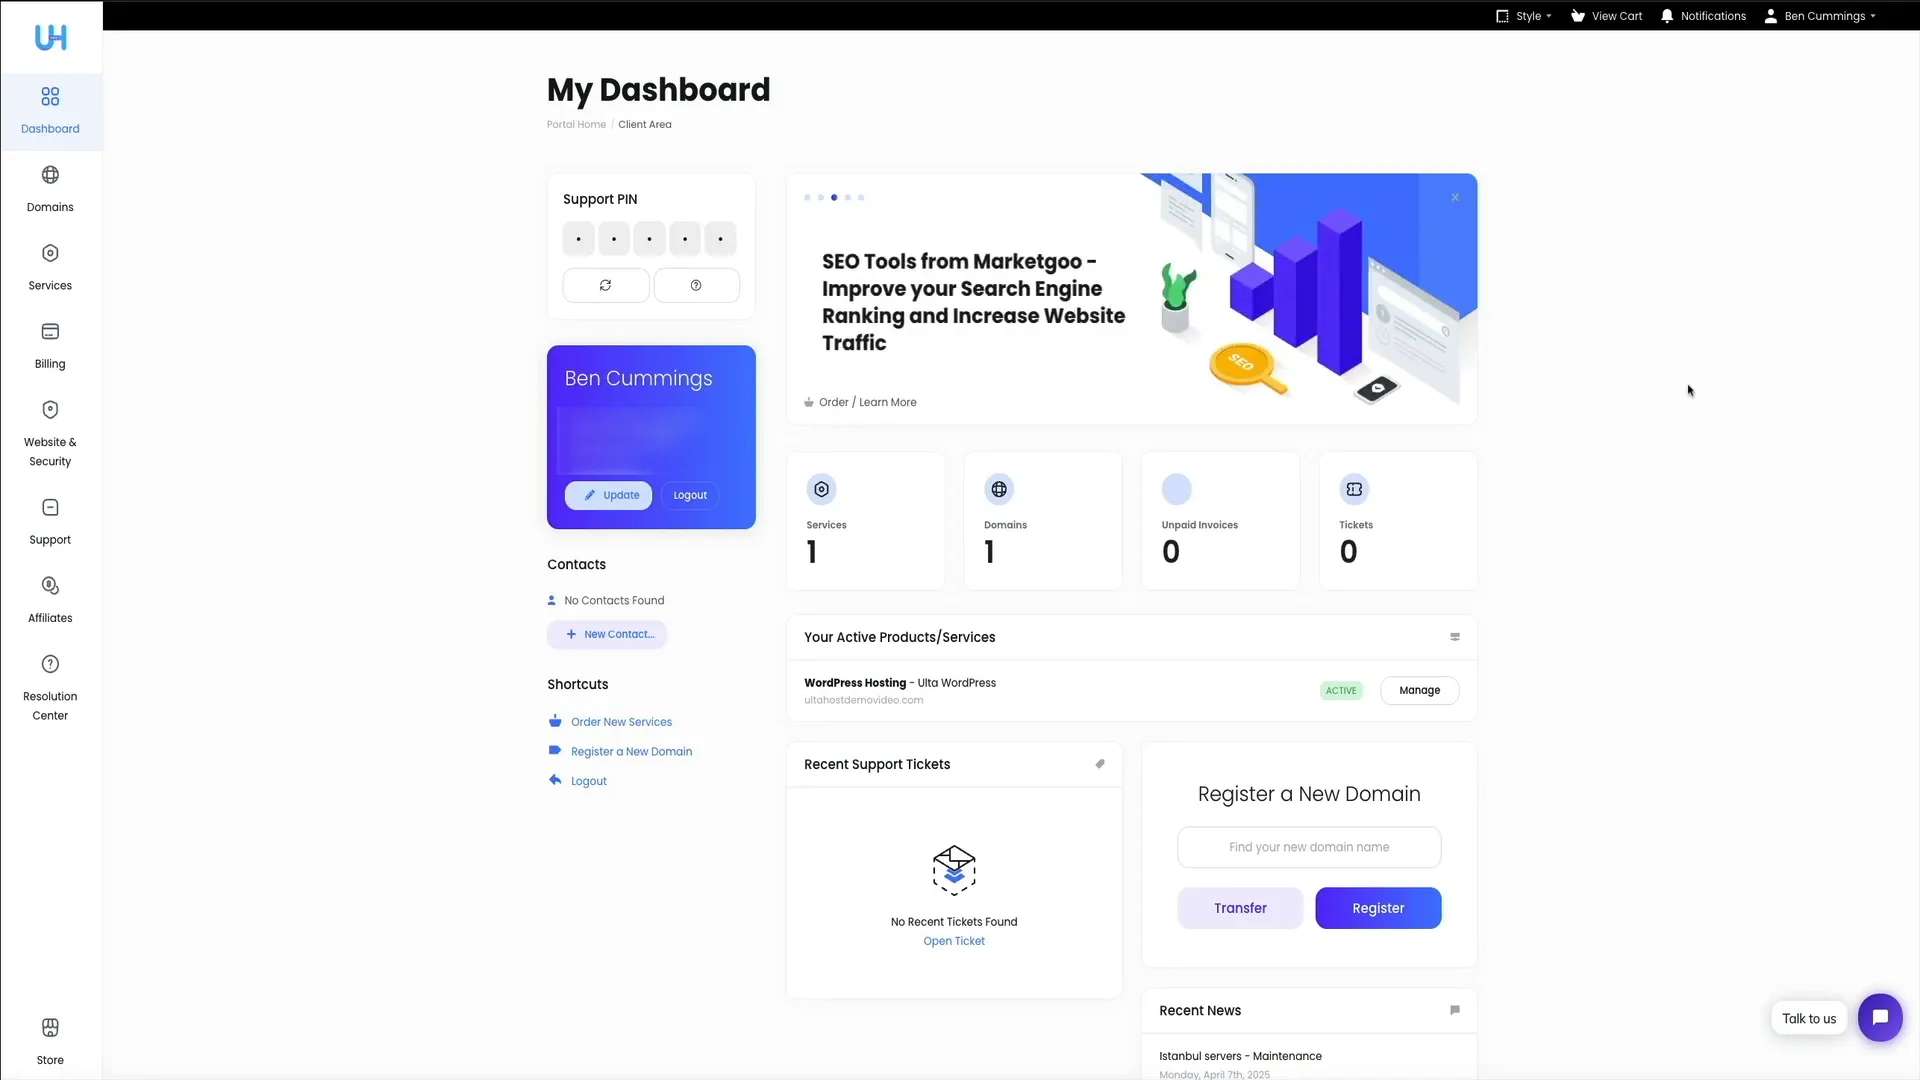
This clean and intuitive interface makes managing your hosting and website easier, even if you’re not a tech expert.
Step 3: Verify Your Domain and Activate Your Free SSL Certificate
Once your hosting and domain are set up, there are two crucial follow-up steps to ensure your website works securely and reliably:
Domain Verification
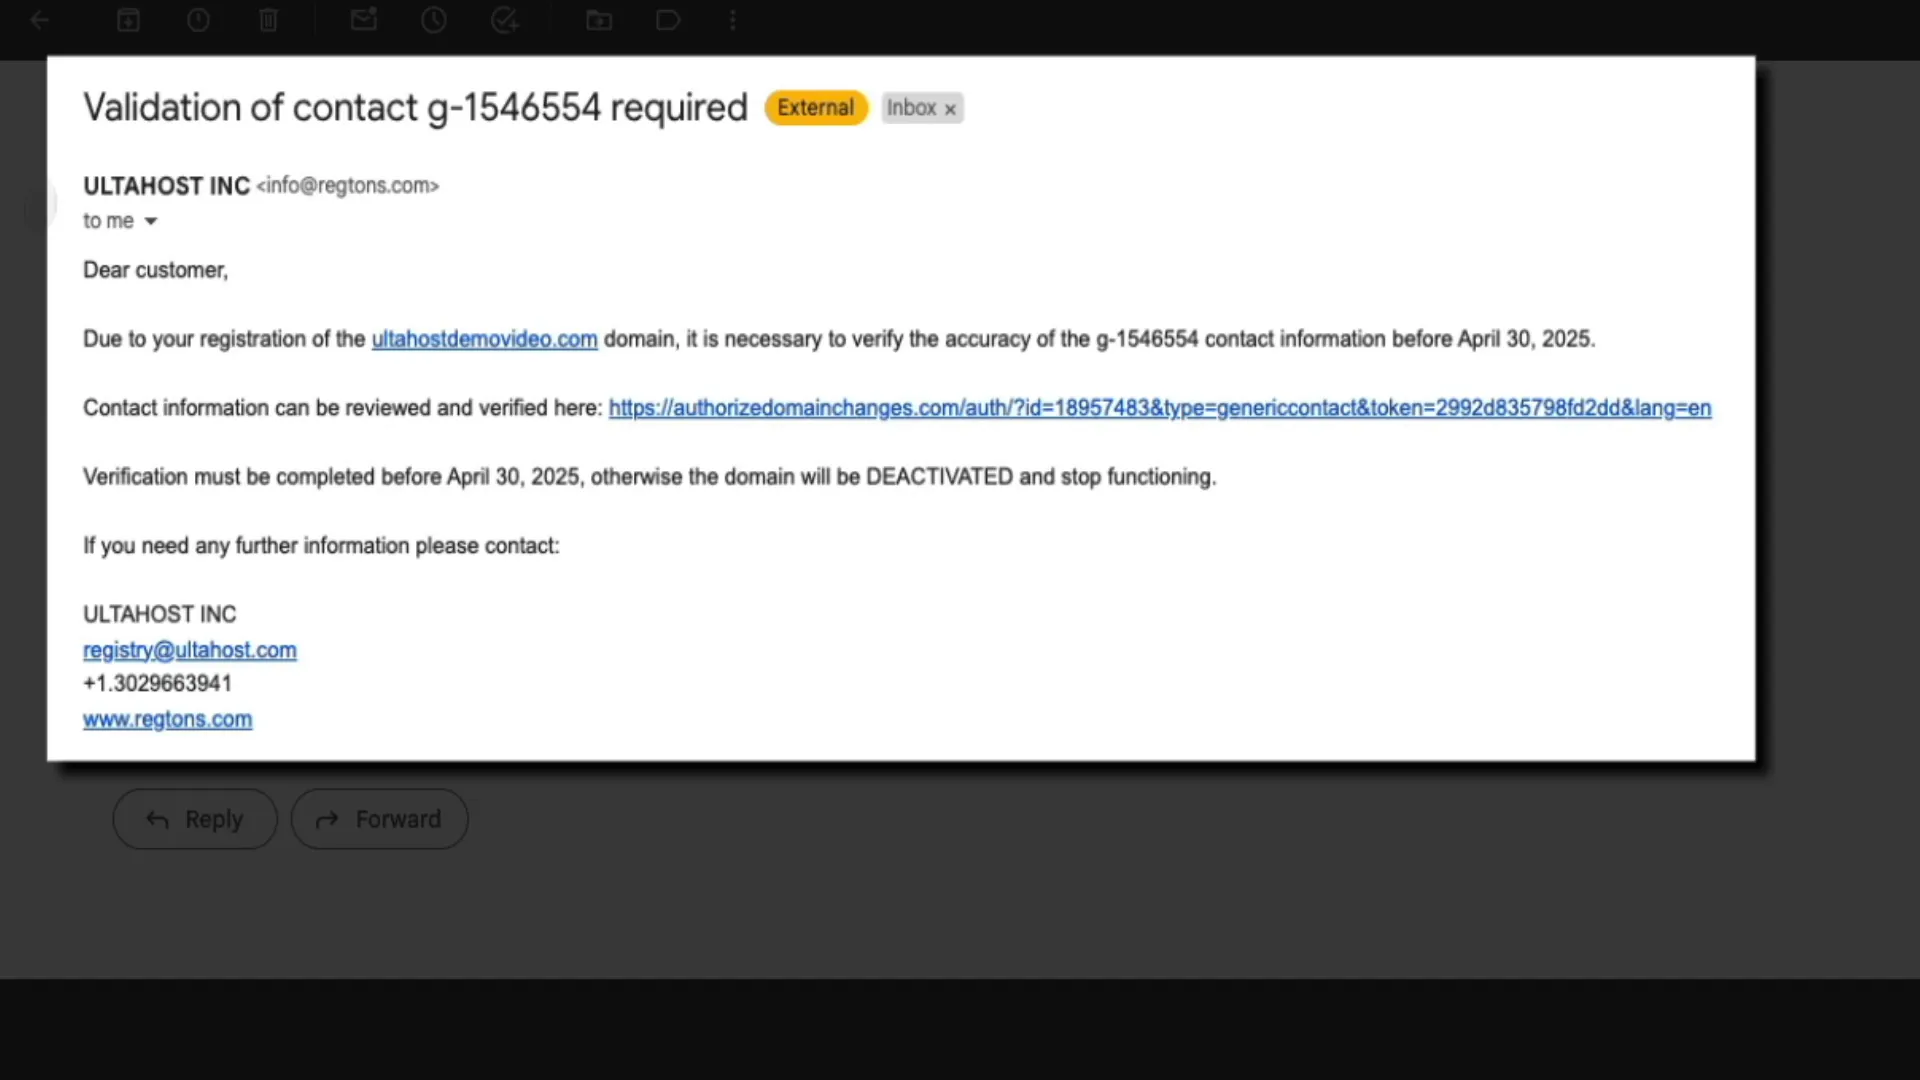
Within about 15 minutes of purchasing your domain, you’ll receive an email from UltaHost or their domain registrar partner titled something like “Validation of Contact Required.” This email is sent to the address you registered with and contains a link to verify your domain registration details.
Check your inbox, spam, junk, or promotions folders if you don’t see it immediately. Click the verification link, review your contact information, confirm accuracy, and authorize contact. This step is critical—if you skip domain verification, your domain will be deactivated and stop working.
Activating Your SSL Certificate
SSL (Secure Socket Layer) certificates encrypt data between your website and visitors, enabling HTTPS and boosting security, professionalism, and SEO rankings.
To activate the free SSL certificate that comes with your UltaHost WordPress hosting:
- Go back to your UltaHost dashboard.
- Under your active services, click “Manage” next to your hosting plan.
- Scroll down to find and click the “cPanel” icon to open the control panel.
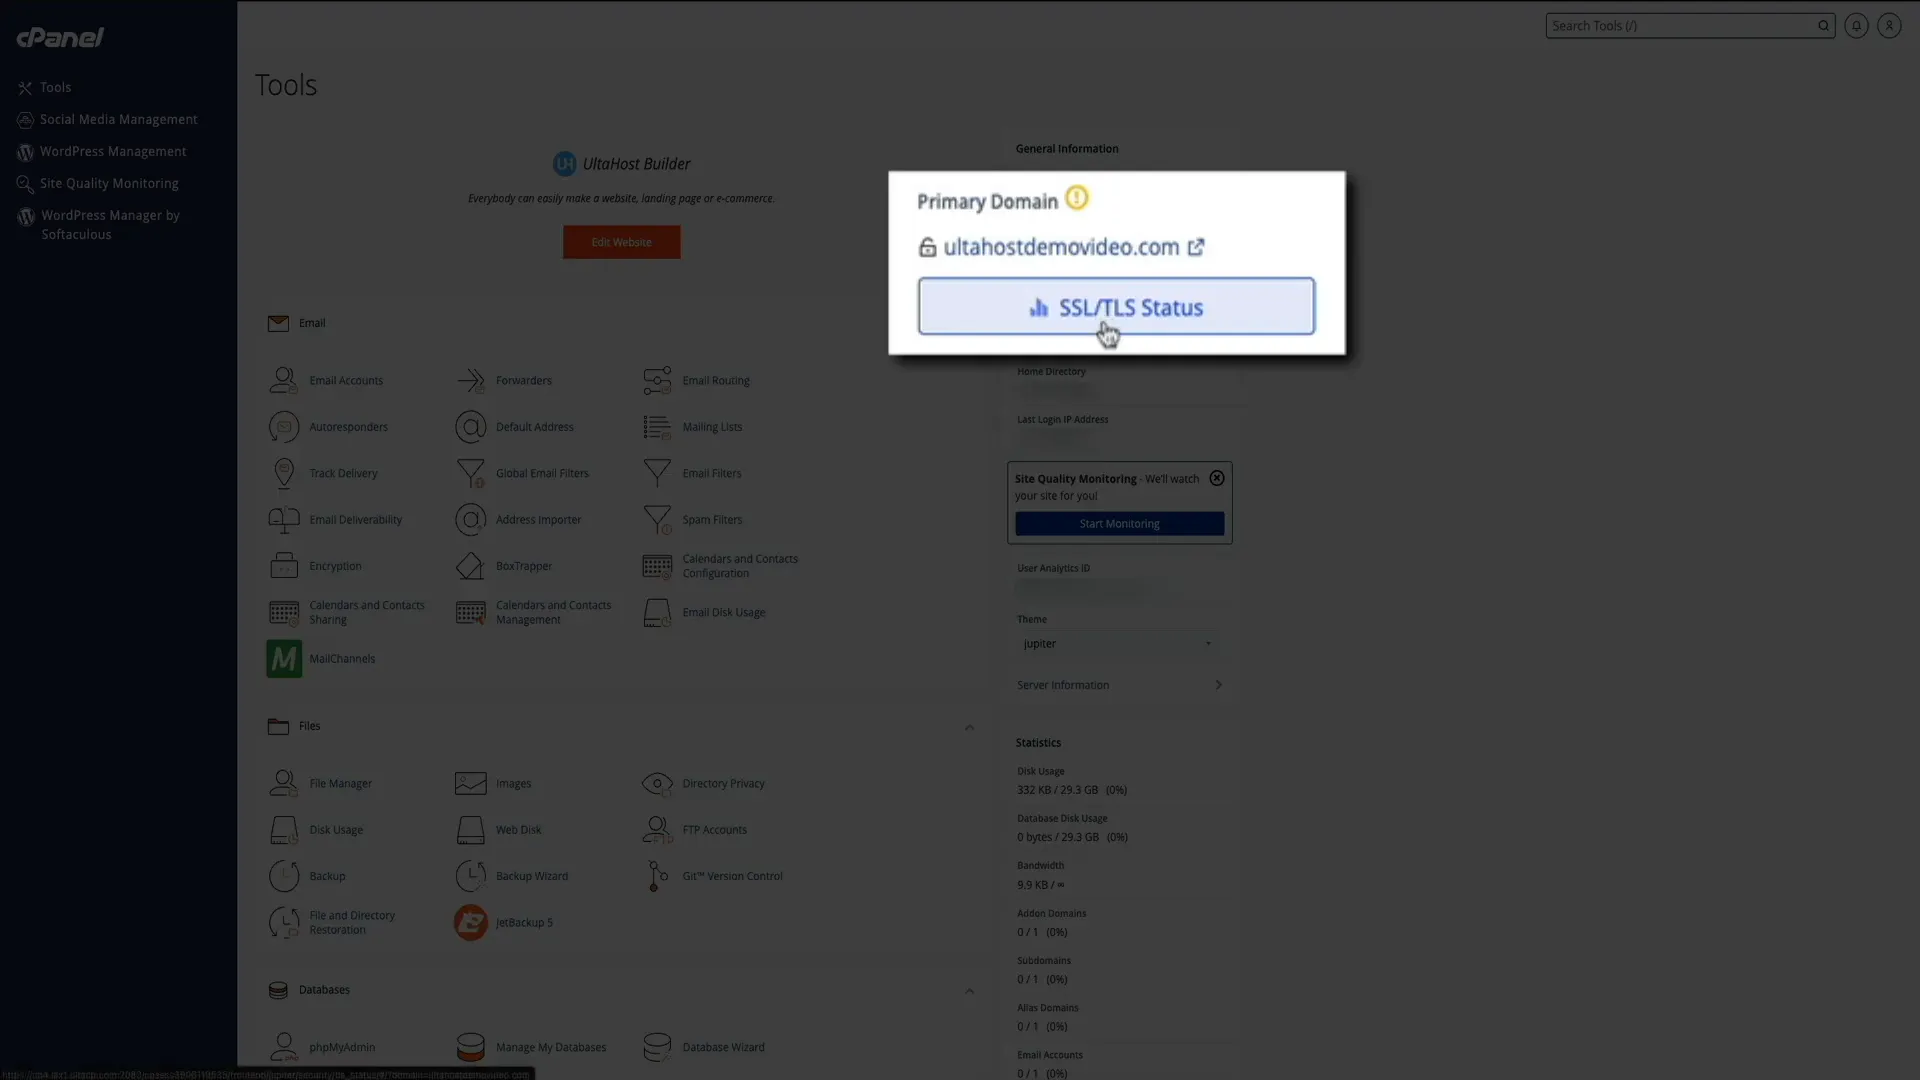
- In cPanel, locate and click “SSL/TLS Status” near your primary domain.
- Select your primary domain and all related entries by checking the top box.
- Click “Run AutoSSL” to initiate the certificate installation.
- Wait a few moments for the process to complete. The red padlock icons will turn green, indicating HTTPS is active.
And just like that, your site is secured, building trust with visitors and search engines alike.
Step 4: Install WordPress via cPanel
With hosting and SSL ready, it’s time to install WordPress, the platform powering millions of blogs worldwide. UltaHost makes this easy with Softaculous, an automated installer in cPanel.
Follow these steps:
- In your UltaHost dashboard, under your hosting service, click “Manage.”
- Click the “cPanel” icon to open the control panel.
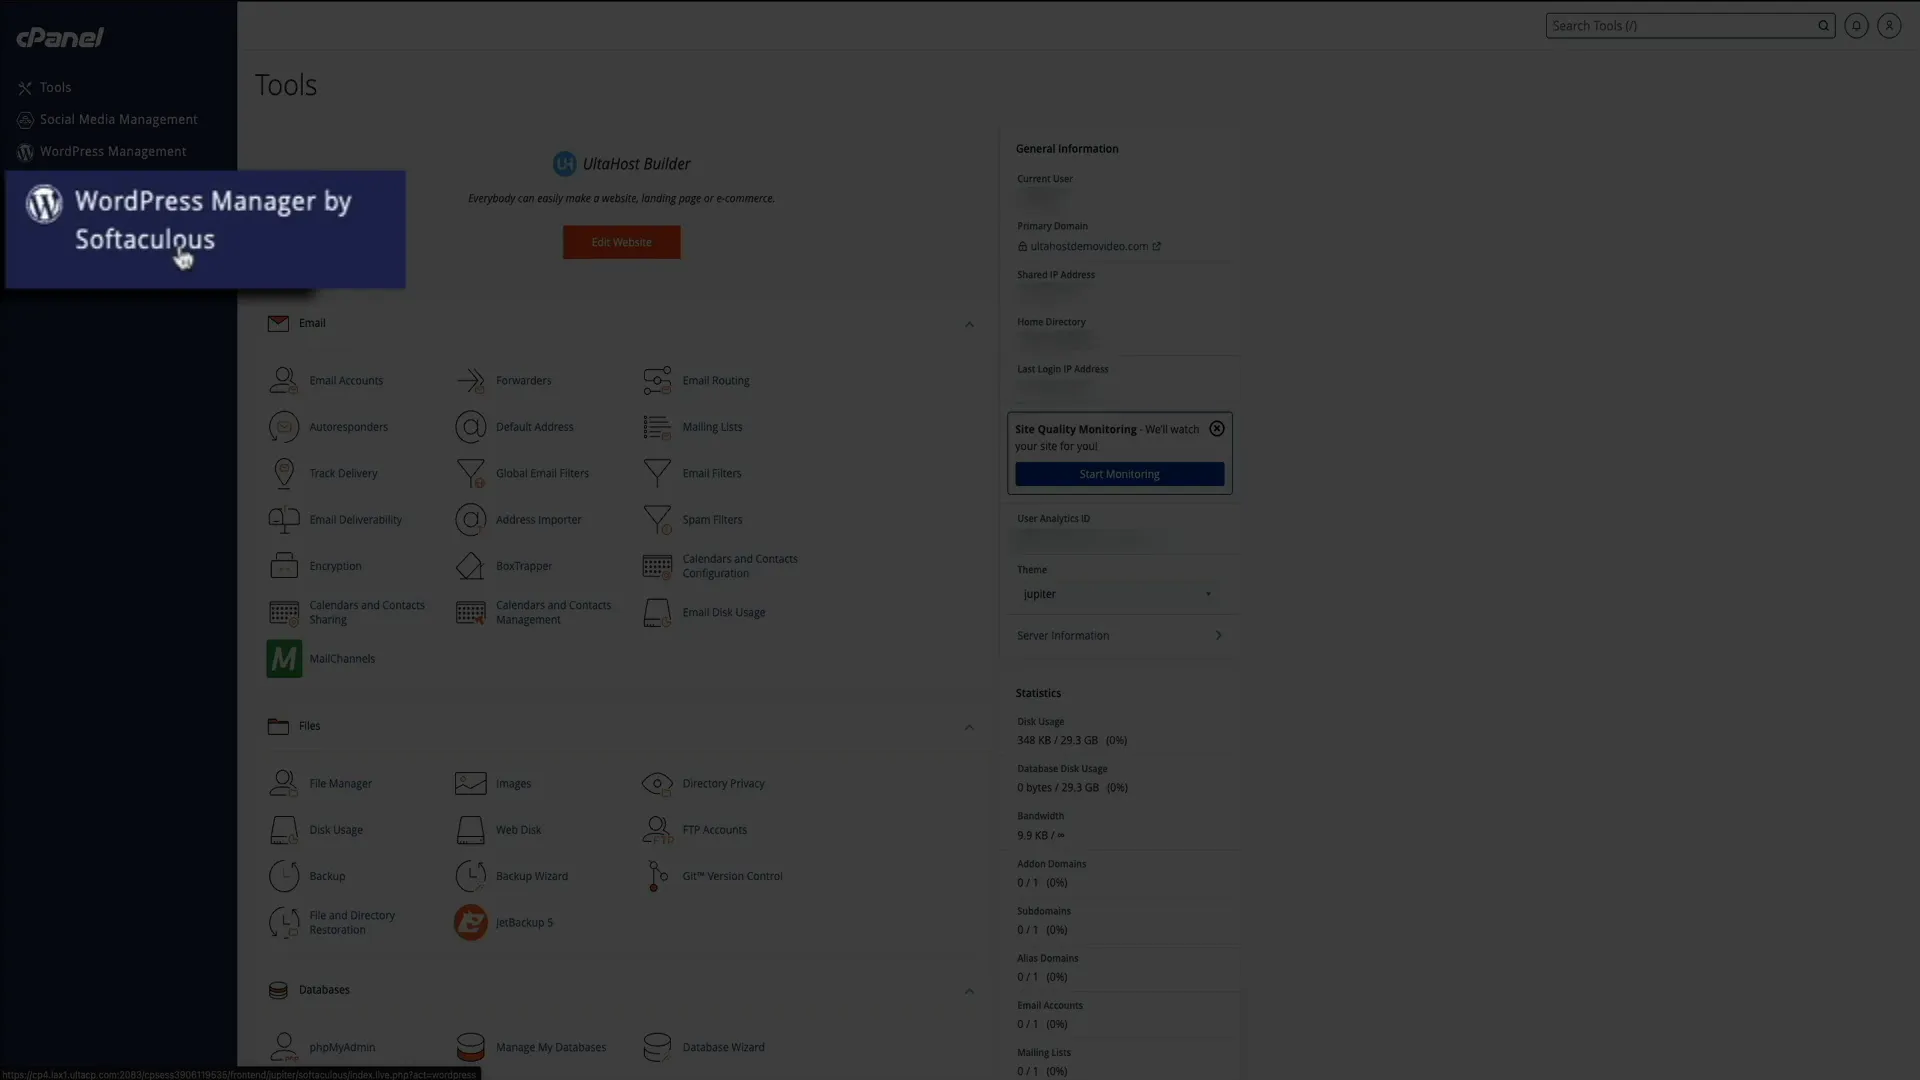
- In cPanel’s left sidebar, find and click “WordPress Manager by Softaculous.”
- Click the blue “Install” button to begin setup.
Configure the installation:
- Protocol: Set to HTTPS for secure connections.
- Domain: Select your registered domain.
- In Directory: Leave blank to install WordPress directly on your main domain (not in a subfolder).
- Version: Choose the latest stable WordPress version to get the newest features and security updates.
- Site Settings: You can enter a site name and description or leave placeholders to edit later.
- Enable Multi-site (WPMU): Leave unchecked unless you want to manage multiple WordPress sites under one dashboard.
- Disable WordPress Cron: Leave unchecked for now; it’s an advanced setting for performance optimization.
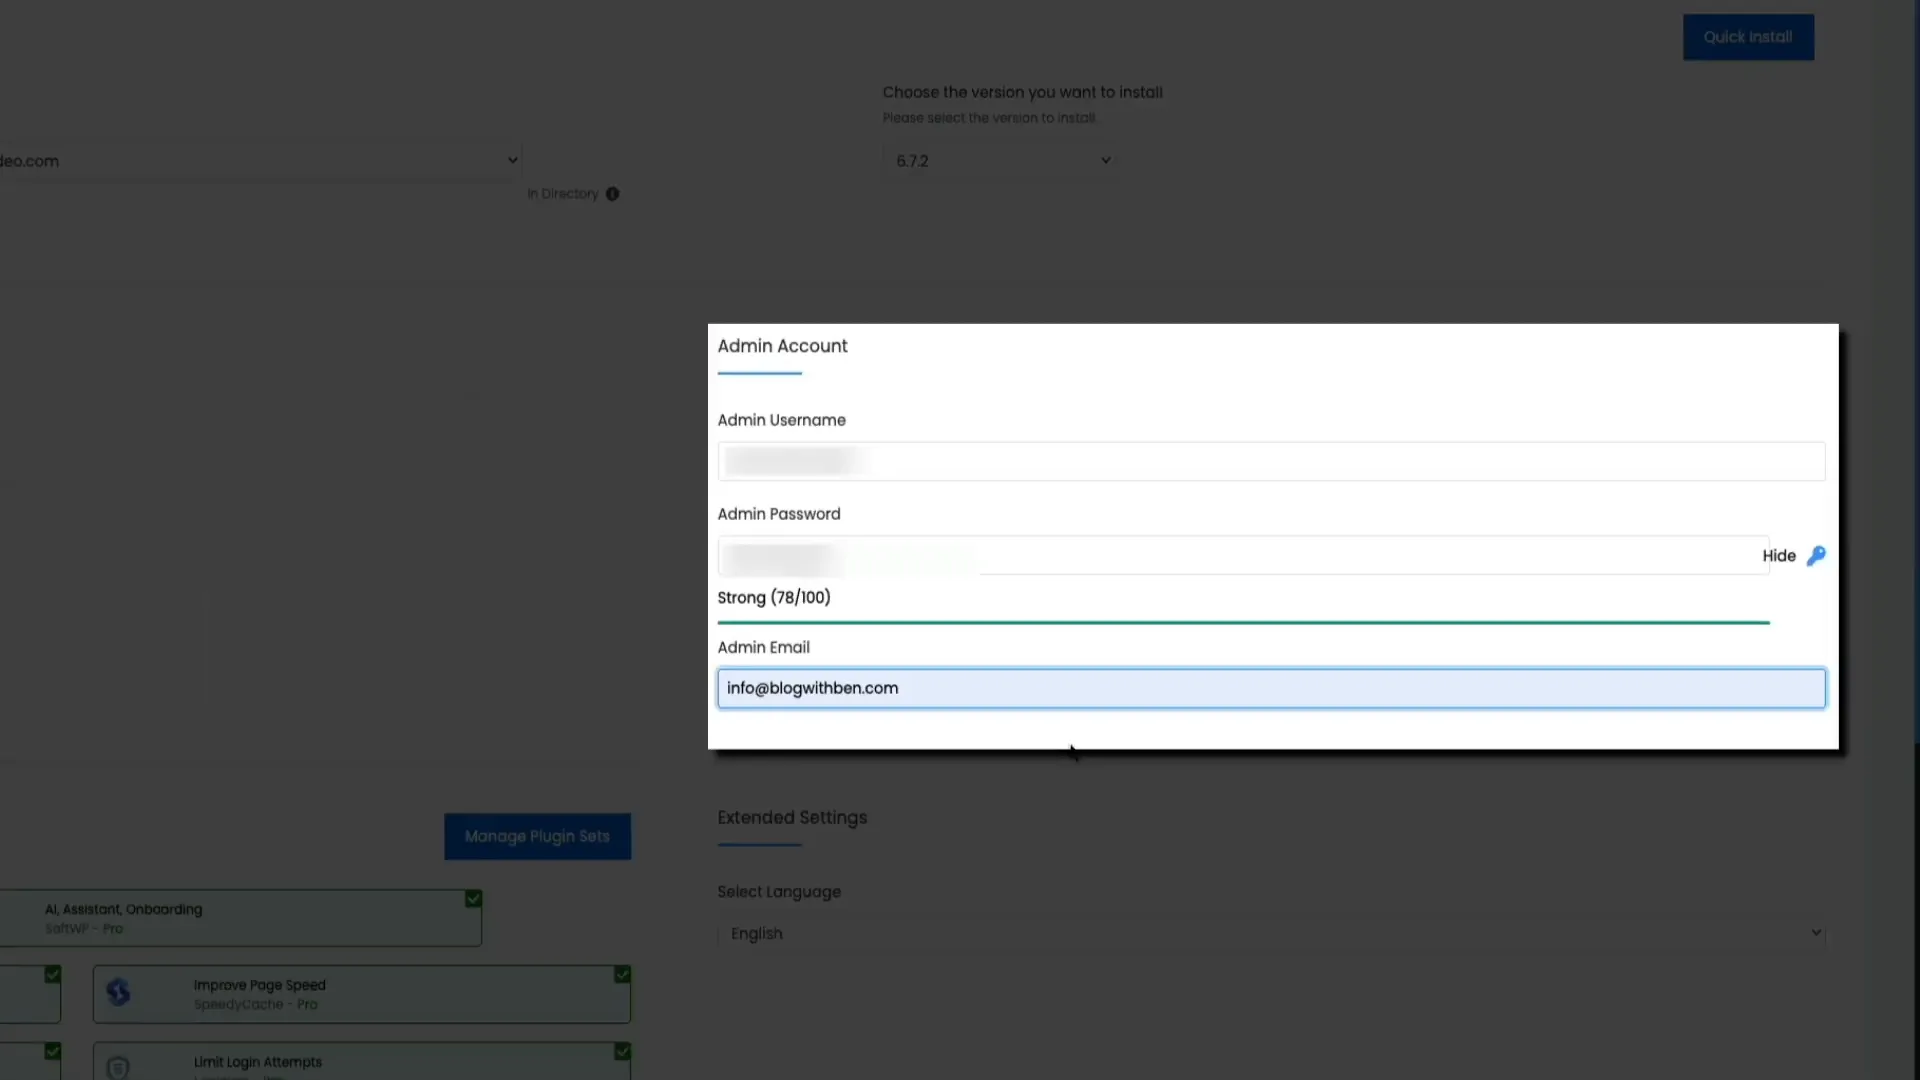
Next, create your WordPress admin account:
- Choose a strong username and password.
- Enter an email address you regularly check for password resets and notifications.
UltaHost pre-selects some pro plugins to enhance speed, backups, and SEO. You don’t need to add more plugins during installation—you can always install them later.
Choose your preferred language for the WordPress dashboard (English is default).
Finally, enter your email to receive WordPress login details and click “Install.”
Softaculous will handle the installation within seconds to a few minutes. Avoid refreshing or closing the tab during this process.
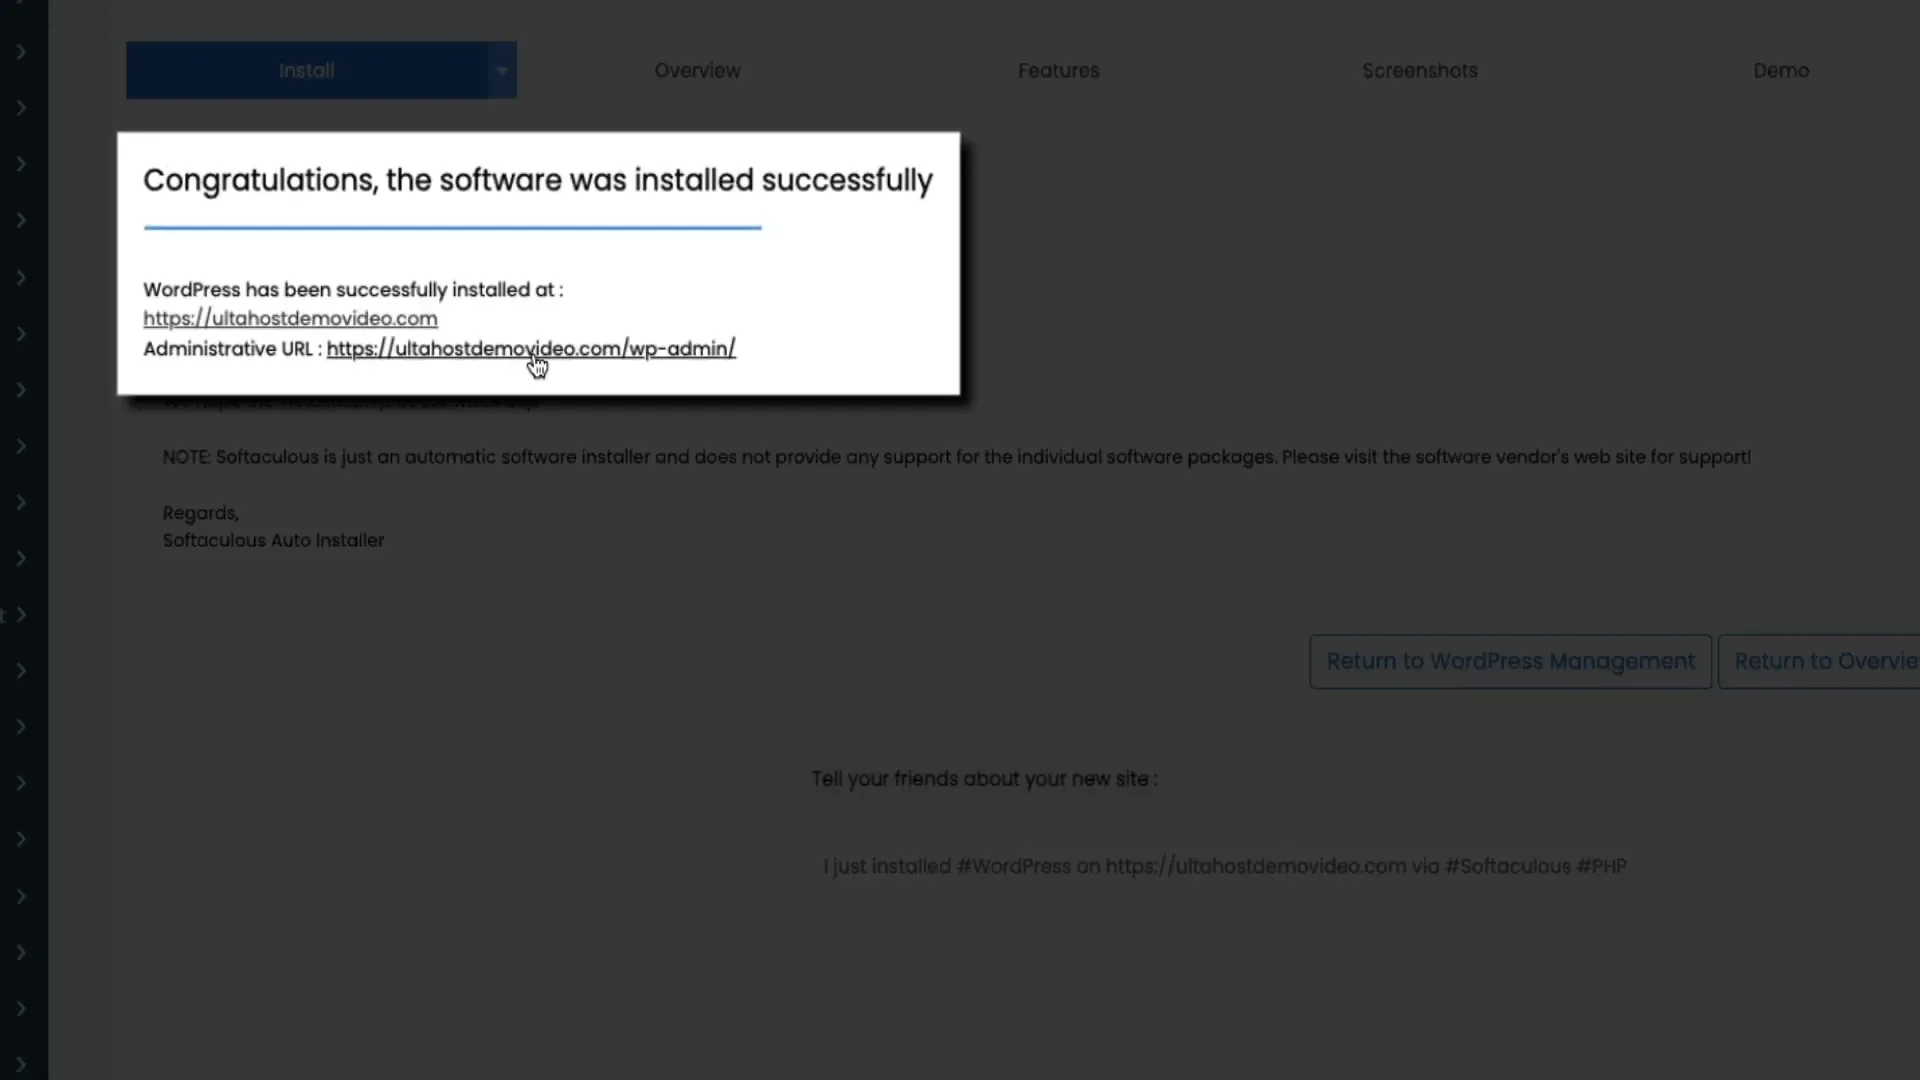
After successful installation, you’ll see links to your website and WordPress admin login page. The admin URL usually ends with /wp-admin, where you’ll manage your blog.
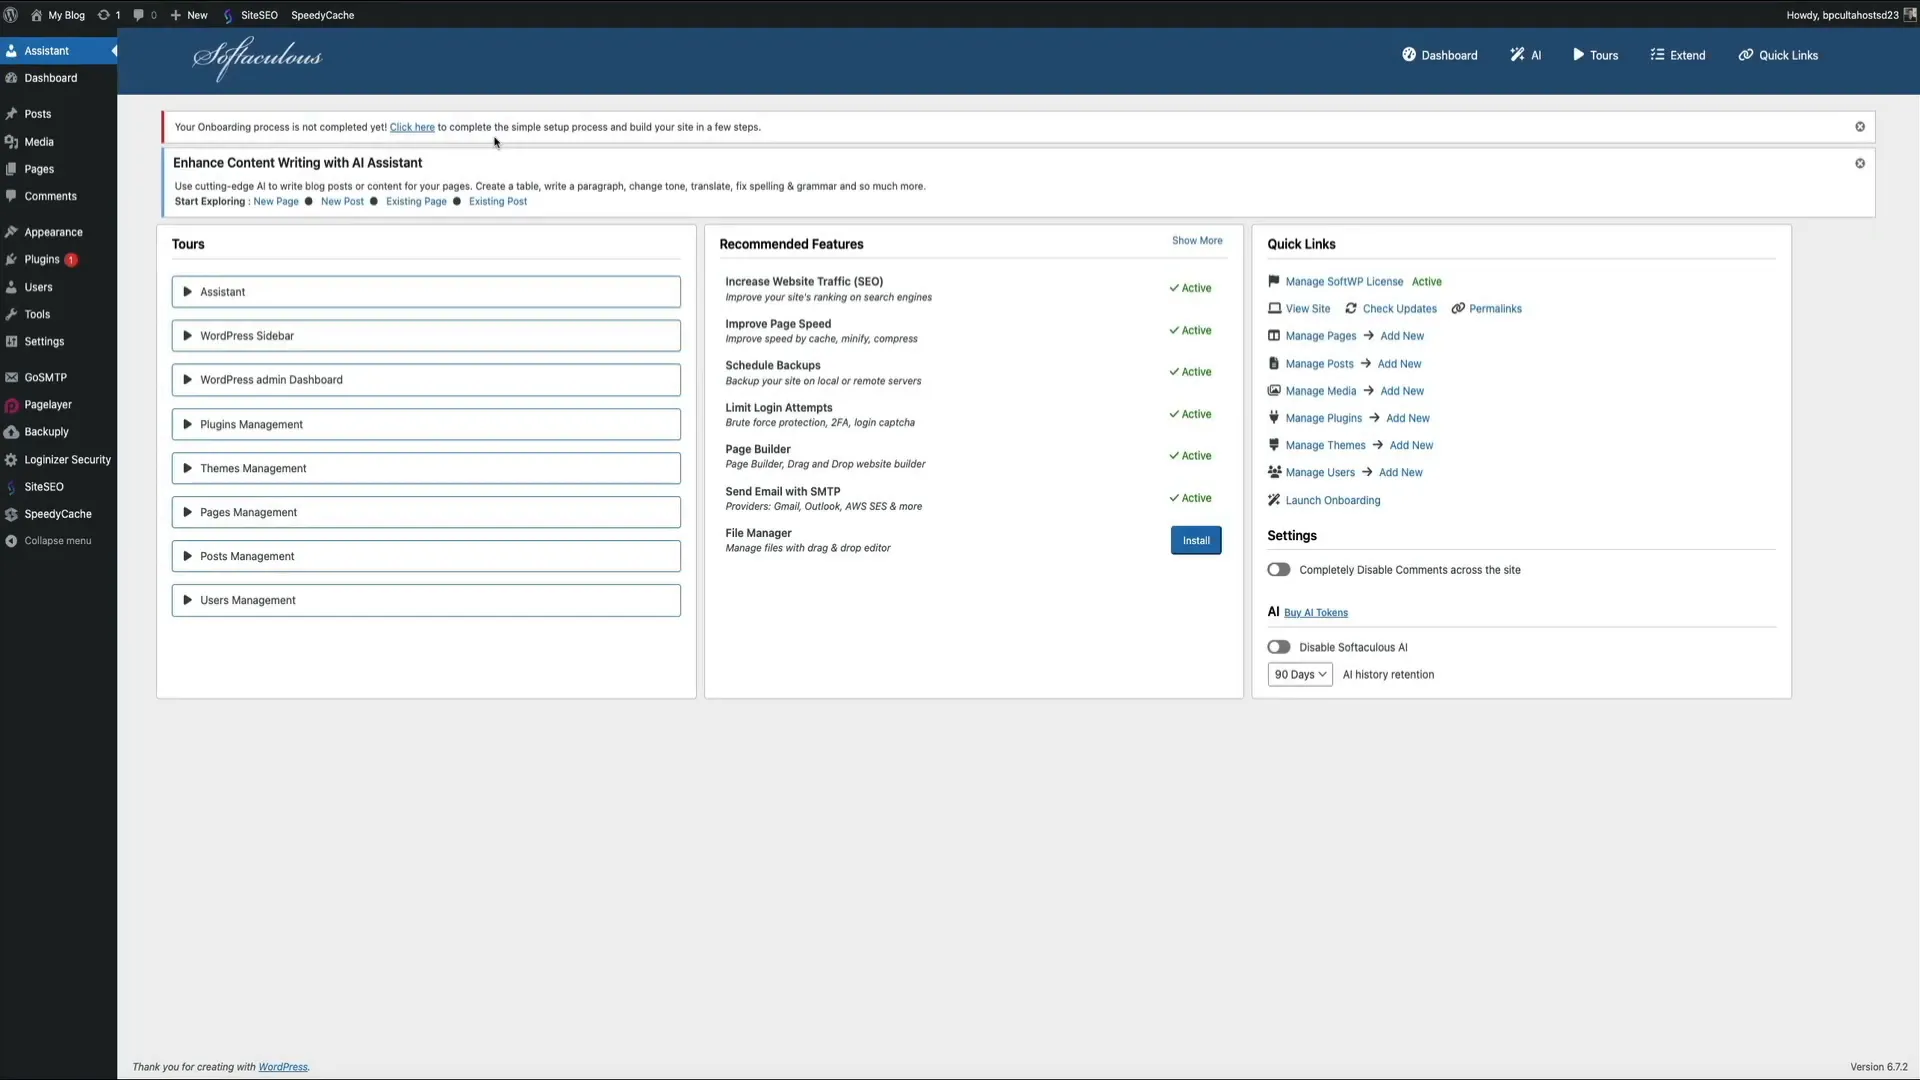
Clicking the admin URL opens a Softaculous onboarding assistant, but for full control, skip it and go straight to the WordPress dashboard.
Step 5: Tour Your WordPress Dashboard
Welcome to your WordPress dashboard—the command center for your blog. Here’s a quick overview of what you’ll find:
- Admin Menu (left sidebar): Manage posts, pages, comments, themes, plugins, users, and settings.
- Admin Toolbar (top bar): Quick shortcuts for visiting your site, creating content, moderating comments, and accessing plugin settings.
- Site Preview: The toolbar remains visible when viewing your live site while logged in, letting you jump between front-end and back-end easily.
To preview your live site, hover over your site title in the upper left corner and click “Visit Site.” By default, WordPress installs a theme like “Twenty Twenty-Five” which you can customize later.
Step 6: Install and Customize Your WordPress Theme
The look and feel of your blog depend largely on the theme you choose. WordPress offers thousands of free and premium themes to fit any style or niche.
To install a new theme:
- From your WordPress dashboard, hover over “Appearance” and click “Themes.”
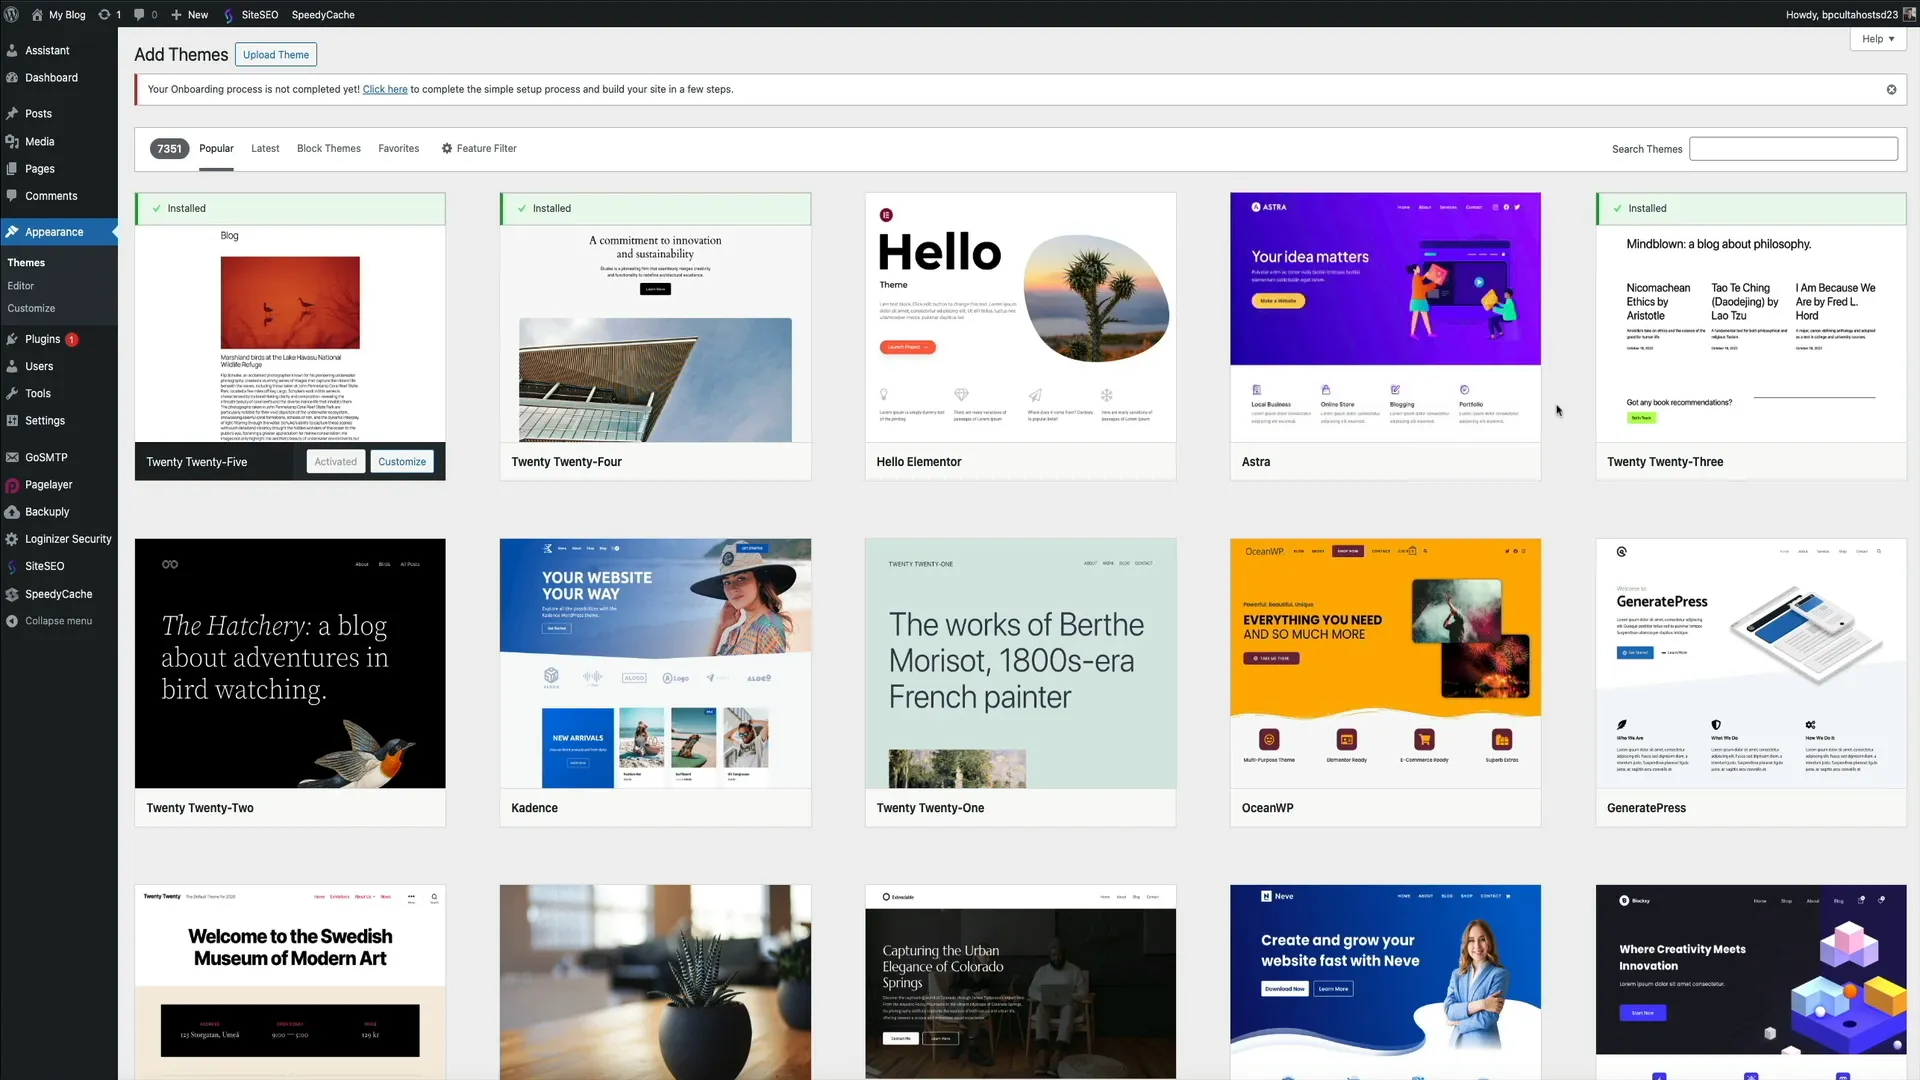
- Click the “Add New” button to browse the WordPress theme directory.
- Use filters or search keywords to find themes that suit your blog’s vibe. For example, searching “Kale” brings up a popular food blog theme.
- Hover over a theme to preview it or click “Install” and then “Activate” to apply it to your site.
Note: The customization options vary by theme. The steps I demonstrate here use the default WordPress theme, so your experience may differ if you use a different theme.
Using the Full Site Editor to Customize Your Theme
WordPress’s Full Site Editor lets you visually customize your blog without coding:
- Hover over your site title in the top left and click “Visit Site.”
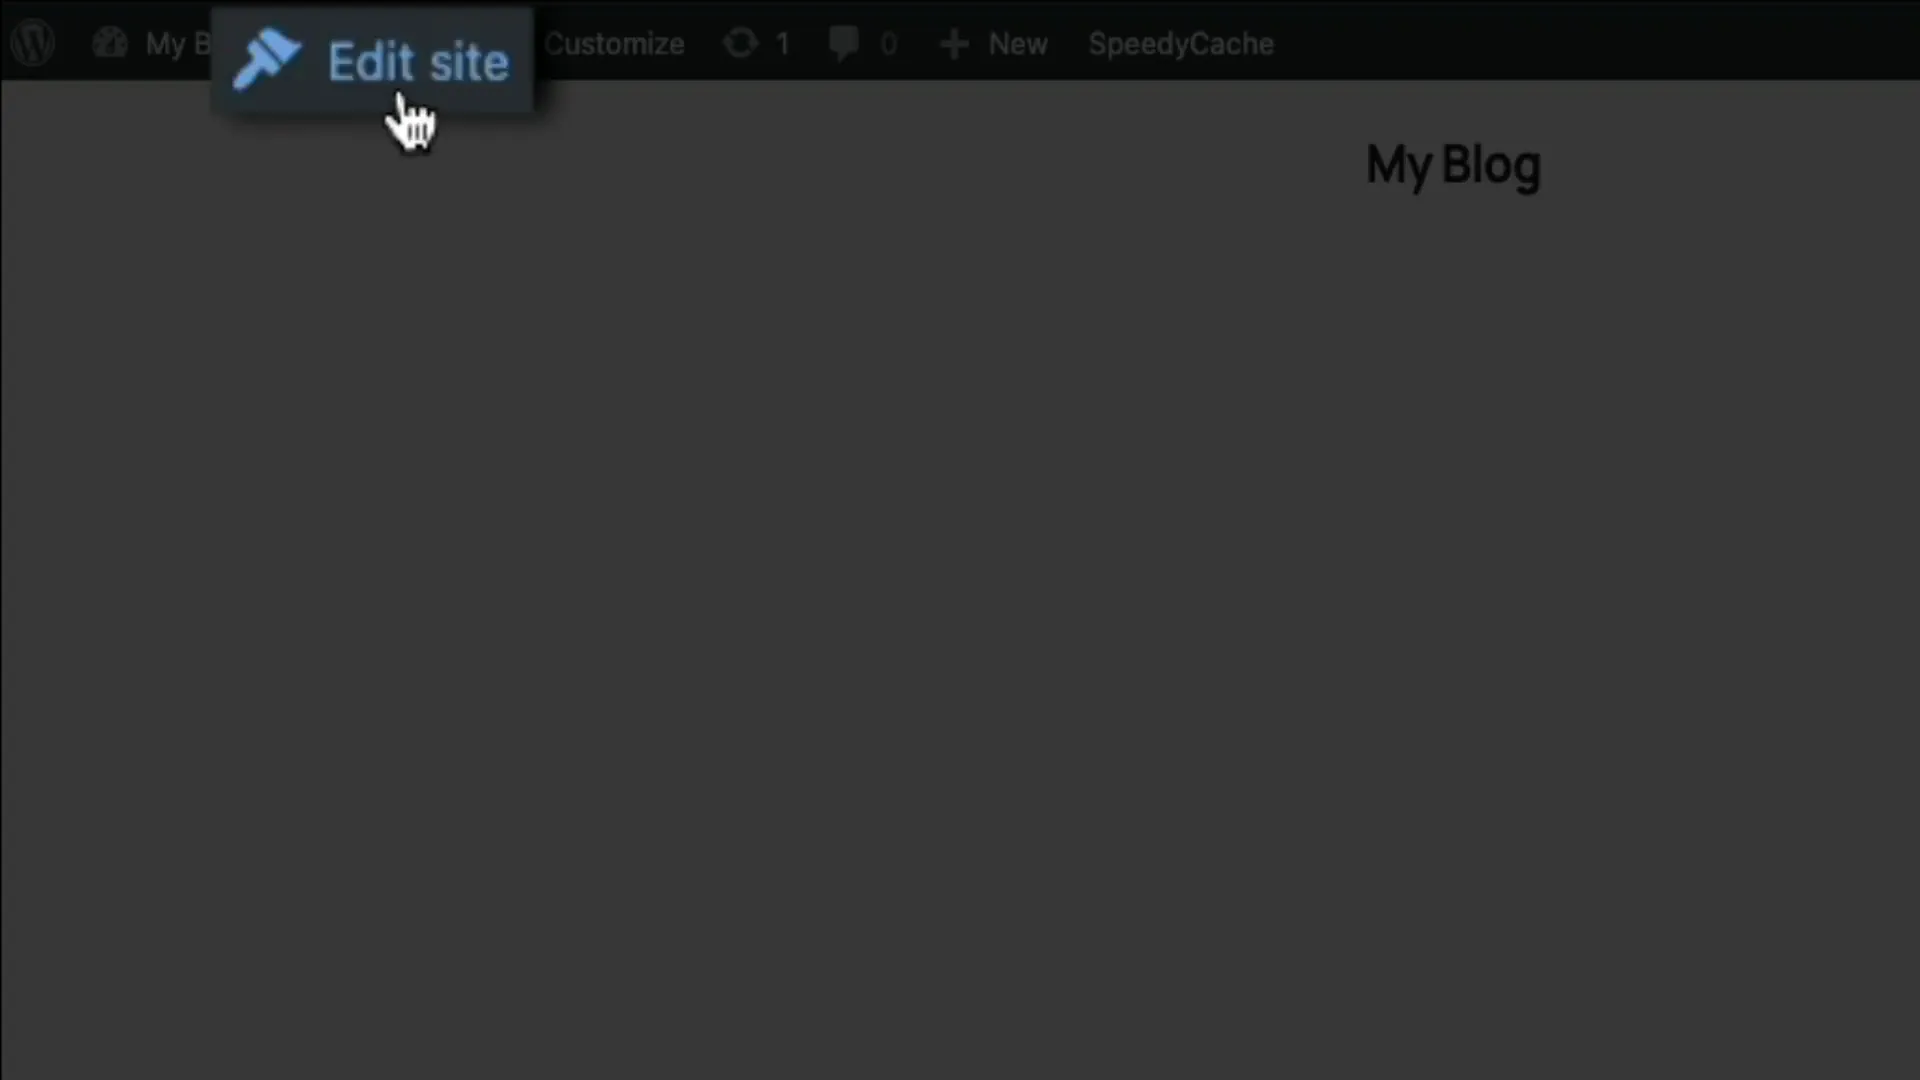
- Click “Edit Site” in the toolbar at the top to open the Full Site Editor.
With the block-based editor, every element—headers, menus, footers—is a block you can move, style, and customize. For example:
- Click the site title and rename it to something unique like “AI with Ben.”
- Edit the blog heading to personalize it (e.g., from “Blog” to “The Blog”).
- Customize navigation menus by adding or removing page links.
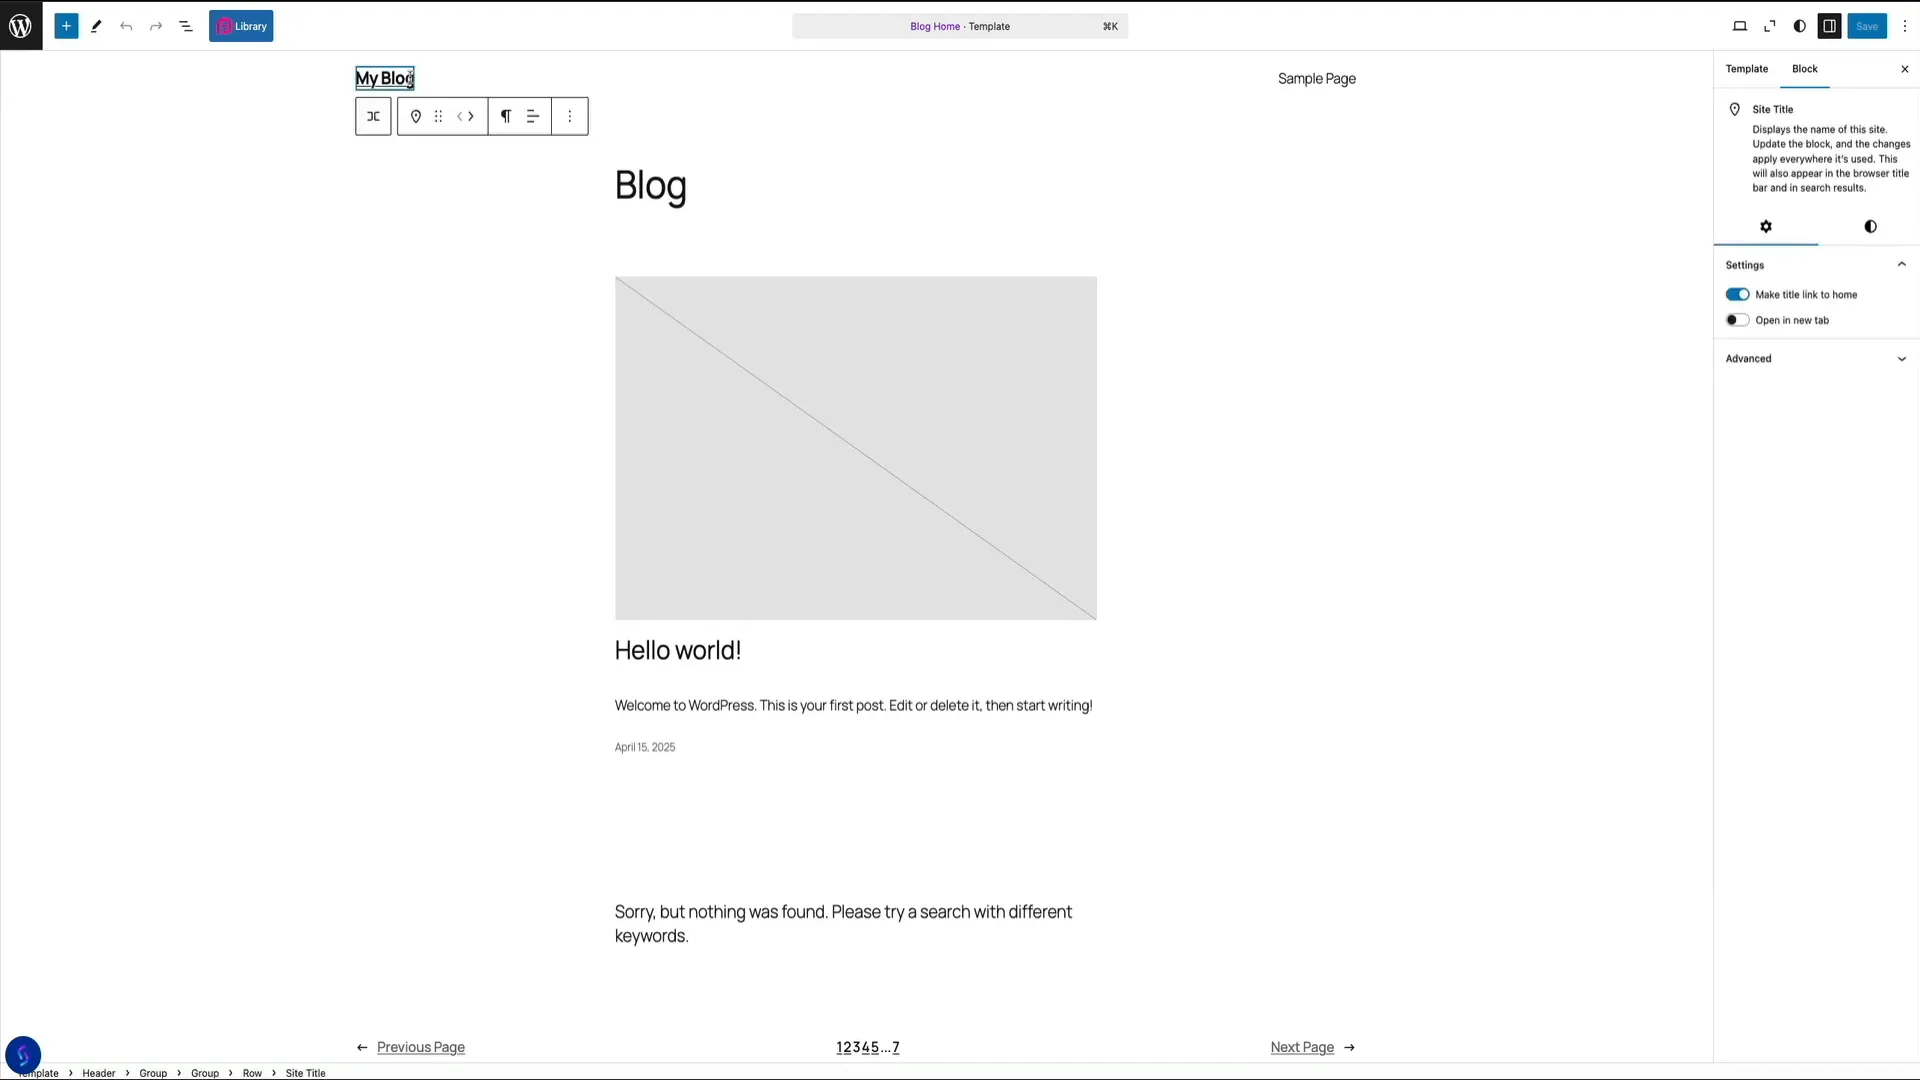
Keep in mind, some parts of your blog, like the post titles and featured images in the blog feed, are dynamic and pulled from individual posts. To edit these, you’ll update the actual blog posts rather than the template.
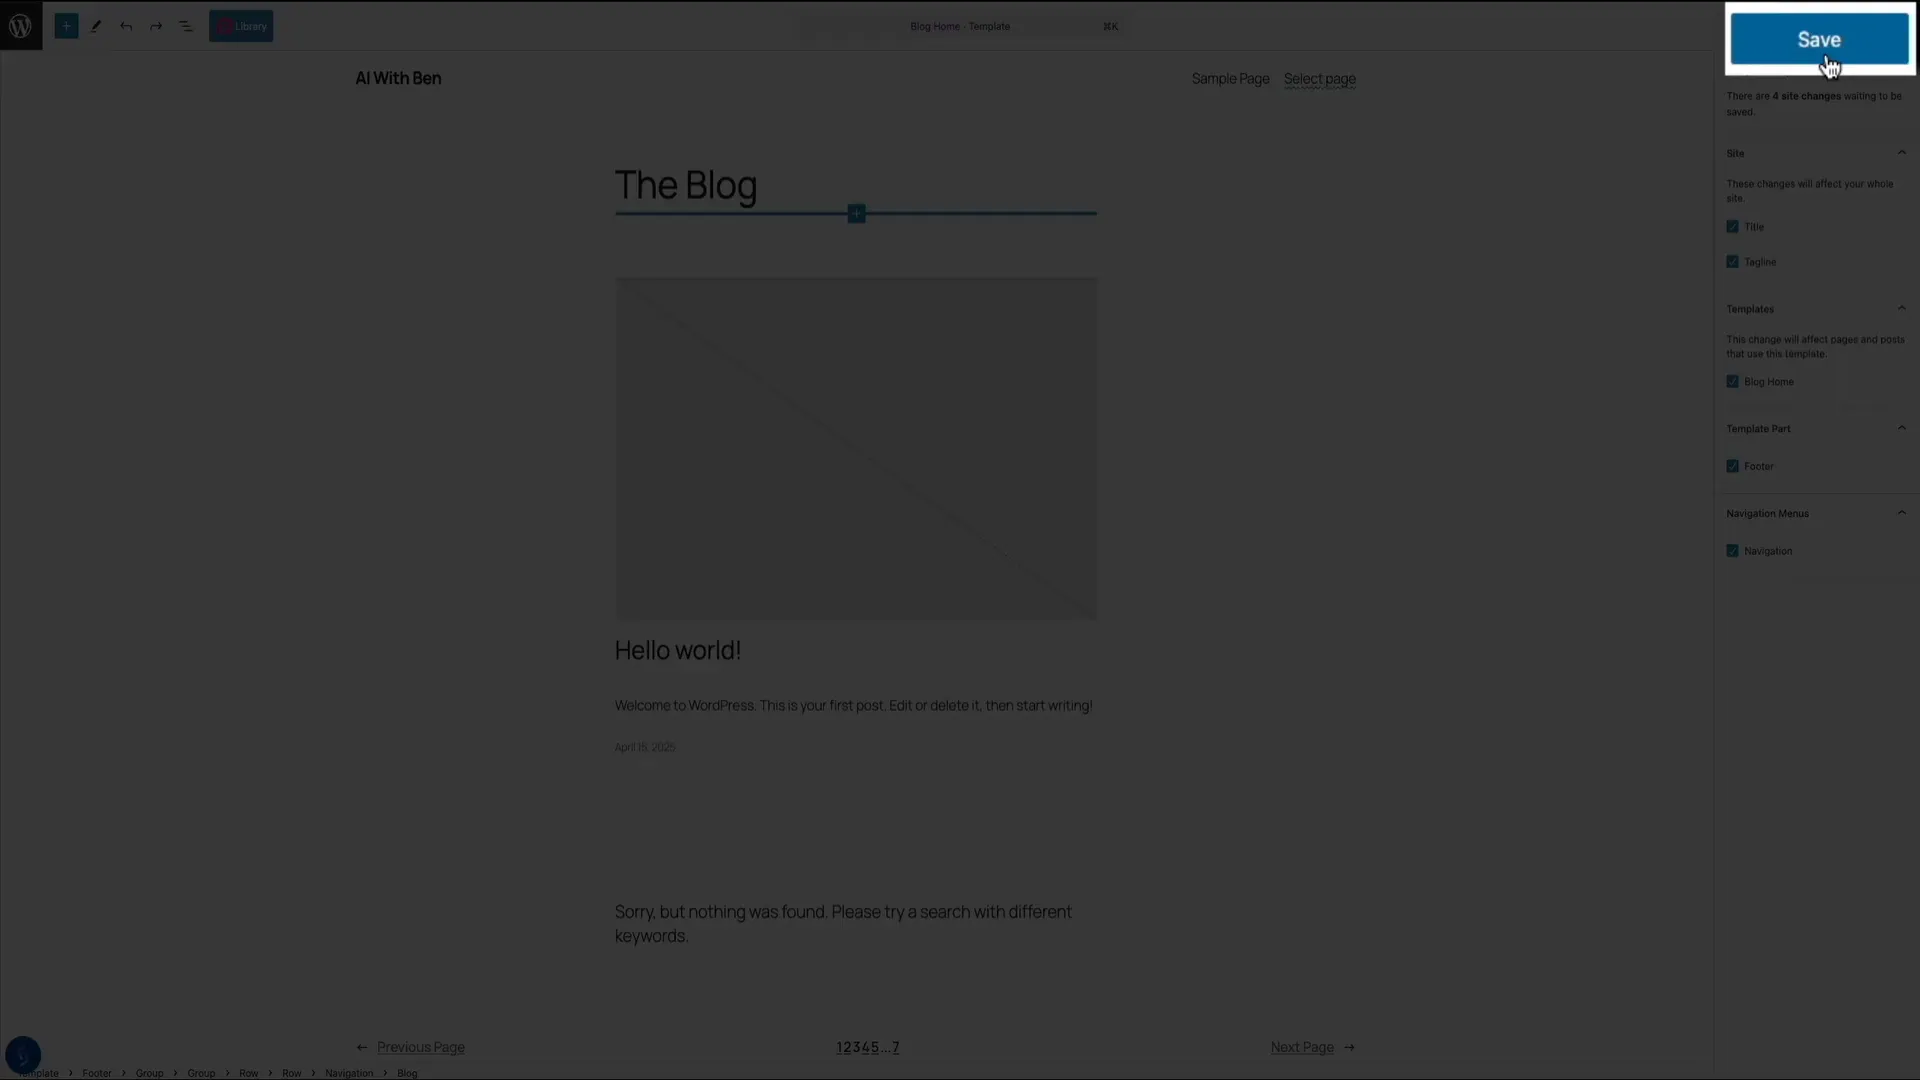
Once your edits are complete, don’t forget to save your changes in the upper right corner. Your updates will immediately reflect on your live site.
Step 7: Install and Manage WordPress Plugins
Plugins extend your blog’s functionality, adding everything from SEO tools and contact forms to security and caching. UltaHost includes several pro plugins at no extra cost, but you can always add more.
To manage plugins:
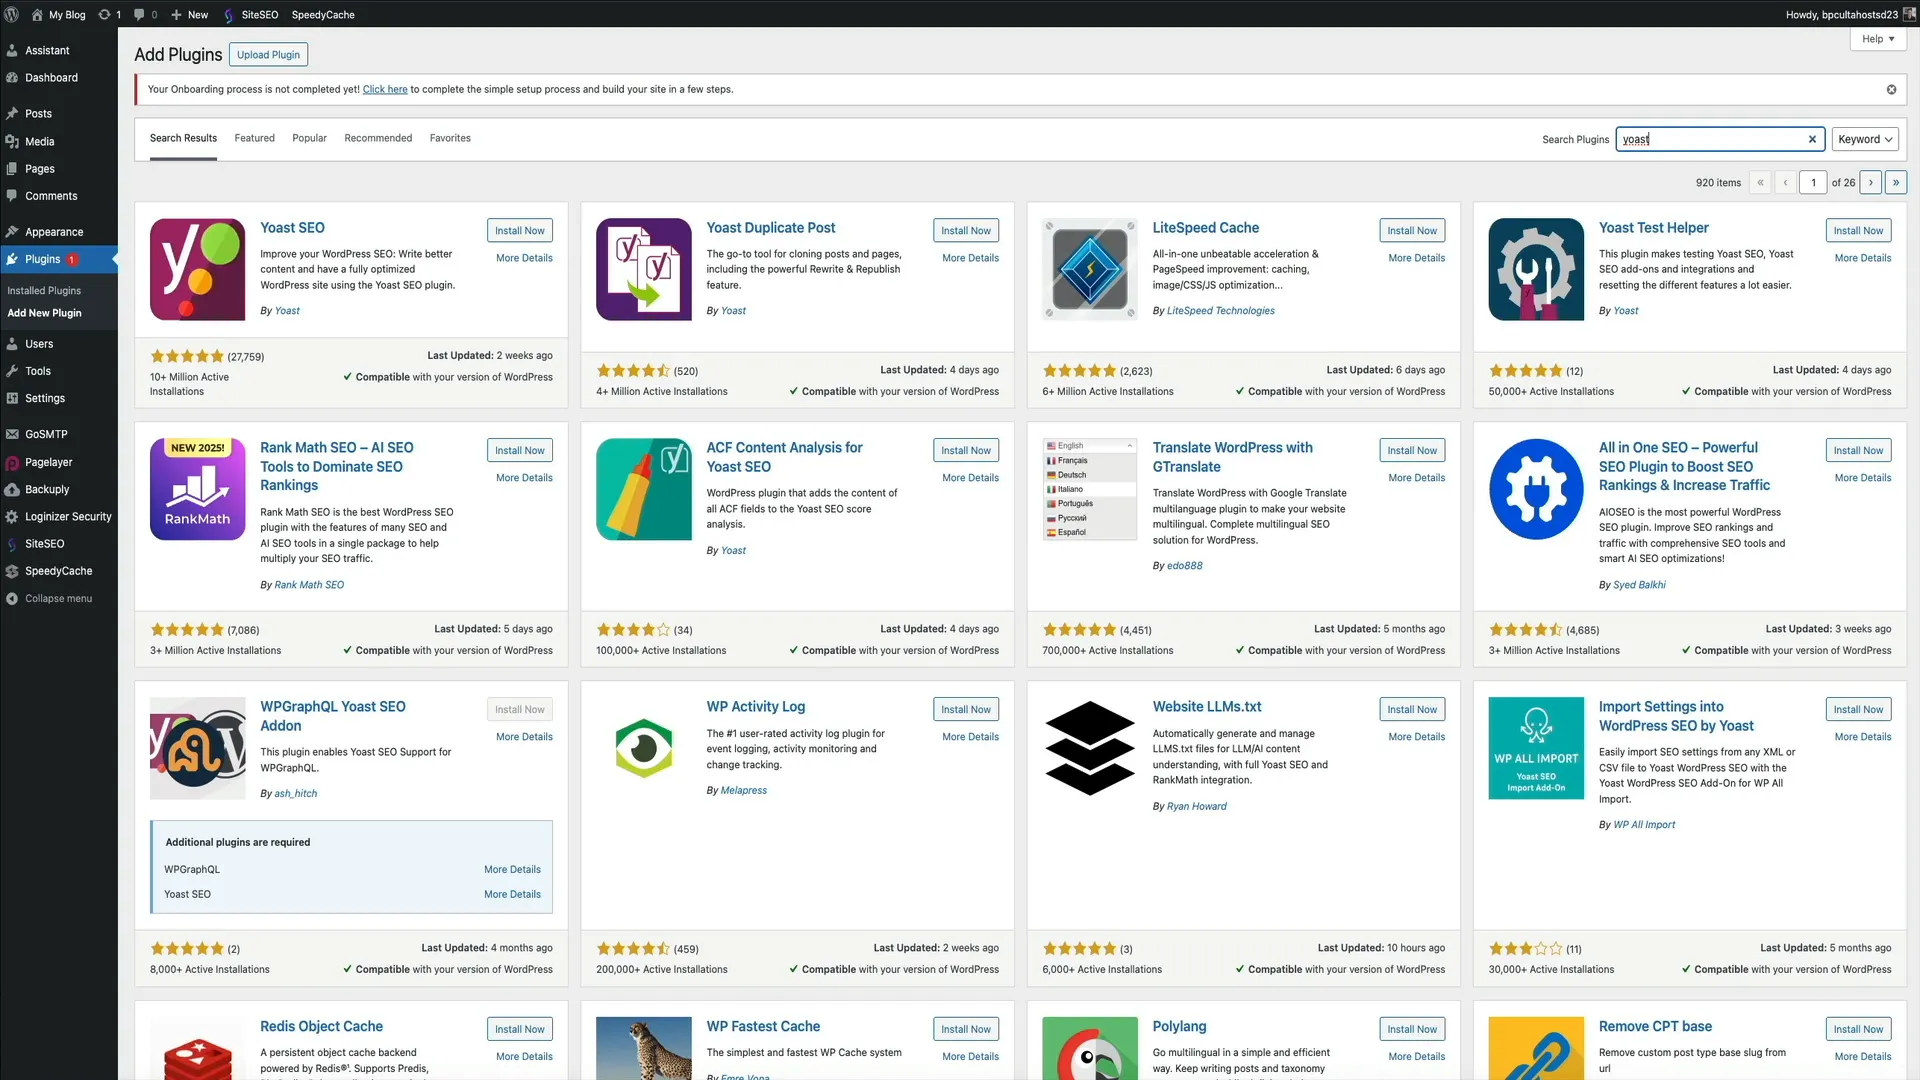
- Hover over “Plugins” in the dashboard sidebar and click “Installed Plugins” to see what’s active.
- To add new plugins, click “Add New” either from the top of the plugins page or the sidebar menu.
- Use the search bar to find plugins by name or keyword. For example, “Yoast” is a popular SEO plugin.
- Click “Install Now” and then “Activate” to enable the plugin on your site.
Plugin Tips:
- Be intentional about which plugins you activate to avoid slowing down your site or causing conflicts.
- Test new plugins thoroughly to ensure compatibility with your theme and other plugins.
Step 8: Publish Your First Blog Post
Now that your site is set up, it’s time for the exciting part—publishing your first blog post!
By default, WordPress includes a sample post titled “Hello World.” Let’s remove that and create a new post:
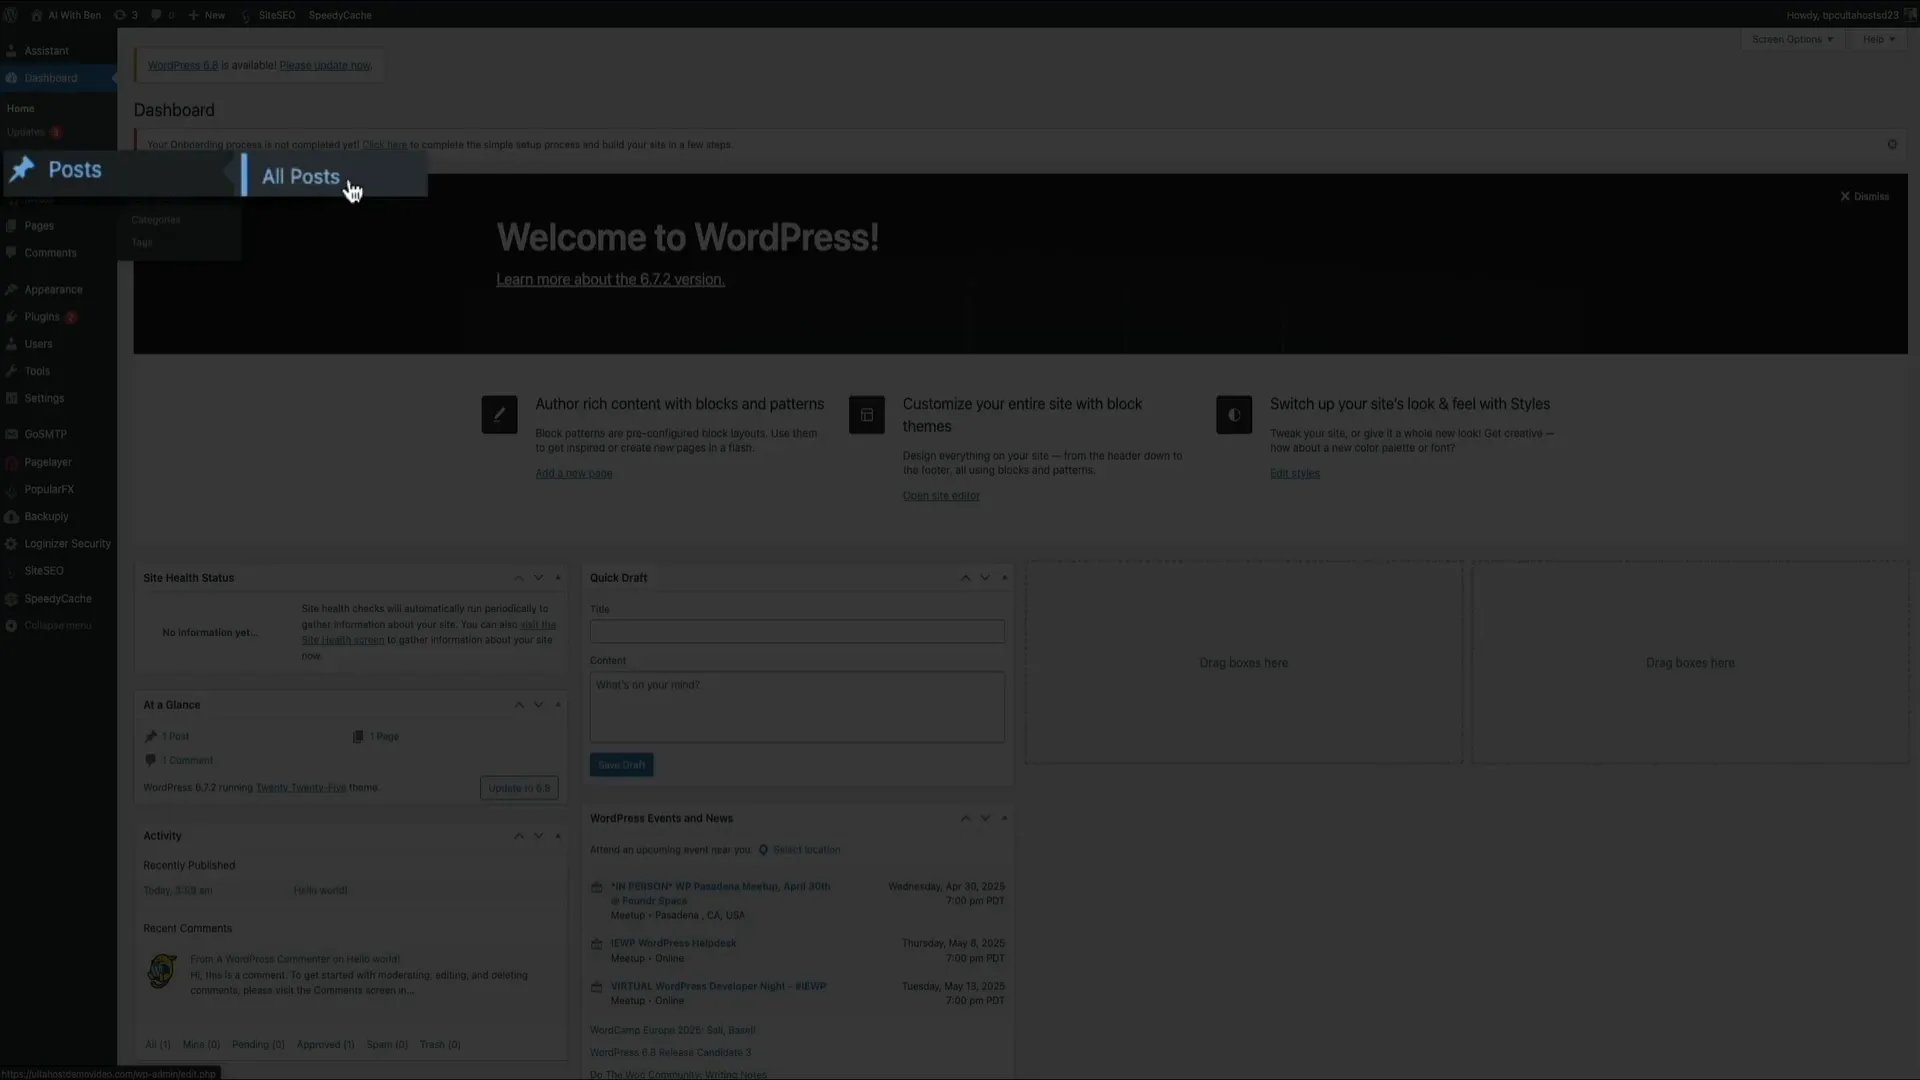
- Hover over your site title in the upper left corner and click “Dashboard” to return to the backend.
- Hover over “Posts” and click “All Posts.”
- Hover over the “Hello World” post and click “Trash” to delete it.
- Hover over “Posts” again and select “Add New” to open the block editor.
In the post editor:
- Enter a compelling blog post title. Keep it under 70 characters and include relevant keywords for SEO.
- Write your content in blocks. Press “Enter” to create new blocks for paragraphs, images, headings, and more.
- Explore the block library for various content types, but for simplicity, start with paragraph blocks.
Adding a Featured Image
A featured image is essential for visual appeal, branding, and social sharing. It appears on your blog homepage, social media, and search results.
To add a featured image:
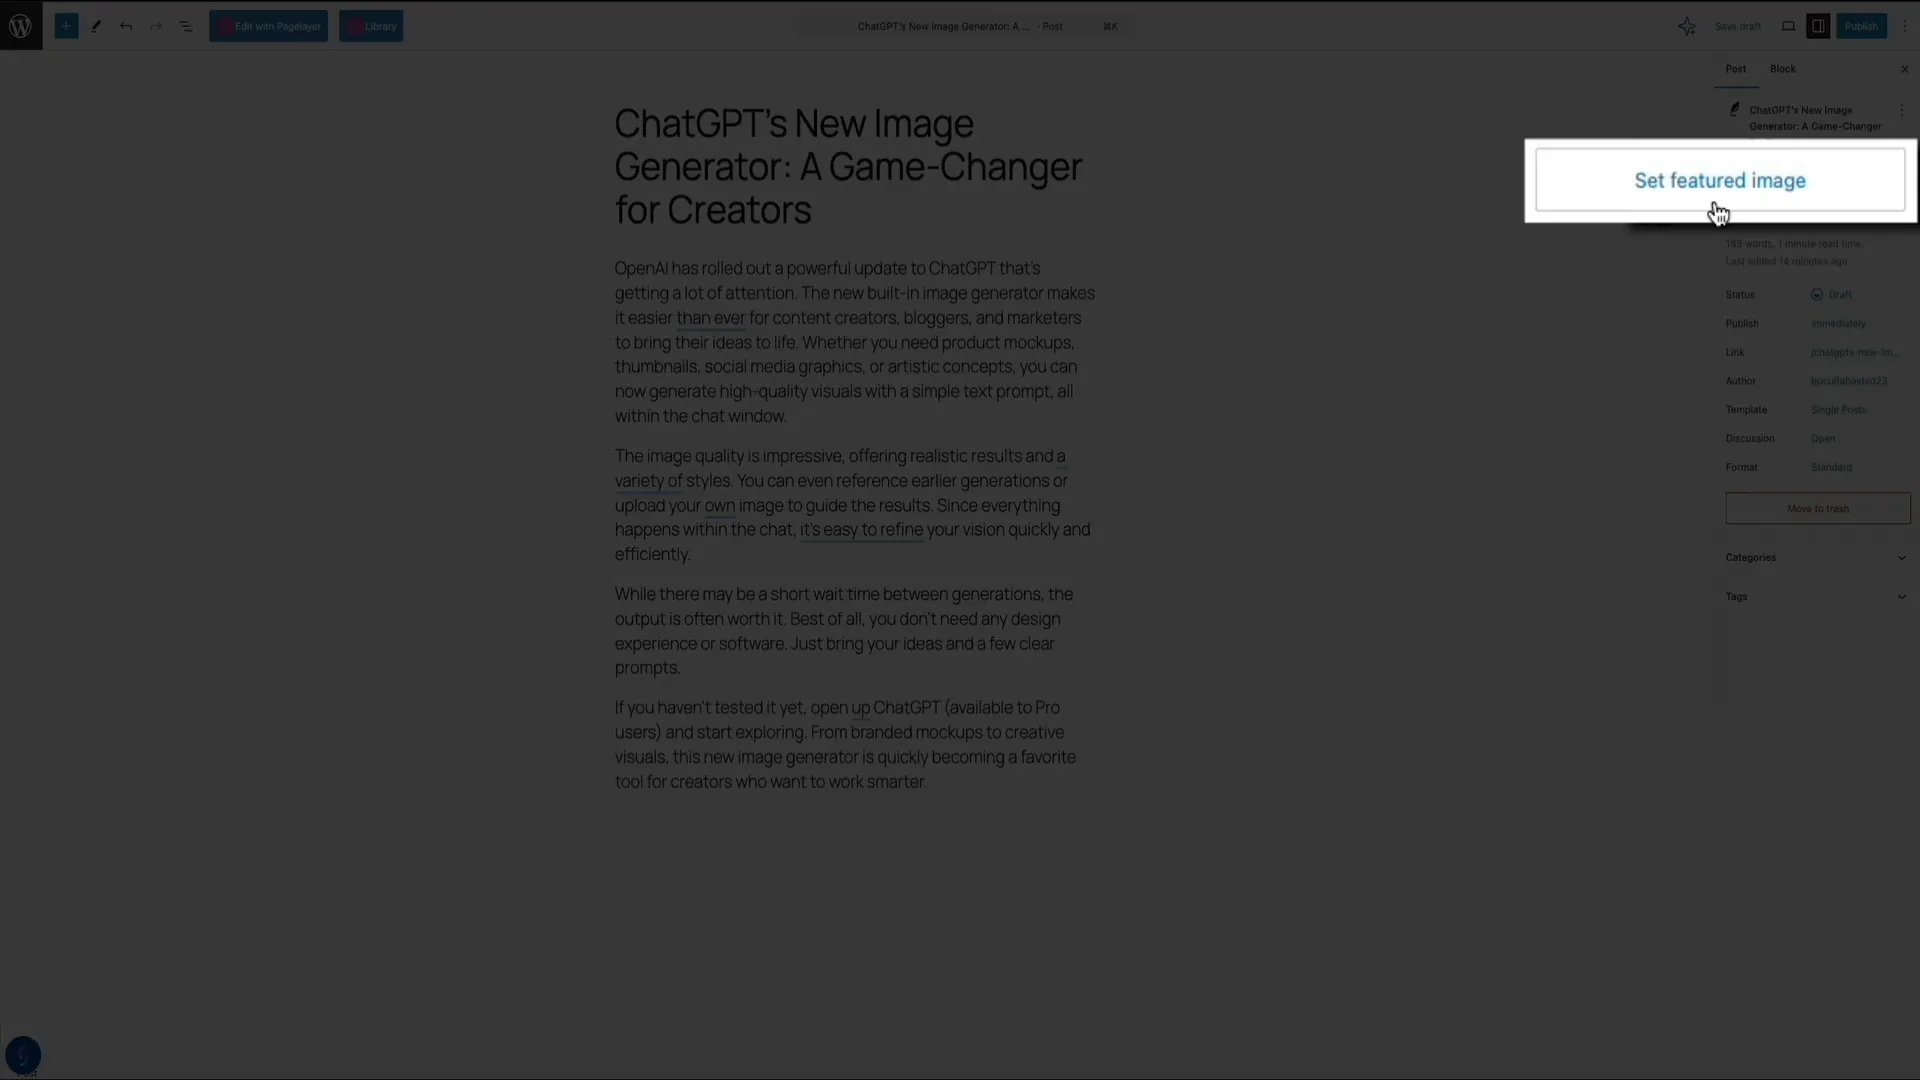
- In the post editor, open the post settings panel on the right.
- Click “Set Featured Image.”
- Choose an image from your media library or upload a new one (recommended size: 1200 x 628 pixels).
- Fill in the image title and alt text for accessibility and SEO.
- Click “Set Featured Image” to apply it.
Assigning Categories
Categories organize your blog content into main topics or sections, helping visitors and search engines navigate your site effectively.
To assign categories:
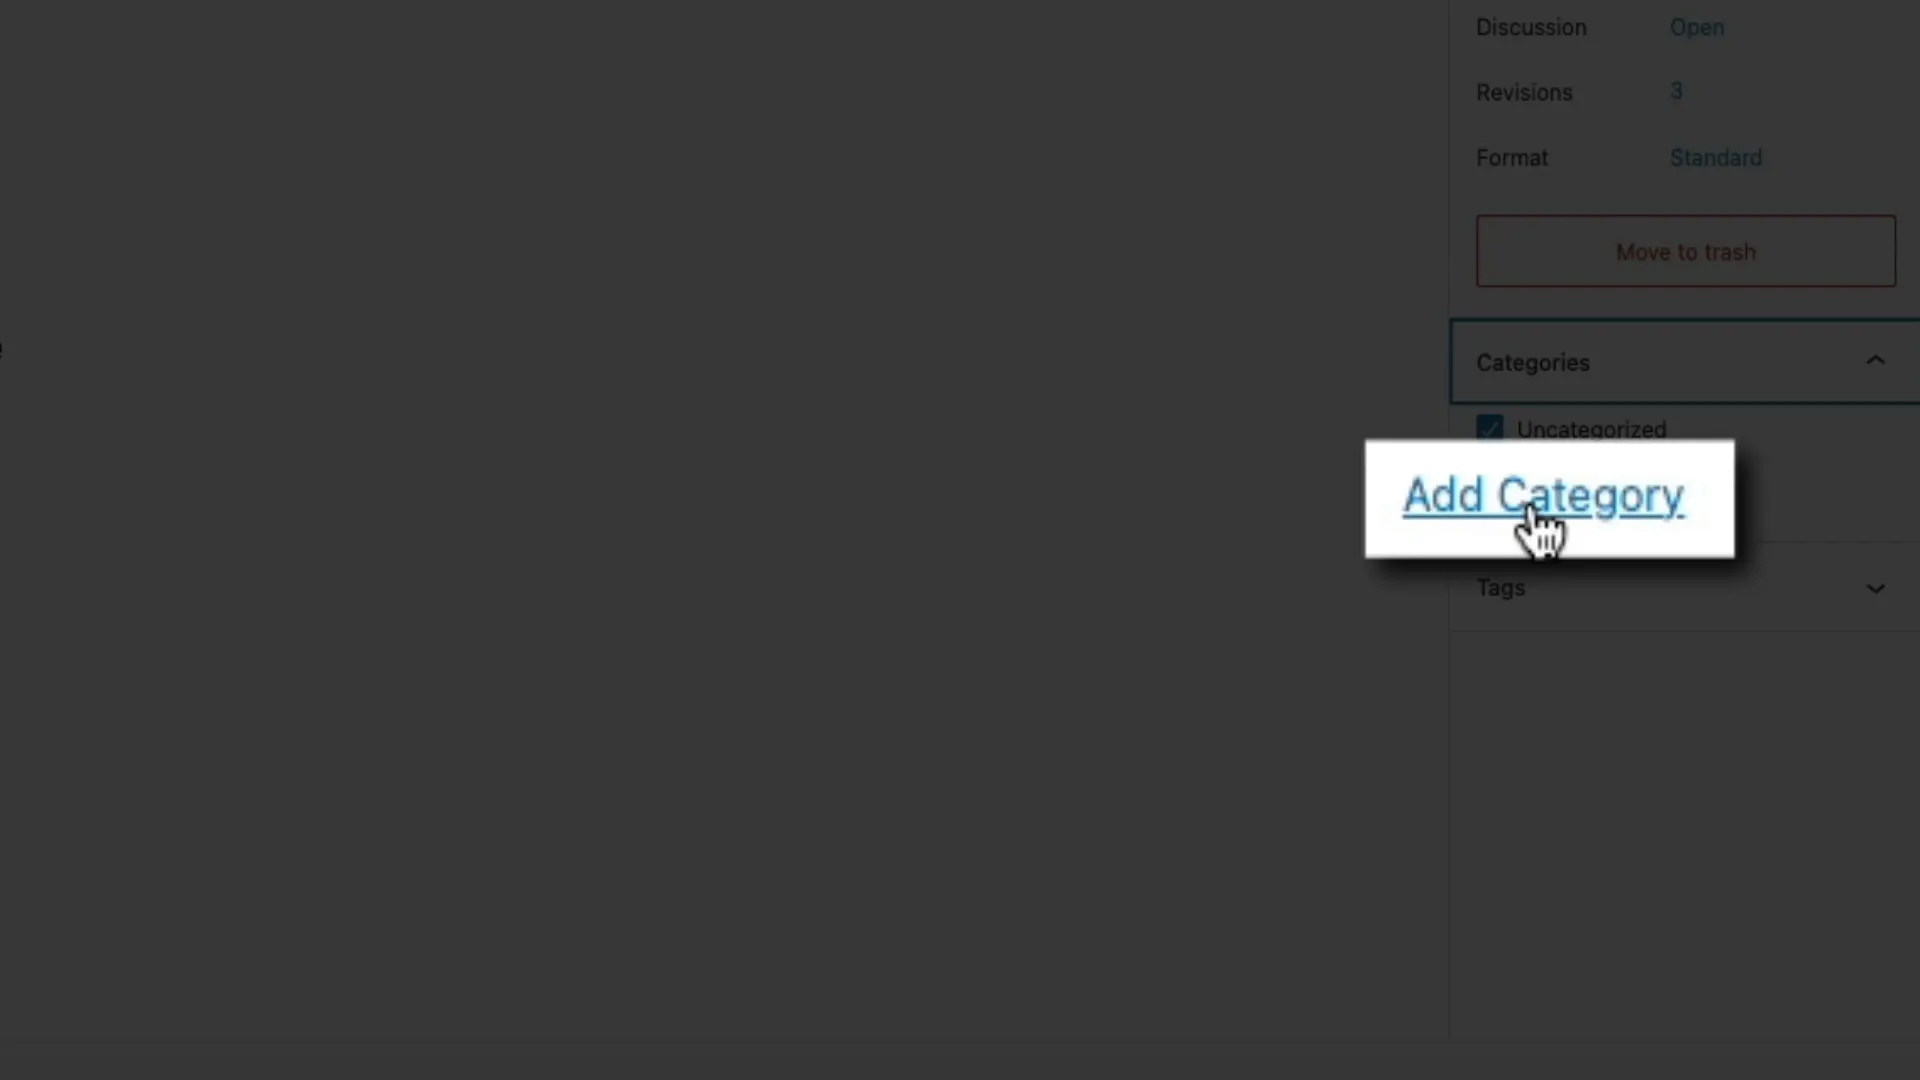
- In the post settings panel, find the “Categories” section.
- Choose existing categories or create a new one by typing a name and clicking “Add Category.”
- Uncheck the default “Uncategorized” category to keep your posts organized.
Preview and Publish
Before publishing, always preview your post:
- Click the preview icon (a computer screen) in the top right corner of the editor.
- You can preview in the same tab or open a new tab to see how your post will look live.
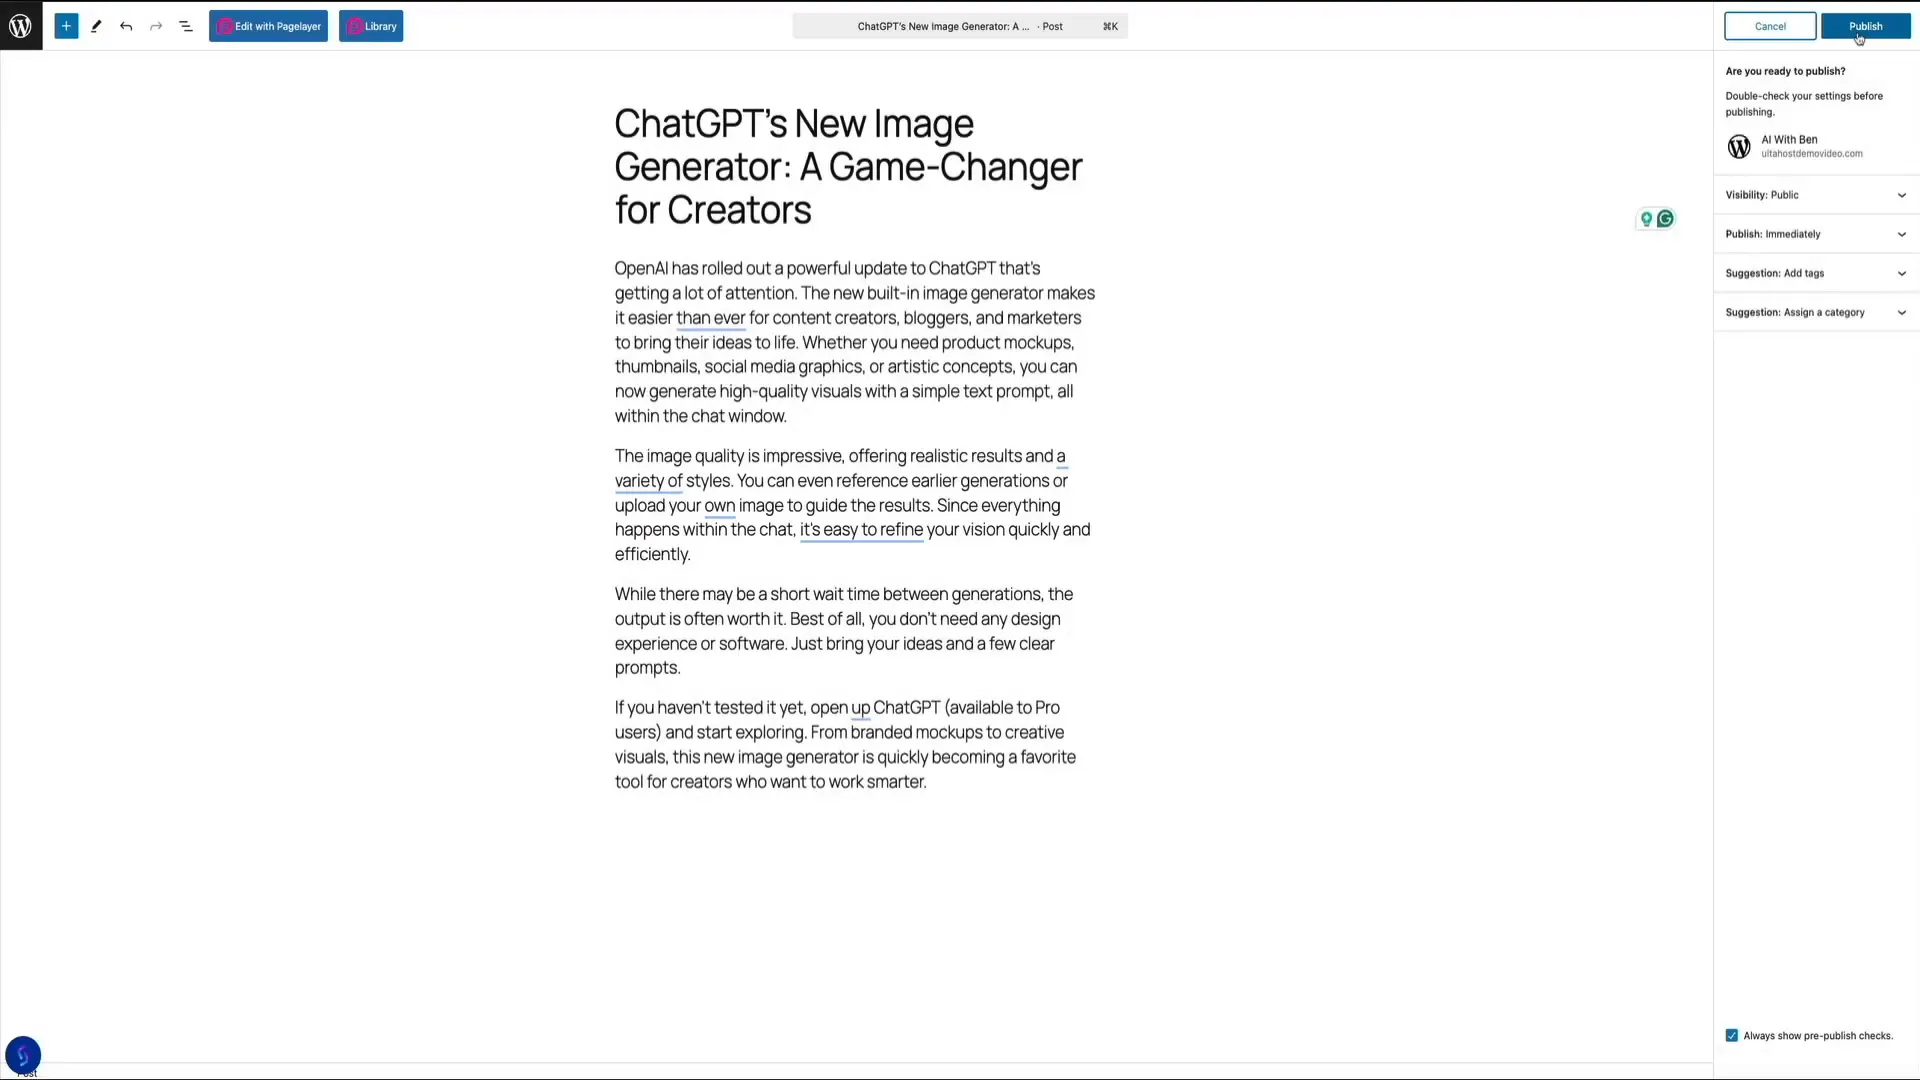
If everything looks good, hit the “Publish” button. WordPress will confirm your settings and ask you to publish again to finalize.
Once published, you’ll see a confirmation message with a direct link to your live post. Click “View Post” to see your work in action, complete with your featured image, title, and content.
Conclusion
Congratulations! You’ve successfully set up and launched your first WordPress blog using ultahost wordpress hosting. From selecting the perfect hosting plan and registering your domain to installing WordPress, activating SSL, customizing your theme, managing plugins, and publishing your first post, you now have the foundation to build and grow your online presence.
Remember, blogging is a journey. Continue exploring WordPress features, optimizing your site for SEO, and creating engaging content to attract and retain readers. If you ever need help, UltaHost’s dashboard and support team are there to assist you.
Ready to take your blog further? Consider exploring tutorials on SEO plugins like Yoast, advanced theme customization, and monetization strategies to turn your passion into a thriving online brand.
Happy blogging!
Starting a blog can feel overwhelming, especially if you're new to WordPress or the technical aspects of website creation. But with the right tools and guidance, launching your blog can be a smooth and exciting journey. In this comprehensive tutorial, I'll walk you through how to set up your blog using ultahost wordpress hosting, a managed WordPress hosting service tailored for bloggers. Whether you're building a personal blog, a niche website, or an online brand, this step-by-step guide will help you get your WordPress blog live quickly and confidently.
From choosing your hosting plan and registering your domain to installing WordPress, activating your SSL certificate, customizing your theme, installing plugins, and publishing your first post, every essential step is covered. Let’s dive right in!
Step 1: Choose Your UltaHost WordPress Hosting Plan and Register Your Domain
Your blogging journey begins with selecting the right hosting plan and domain name. UltaHost offers a variety of hosting plans designed to meet different needs, but for most new bloggers, the Ulta WordPress plan is an ideal and budget-friendly starting point.
To get started, visit the UltaHost website by following the link provided in your resources or searching for UltaHost. Once on the homepage, navigate to the WordPress hosting section:
- Hover over the “Hosting” menu at the top of the page.
- Click on “WordPress Hosting” to view plans tailored specifically for WordPress users.
UltaHost offers four main plans:
- Ulta WordPress: Best for beginners and budget-conscious bloggers.
- WordPress Starter: For slightly larger sites with more traffic.
- Business WordPress: For growing blogs and small businesses.
- VPS WordPress: For high-traffic and complex sites needing dedicated resources.
For new bloggers, the Ulta WordPress plan is perfect. It provides:
- One website hosting
- 30 GB of SSD storage
- 10,000 monthly visits
- Unlimited bandwidth
- One email account
- A free WordPress manager
- A free SSL certificate
UltaHost also offers flexible billing cycles. You can choose monthly, yearly, two-year, or three-year plans. Longer commitments give bigger discounts, but if you’re just starting, monthly billing at $3.50 per month is a great, low-risk option.
Once you've selected your plan, click the “Order” button below it to proceed to domain setup. Here, you have three choices:
- Register a new domain
- Transfer an existing domain from another registrar
- Use an existing domain by updating your name servers
If you’re starting fresh, choose to register a new domain. Enter your desired domain name and select the extension (.com, .net, etc.). UltaHost will check availability and show you the price, typically around $13.99 per year.
Add the domain to your cart and continue to the configuration page, where you’ll review your hosting plan, domain registration, and extras. Here you can choose your server location. Pick a data center near your target audience to optimize site speed. For example, if you’re in Southern California, selecting the Los Angeles server is ideal.
UltaHost also offers optional add-ons like premium SSL certificates, email security, site backups, and SEO tools. Since the Ulta WordPress plan already includes a free SSL certificate, you can skip these extras for now.
Before checkout, add domain ID protection to keep your personal information private in the public domain registry. This small additional cost helps secure your privacy.
Finally, review your entire order, enter any promo codes if available, and create your UltaHost account. You can sign up using Facebook, GitHub, Google, or by entering your personal details manually. Choose your payment method—credit card, PayPal, crypto, or bank transfer—and complete the purchase.
Step 2: Explore the UltaHost Dashboard
After completing your order, you’ll be directed to the UltaHost dashboard, your central hub for managing your hosting, domains, billing, and support.
The dashboard features:
- A high-level overview of your active services, domains, support tickets, and unpaid invoices.
- Your active products/services section, showing your WordPress hosting plan status.
- A navigation panel on the left for quick access to domains, services, billing, security, support, and affiliate features.
- Your account profile sidebar with contact info, support pin, and shortcuts for common actions like ordering new services or registering domains.
- Recent support tickets and latest news from UltaHost.
- Live chat support via the “Talk to Us” button at the bottom right for quick assistance.
This clean and intuitive interface makes managing your hosting and website easier, even if you’re not a tech expert.
Step 3: Verify Your Domain and Activate Your Free SSL Certificate
Once your hosting and domain are set up, there are two crucial follow-up steps to ensure your website works securely and reliably:
Domain Verification
Within about 15 minutes of purchasing your domain, you’ll receive an email from UltaHost or their domain registrar partner titled something like “Validation of Contact Required.” This email is sent to the address you registered with and contains a link to verify your domain registration details.
Check your inbox, spam, junk, or promotions folders if you don’t see it immediately. Click the verification link, review your contact information, confirm accuracy, and authorize contact. This step is critical—if you skip domain verification, your domain will be deactivated and stop working.
Activating Your SSL Certificate
SSL (Secure Socket Layer) certificates encrypt data between your website and visitors, enabling HTTPS and boosting security, professionalism, and SEO rankings.
To activate the free SSL certificate that comes with your UltaHost WordPress hosting:
- Go back to your UltaHost dashboard.
- Under your active services, click “Manage” next to your hosting plan.
- Scroll down to find and click the “cPanel” icon to open the control panel.
- In cPanel, locate and click “SSL/TLS Status” near your primary domain.
- Select your primary domain and all related entries by checking the top box.
- Click “Run AutoSSL” to initiate the certificate installation.
- Wait a few moments for the process to complete. The red padlock icons will turn green, indicating HTTPS is active.
And just like that, your site is secured, building trust with visitors and search engines alike.
Step 4: Install WordPress via cPanel
With hosting and SSL ready, it’s time to install WordPress, the platform powering millions of blogs worldwide. UltaHost makes this easy with Softaculous, an automated installer in cPanel.
Follow these steps:
- In your UltaHost dashboard, under your hosting service, click “Manage.”
- Click the “cPanel” icon to open the control panel.
- In cPanel’s left sidebar, find and click “WordPress Manager by Softaculous.”
- Click the blue “Install” button to begin setup.
Configure the installation:
- Protocol: Set to HTTPS for secure connections.
- Domain: Select your registered domain.
- In Directory: Leave blank to install WordPress directly on your main domain (not in a subfolder).
- Version: Choose the latest stable WordPress version to get the newest features and security updates.
- Site Settings: You can enter a site name and description or leave placeholders to edit later.
- Enable Multi-site (WPMU): Leave unchecked unless you want to manage multiple WordPress sites under one dashboard.
- Disable WordPress Cron: Leave unchecked for now; it’s an advanced setting for performance optimization.
Next, create your WordPress admin account:
- Choose a strong username and password.
- Enter an email address you regularly check for password resets and notifications.
UltaHost pre-selects some pro plugins to enhance speed, backups, and SEO. You don’t need to add more plugins during installation—you can always install them later.
Choose your preferred language for the WordPress dashboard (English is default).
Finally, enter your email to receive WordPress login details and click “Install.”
Softaculous will handle the installation within seconds to a few minutes. Avoid refreshing or closing the tab during this process.
After successful installation, you’ll see links to your website and WordPress admin login page. The admin URL usually ends with /wp-admin, where you’ll manage your blog.
Clicking the admin URL opens a Softaculous onboarding assistant, but for full control, skip it and go straight to the WordPress dashboard.
Step 5: Tour Your WordPress Dashboard
Welcome to your WordPress dashboard—the command center for your blog. Here’s a quick overview of what you’ll find:
- Admin Menu (left sidebar): Manage posts, pages, comments, themes, plugins, users, and settings.
- Admin Toolbar (top bar): Quick shortcuts for visiting your site, creating content, moderating comments, and accessing plugin settings.
- Site Preview: The toolbar remains visible when viewing your live site while logged in, letting you jump between front-end and back-end easily.
To preview your live site, hover over your site title in the upper left corner and click “Visit Site.” By default, WordPress installs a theme like “Twenty Twenty-Five” which you can customize later.
Step 6: Install and Customize Your WordPress Theme
The look and feel of your blog depend largely on the theme you choose. WordPress offers thousands of free and premium themes to fit any style or niche.
To install a new theme:
- From your WordPress dashboard, hover over “Appearance” and click “Themes.”
- Click the “Add New” button to browse the WordPress theme directory.
- Use filters or search keywords to find themes that suit your blog’s vibe. For example, searching “Kale” brings up a popular food blog theme.
- Hover over a theme to preview it or click “Install” and then “Activate” to apply it to your site.
Note: The customization options vary by theme. The steps I demonstrate here use the default WordPress theme, so your experience may differ if you use a different theme.
Using the Full Site Editor to Customize Your Theme
WordPress’s Full Site Editor lets you visually customize your blog without coding:
- Hover over your site title in the top left and click “Visit Site.”
- Click “Edit Site” in the toolbar at the top to open the Full Site Editor.
With the block-based editor, every element—headers, menus, footers—is a block you can move, style, and customize. For example:
- Click the site title and rename it to something unique like “AI with Ben.”
- Edit the blog heading to personalize it (e.g., from “Blog” to “The Blog”).
- Customize navigation menus by adding or removing page links.
Keep in mind, some parts of your blog, like the post titles and featured images in the blog feed, are dynamic and pulled from individual posts. To edit these, you’ll update the actual blog posts rather than the template.
Once your edits are complete, don’t forget to save your changes in the upper right corner. Your updates will immediately reflect on your live site.
Step 7: Install and Manage WordPress Plugins
Plugins extend your blog’s functionality, adding everything from SEO tools and contact forms to security and caching. UltaHost includes several pro plugins at no extra cost, but you can always add more.
To manage plugins:
- Hover over “Plugins” in the dashboard sidebar and click “Installed Plugins” to see what’s active.
- To add new plugins, click “Add New” either from the top of the plugins page or the sidebar menu.
- Use the search bar to find plugins by name or keyword. For example, “Yoast” is a popular SEO plugin.
- Click “Install Now” and then “Activate” to enable the plugin on your site.
Plugin Tips:
- Be intentional about which plugins you activate to avoid slowing down your site or causing conflicts.
- Test new plugins thoroughly to ensure compatibility with your theme and other plugins.
Step 8: Publish Your First Blog Post
Now that your site is set up, it’s time for the exciting part—publishing your first blog post!
By default, WordPress includes a sample post titled “Hello World.” Let’s remove that and create a new post:
- Hover over your site title in the upper left corner and click “Dashboard” to return to the backend.
- Hover over “Posts” and click “All Posts.”
- Hover over the “Hello World” post and click “Trash” to delete it.
- Hover over “Posts” again and select “Add New” to open the block editor.
In the post editor:
- Enter a compelling blog post title. Keep it under 70 characters and include relevant keywords for SEO.
- Write your content in blocks. Press “Enter” to create new blocks for paragraphs, images, headings, and more.
- Explore the block library for various content types, but for simplicity, start with paragraph blocks.
Adding a Featured Image
A featured image is essential for visual appeal, branding, and social sharing. It appears on your blog homepage, social media, and search results.
To add a featured image:
- In the post editor, open the post settings panel on the right.
- Click “Set Featured Image.”
- Choose an image from your media library or upload a new one (recommended size: 1200 x 628 pixels).
- Fill in the image title and alt text for accessibility and SEO.
- Click “Set Featured Image” to apply it.
Assigning Categories
Categories organize your blog content into main topics or sections, helping visitors and search engines navigate your site effectively.
To assign categories:
- In the post settings panel, find the “Categories” section.
- Choose existing categories or create a new one by typing a name and clicking “Add Category.”
- Uncheck the default “Uncategorized” category to keep your posts organized.
Preview and Publish
Before publishing, always preview your post:
- Click the preview icon (a computer screen) in the top right corner of the editor.
- You can preview in the same tab or open a new tab to see how your post will look live.
If everything looks good, hit the “Publish” button. WordPress will confirm your settings and ask you to publish again to finalize.
Once published, you’ll see a confirmation message with a direct link to your live post. Click “View Post” to see your work in action, complete with your featured image, title, and content.
Conclusion
Congratulations! You’ve successfully set up and launched your first WordPress blog using ultahost wordpress hosting. From selecting the perfect hosting plan and registering your domain to installing WordPress, activating SSL, customizing your theme, managing plugins, and publishing your first post, you now have the foundation to build and grow your online presence.
Remember, blogging is a journey. Continue exploring WordPress features, optimizing your site for SEO, and creating engaging content to attract and retain readers. If you ever need help, UltaHost’s dashboard and support team are there to assist you.
Ready to take your blog further? Consider exploring tutorials on SEO plugins like Yoast, advanced theme customization, and monetization strategies to turn your passion into a thriving online brand.
Happy blogging!

Written by Ben Cummings
Co-Founder of Sage Wave Media
Ben is the Co-Founder of Sage Wave Media, LLC which is the parent company of Blog With Ben. He enjoys teaching, blogging, startups, a hoppy IPA, and college basketball. Whenever he's not blogging, you can find him cruising around sunny San Diego with his amazing family.
0 Comments