WordPress SEO Made Simple with the Yoast SEO Plugin
WordPress SEO Made Simple with the Yoast SEO Plugin
When it comes to optimizing your WordPress blog for search engines, few tools are as trusted and powerful as Yoast SEO. As a blogger who has relied on Yoast for years, I want to share a complete, step-by-step tutorial on how to harness the full potential of this plugin—especially the premium version that includes exciting AI-powered features to make SEO easier and more efficient than ever.
Whether you’re just starting out with SEO or looking to sharpen your process, this guide will walk you through everything from installing Yoast SEO to optimizing your blog posts, generating XML sitemaps, enabling breadcrumbs, managing redirects, and more. By the end, you’ll have a solid understanding of how to improve your blog’s search visibility and user experience without any guesswork or technical headaches.

Step 1: Installing and Activating the Yoast SEO Plugin
The first step to improving your WordPress SEO is installing the Yoast SEO plugin. From your WordPress dashboard, navigate to the left sidebar, hover over Plugins, and click Add New. This opens the WordPress plugin directory where you can search for new tools to enhance your site.
In the search bar at the top right, type Yoast. The plugin should appear as the first result, boasting millions of active installations and strong user reviews—always a good indicator of reliability.
Click Install Now. Once the installation is complete, the button will change to Activate. Click it, and Yoast SEO will become active on your site.
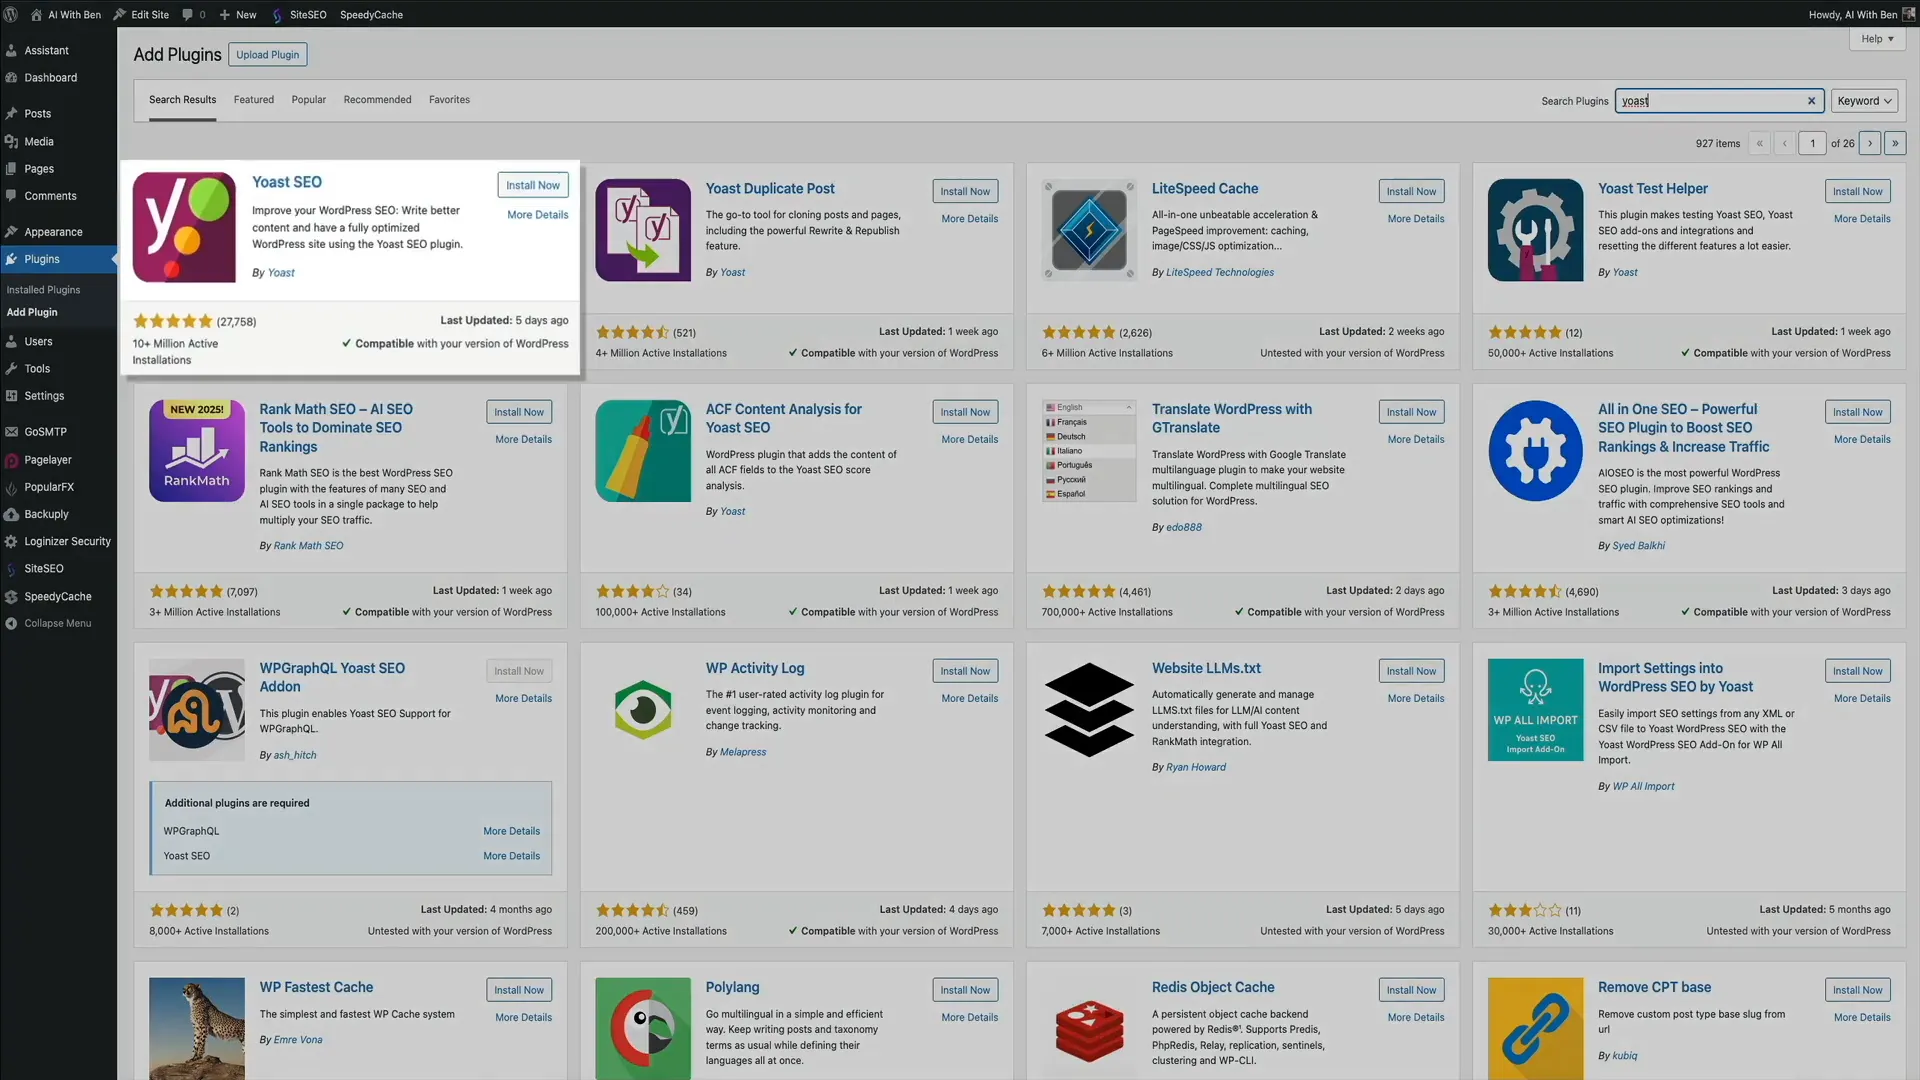
After activation, you’ll be greeted with a welcome screen confirming that your site is now more search engine friendly. You’ll also see an option to run the configuration wizard. While this is a helpful tool, in this tutorial, we’ll skip it and dive directly into the plugin’s dashboard to get hands-on.
Once installed, notice the new Yoast SEO menu item in your sidebar and the Yoast icon in the admin toolbar at the top of your dashboard. These shortcuts make accessing Yoast’s powerful features quick and easy from anywhere in your WordPress admin area.
Step 2: Upgrading to Yoast SEO Premium and Unlocking AI Features
While the free Yoast SEO plugin is excellent, the premium version unlocks a suite of powerful features that can significantly speed up and simplify your SEO workflow.
Currently priced at $99 per year, Yoast SEO Premium includes a 30-day money-back guarantee and offers a full year of updates and support. To celebrate Yoast’s 15th anniversary, there’s a special discount for Blog With Ben readers—use the code BLOGWITHBEN15 at checkout to save 15%.
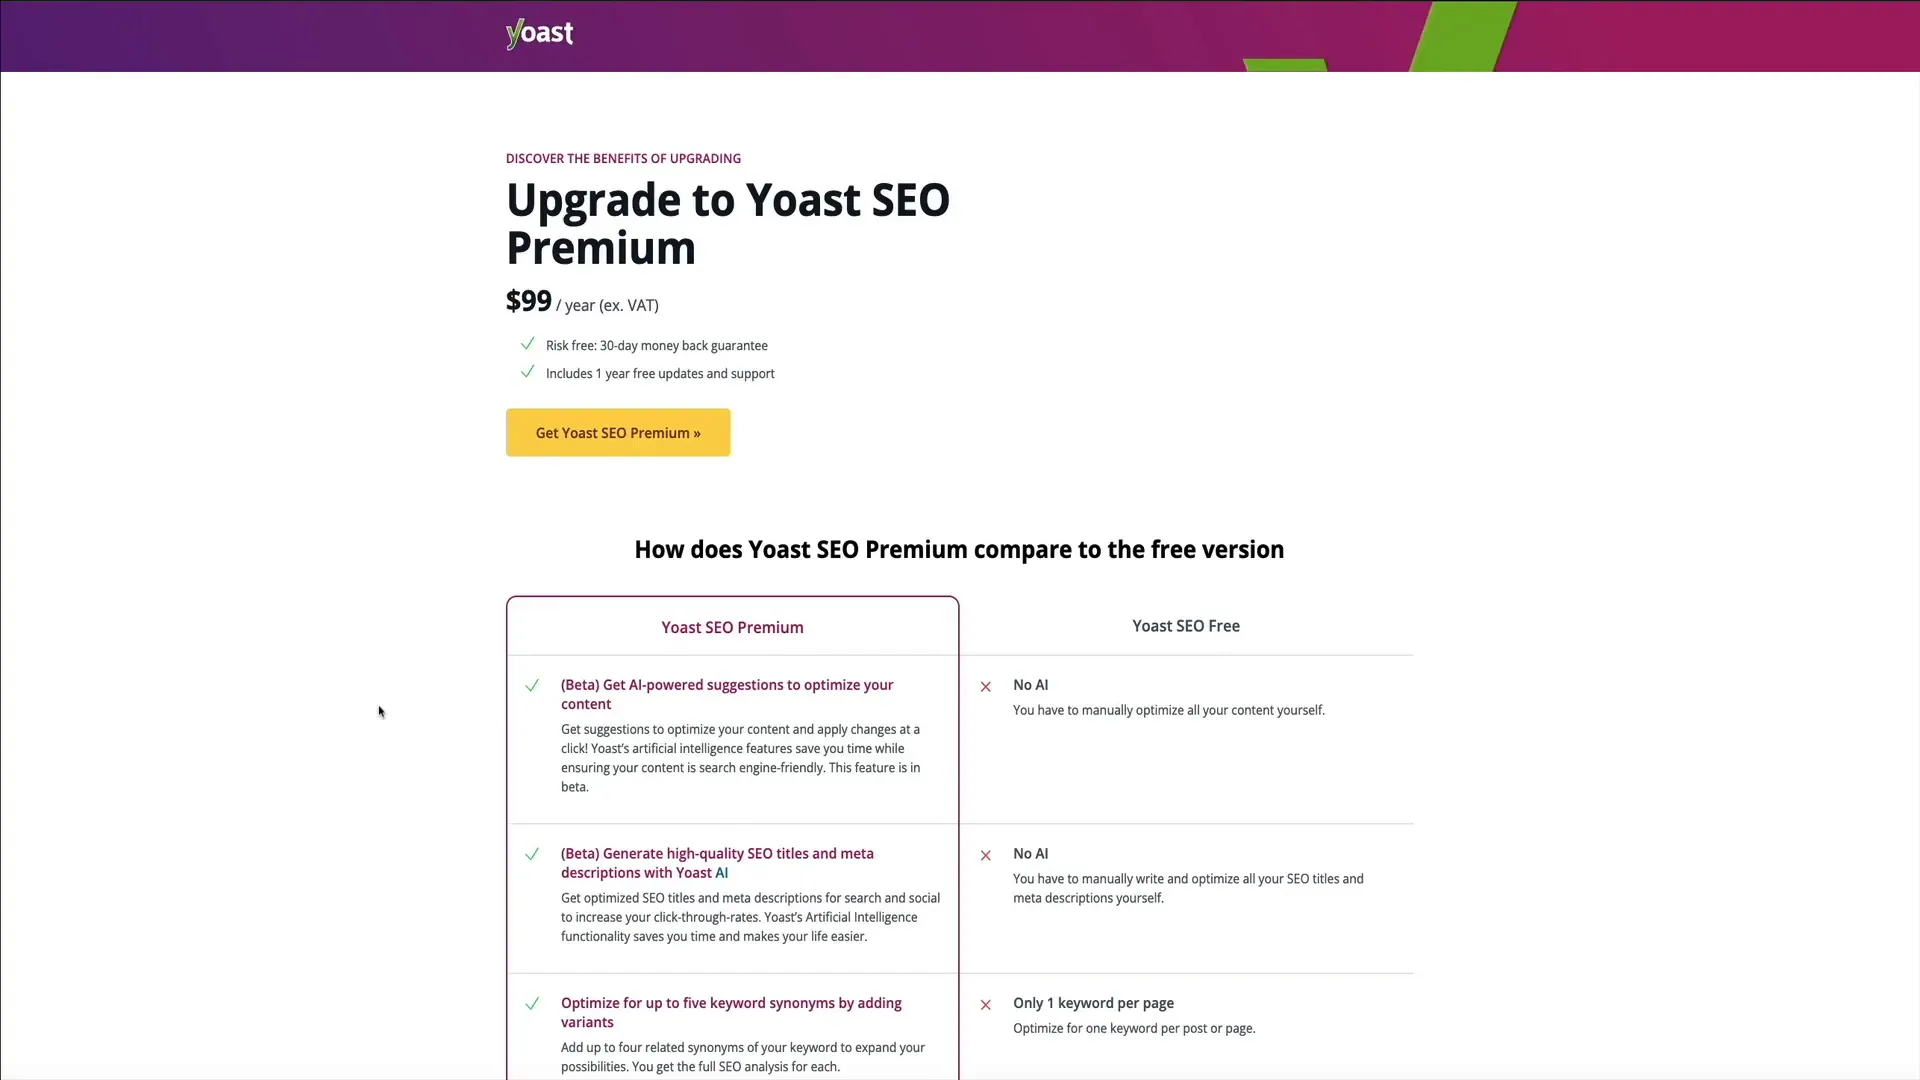
Here are some key benefits of the premium version:
- AI-generated meta descriptions and SEO titles: Save time by letting Yoast’s AI craft compelling meta descriptions and titles that boost click-through rates.
- Multiple keyword synonyms: Target up to five keywords per post to broaden your search reach.
- Automatic redirects: Prevent broken links and 404 errors by managing URL changes effortlessly.
- Real-time internal linking suggestions: Improve site structure and SEO by linking related content with ease.
- Social preview tools: See how your posts will appear on Facebook, LinkedIn, and X (formerly Twitter), and customize social titles and descriptions.
- 24/7 support and access to SEO courses: Stay ahead with expert help and ongoing education.
- Regular plugin updates: Yoast releases updates every two weeks to keep your SEO strategy current.
Once you upgrade to premium, all your existing Yoast settings carry over automatically, and you gain immediate access to these advanced features. It’s a worthwhile investment for bloggers serious about increasing organic traffic.
Step 3: Optimizing a Blog Post Using Yoast SEO
Now that Yoast SEO is installed and activated, let’s walk through how to optimize a WordPress blog post step-by-step.
Navigate to the Posts section in your WordPress dashboard and select the post you want to optimize by clicking Edit. Once the post editor loads, you’ll notice several ways to interact with Yoast SEO:
- A Yoast icon in the top toolbar for quick access to plugin settings.
- An SEO and readability overview in the post settings sidebar on the right.
- The full Yoast SEO panel below the content editor, which is where most of the magic happens.
The Yoast SEO panel features four tabs:
- SEO – Focuses on keyword optimization and search appearance.
- Readability – Analyzes how easy your content is to read.
- Schema – Defines the type of content for search engines.
- Social – Controls how your post looks when shared on social media.
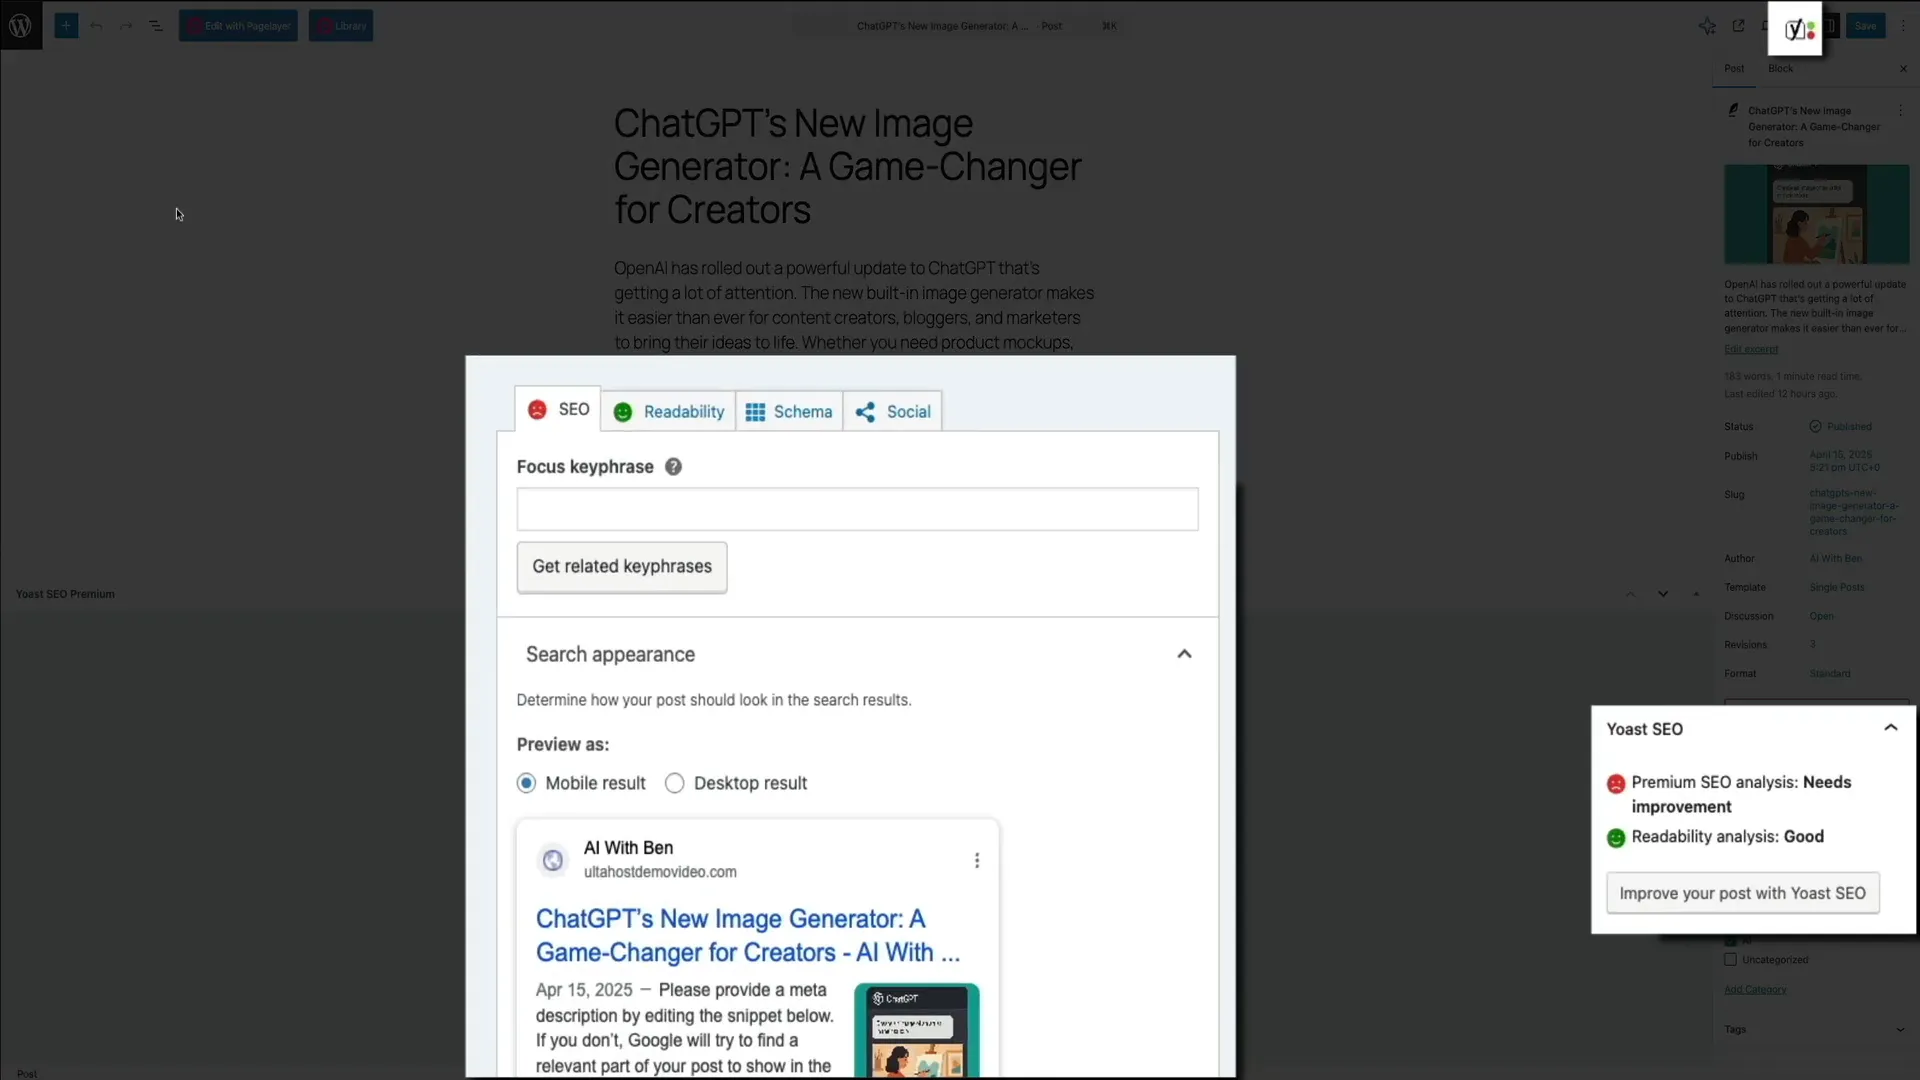
Setting Your Focus Keyphrase
The first step in the SEO tab is to enter your focus keyphrase—the main keyword or phrase you want your blog post to rank for. For example, I’m using chat GPT image generator as my focus keyphrase.
As you enter the keyphrase, Yoast’s real-time analysis updates instantly, changing the color-coded SEO score from red (needs work) to orange (progress made). Our goal is to reach green, indicating optimal SEO alignment.
Customizing Search Appearance
Below the keyphrase field, you’ll find the search appearance preview. This shows how your post will appear in Google search results on both desktop and mobile. You can toggle between these views to ensure your snippet looks clean, clickable, and on brand.
Next, customize the SEO title—the headline that shows up in search results. You can type your own or use Yoast’s variables to automate this. For my example, I’m manually entering: chat GPT's image generator tutorial – AI with Ben. The snippet preview updates accordingly.
The slug is the tail end of your URL and should match your keywords to maintain consistency. You can edit this here if needed.
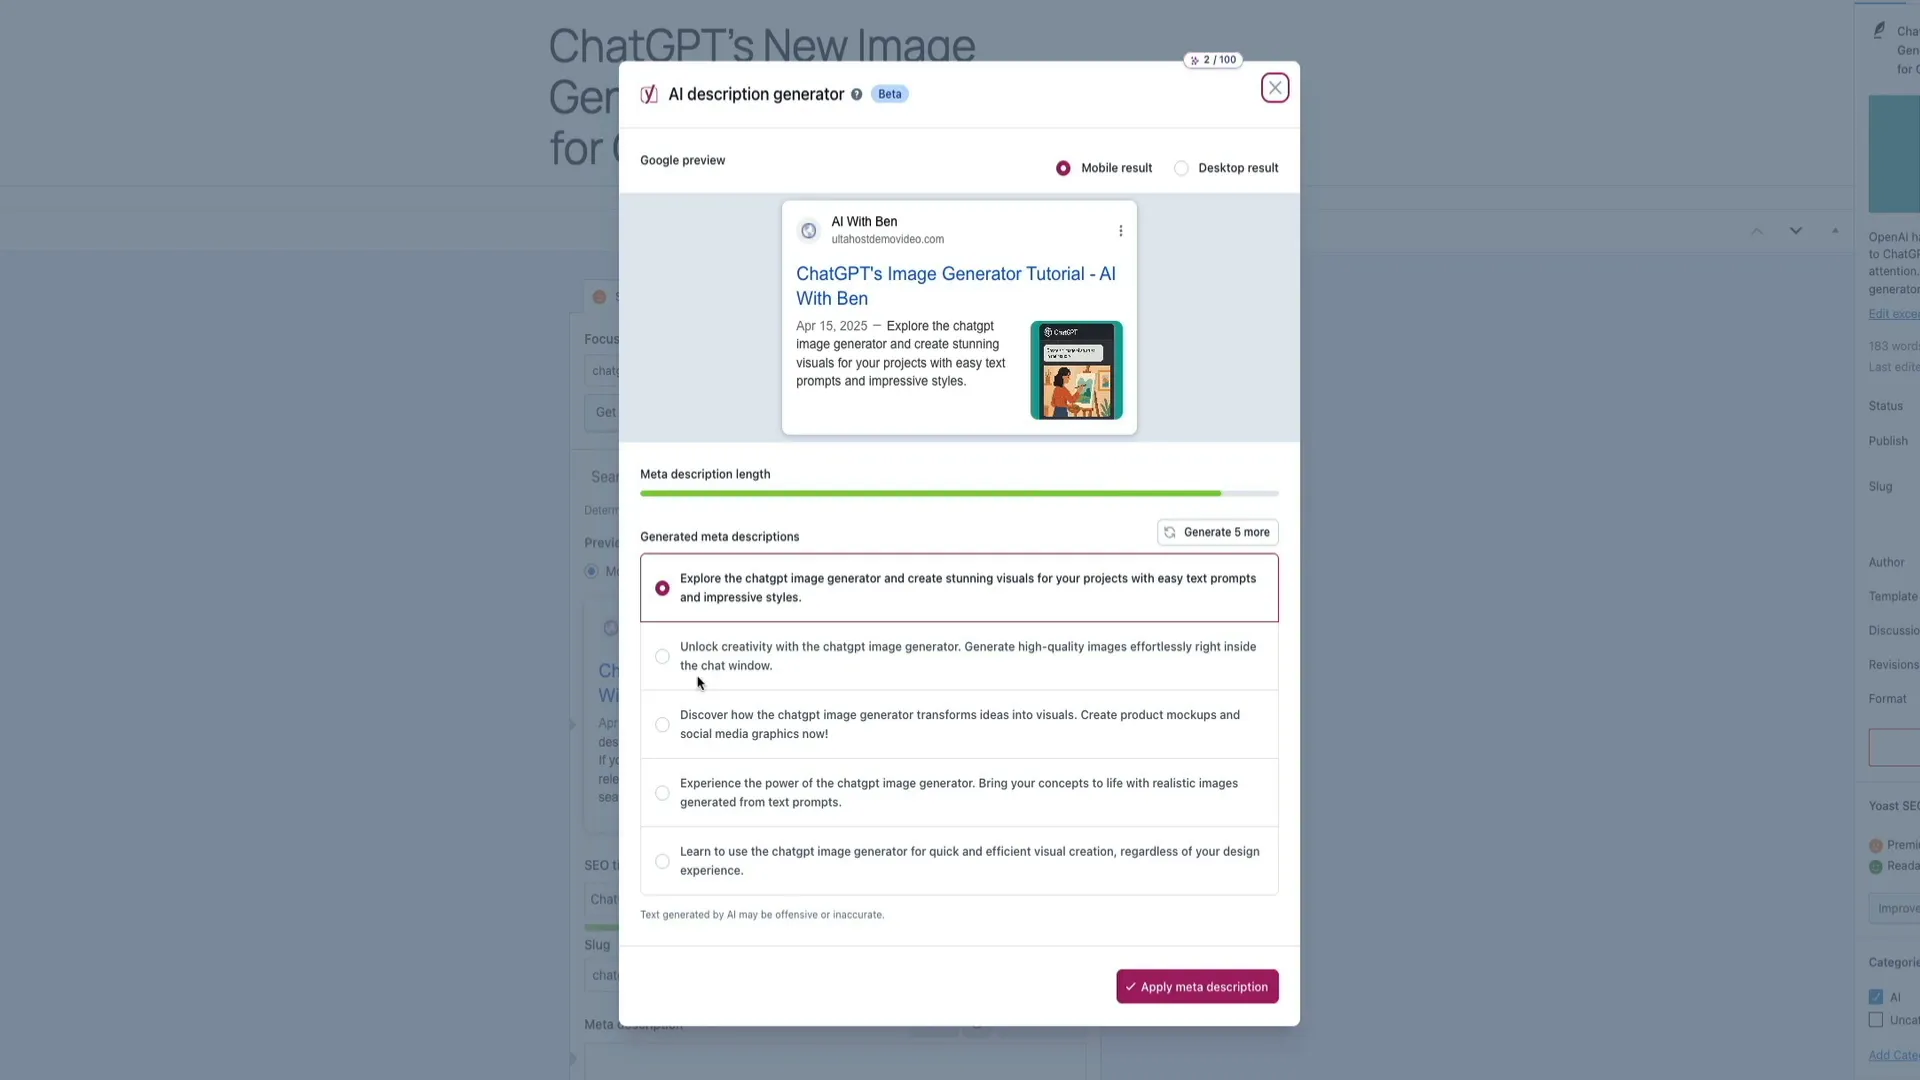
Crafting Your Meta Description with AI
The meta description is the short summary that appears beneath your title in search listings. If left blank, Google will automatically pull content from your post, which may not always be ideal.
With Yoast SEO Premium, you can use the AI-powered Use AI button to generate several ready-to-use meta descriptions instantly. This feature is a game changer, saving hours of manual writing while creating natural and clickable summaries.
Simply click the AI button, review the options, select the one you like best, and click Apply meta description. Just like that, your post’s meta description is optimized for search engines and users alike.
Evaluating SEO Analysis and Applying AI Suggestions
Scroll down to the SEO analysis section, where Yoast evaluates your content based on the focus keyphrase. It uses a traffic light system:
- Green: Good to go
- Orange: Room for improvement
- Red: Critical issues to fix
One of the coolest premium features is the Optimize with AI button next to red or orange items like keyphrase density. Instead of manually rewriting your content, click the AI icon and let Yoast propose improvements. While this feature is still in beta, it can save you a ton of time.
Note: Each AI suggestion costs “sparks” — you get 100 sparks per month included with your subscription.
You can also edit your SEO title to ensure an exact match with your focus keyphrase, which improves search relevance.
Expanding Your Keyword Reach with Related Keyphrases
Just beneath the focus keyphrase field, click Get related keyphrases to access a list of keyword variations and related phrases powered by SEMrush. This data includes search volume, trends, and keyword difficulty, helping you identify easy-to-rank terms.
Click the plus icon next to any related keyphrase you want to target. This lets you broaden your SEO reach without leaving your WordPress editor.
Improving Readability with AI Assistance
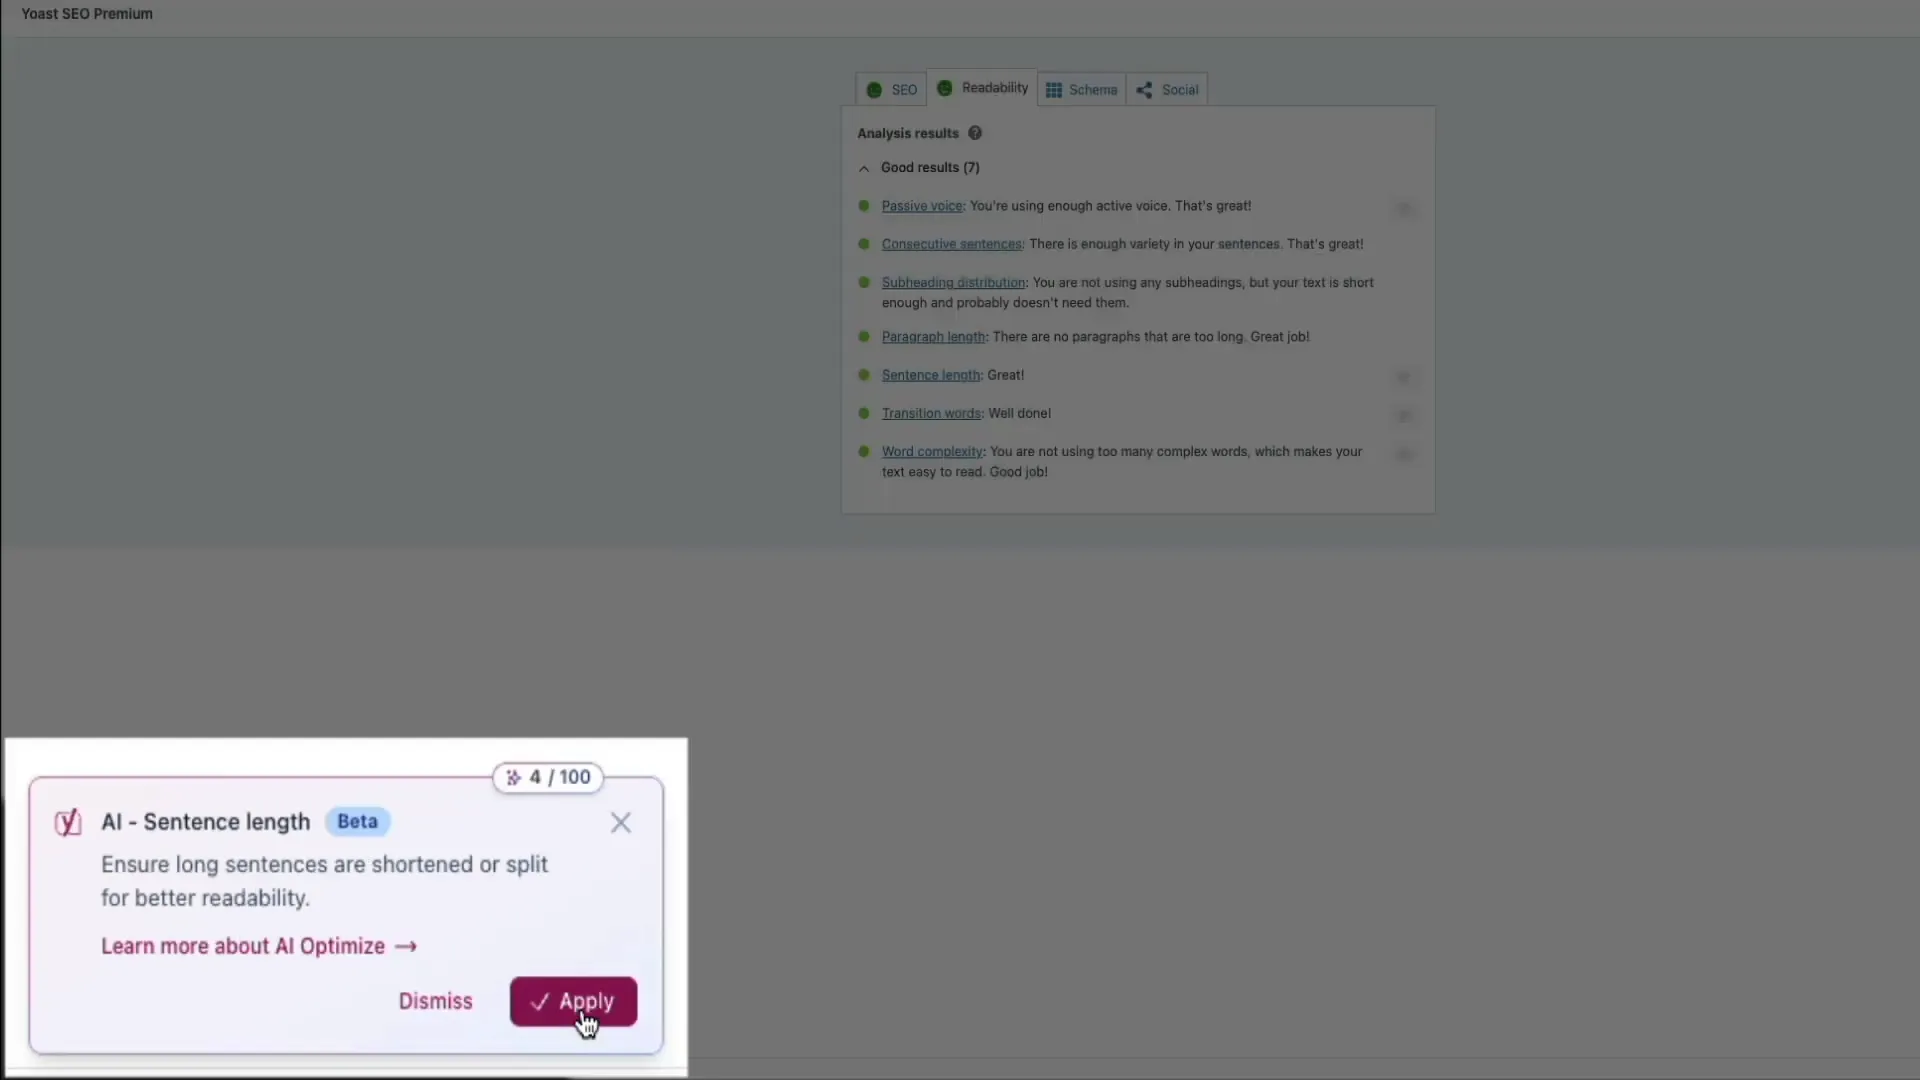
Switch to the Readability tab to see how user-friendly your content is. Yoast flags issues like long sentences, passive voice, or complex wording. For instance, if too many sentences exceed 20 words, readability suffers.
Instead of manually shortening sentences, use the Optimize with AI button here as well. The AI will split or shorten sentences automatically. You can review and tweak these changes after applying them to maintain your unique voice.
With these adjustments, both your SEO and readability scores should turn green, indicating a well-optimized post ready to attract and engage readers.
Defining Schema and Social Sharing Settings
The Schema tab lets you specify the type of content your page represents, such as a standard webpage, contact page, FAQ, blog post, news article, or report. This additional context helps search engines better understand your content and can improve your chances of appearing in rich results or featured snippets.
In the Social tab, you control how your post looks when shared on platforms like Facebook, LinkedIn, and X. Upload custom social images, and even use AI to generate social-specific titles and descriptions that boost clickability.
There’s also a dropdown to customize how your post appears on X specifically, giving you more control over your branding across social channels.
Step 4: Using the Yoast SEO Toolbar Icon for Quick Optimization Overview
While editing a post, you can click the Yoast icon in the top right corner of the editor to open a sidebar overview of your SEO and readability progress. This panel shows your focus keyphrase, scores, and links to key features like keyphrase suggestions, internal linking, search appearance, schema, and social previews.
This quick access lets you monitor and adjust your optimization work without scrolling through the entire post editor.
Step 5: Leveraging Internal Linking Suggestions
Internal linking is critical for SEO and user experience. Yoast’s internal linking tool analyzes prominent words in your post and compares them to other content on your site, recommending relevant links to include.
In the post editor sidebar, under the Internal Linking Suggestions dropdown, you’ll find a list of recommended posts or pages to link to. Simply click the copy-paste icon next to a suggestion to copy the URL to your clipboard, then create a hyperlink in your content.
There’s also a drag-and-drop feature that allows you to place suggested links directly where you want them in your post, making internal linking faster and more intuitive.
Note: If your site is new and has limited content, you might not see suggestions yet. But as your blog grows, this tool becomes invaluable for building a strong interconnected site structure that benefits both SEO and readers.

Step 6: Saving Your Changes
After optimizing your SEO title, meta description, keyphrases, readability, and other settings, don’t forget to click the Save button in the top right corner of the editor. This ensures all your Yoast SEO configurations are applied to the post and will reflect on your live site.
Step 7: Generating an XML Sitemap with Yoast SEO
An often overlooked but essential SEO tool is the XML sitemap. This is a roadmap for search engines like Google, Bing, and Yahoo, listing your site’s most important pages to help them crawl and index your content efficiently.
Without a sitemap, some pages might get missed, especially if they’re not well linked internally. Having a sitemap is crucial for improving your site’s visibility in search results.
Yoast SEO makes generating a sitemap effortless. To check or enable the sitemap:
- Go to the Yoast SEO tab in your WordPress dashboard sidebar and click Settings.
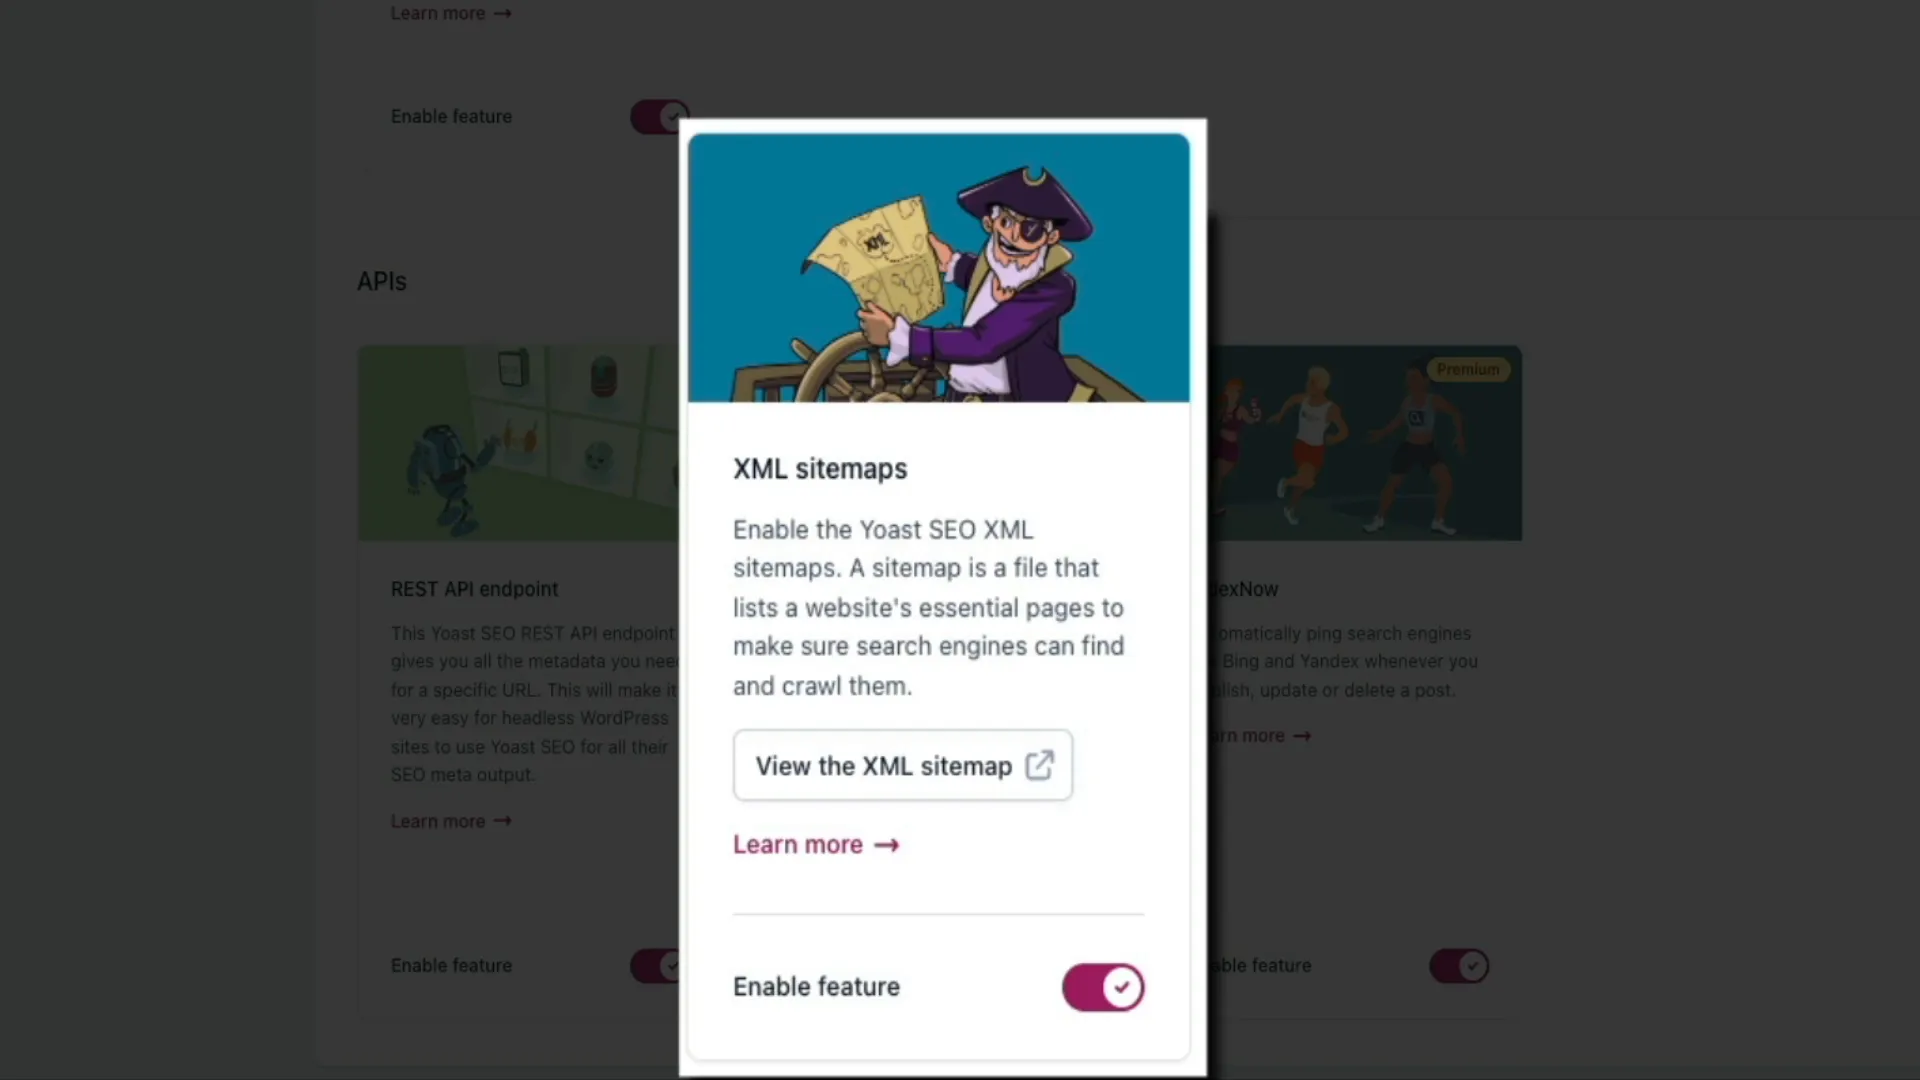
- Scroll down to the Site Structure section and find the XML Sitemaps box.
- Ensure the sitemap feature is toggled on (it usually is by default).
- Click View the XML sitemap button to open your sitemap in a new tab.
The sitemap page lists separate URLs for posts, pages, categories, and authors. The main sitemap index URL at the top is the one you’ll submit to search engines via tools like Google Search Console.
Submitting your sitemap helps search engines discover and index your content more efficiently, boosting your chances of ranking higher. While the submission process is outside the scope of this guide, Yoast provides excellent tutorials to walk you through it.
Step 8: Enabling and Displaying Breadcrumbs
Breadcrumbs are a secondary navigation aid that show visitors their location within your website hierarchy and how to navigate back to previous sections. They improve user experience and help search engines understand your site’s structure, which can positively impact SEO.
There are two main ways to add breadcrumbs: editing code manually or using a WordPress block. The block method is easier and recommended for most users.
To add breadcrumbs using the block editor:
- Open a blog post in the WordPress editor.
- Create a space above your first content block.
- Click the blue plus icon to add a block.
- Search for Breadcrumbs and select the Yoast Breadcrumbs block.
- The breadcrumb navigation path will appear above your content.
- Save your changes and preview the post on the front end to see the breadcrumbs in action.
If you want to customize breadcrumbs or enable them site-wide, go to:
- Yoast SEO > Settings in your WordPress dashboard sidebar.
- Use the search bar to find Breadcrumbs or navigate to Advanced > Breadcrumbs.
- Customize options such as link separators, homepage anchor text, prefixes for archive/search/404 pages, and whether to bold the current page.
- Toggle breadcrumbs on at the bottom of the settings panel to enable them across your site (theme support required).
Step 9: Managing Redirects with Yoast SEO Premium
The redirect manager is an exclusive feature in Yoast SEO Premium that helps maintain your SEO rankings when you change URLs or delete content.
Instead of visitors hitting a dreaded 404 error page, you can redirect them to a relevant page, preserving user experience and link equity.
To access the redirect manager:
- Go to Yoast SEO > Redirects in your WordPress dashboard.
- Choose the redirect type from the dropdown—typically a 301 permanent redirect.
- Enter the old URL path (the part after your domain name) in the Old URL field.
- Enter the new destination URL path in the New URL field.
- Click Add Redirect to activate it.
If you’re familiar with regular expressions (regex), Yoast also offers a tab to create dynamic redirects for groups of URLs. Use this feature cautiously, as incorrect regex can cause unintended redirect loops.
There’s also a settings tab where you can choose whether redirects are handled via PHP (default and safer) or written directly into your server’s .htaccess file.
Step 10: Accessing Yoast SEO Learning Resources and Support
SEO is an ever-evolving field, and staying updated is essential. Thankfully, Yoast provides excellent learning resources directly within your WordPress dashboard.
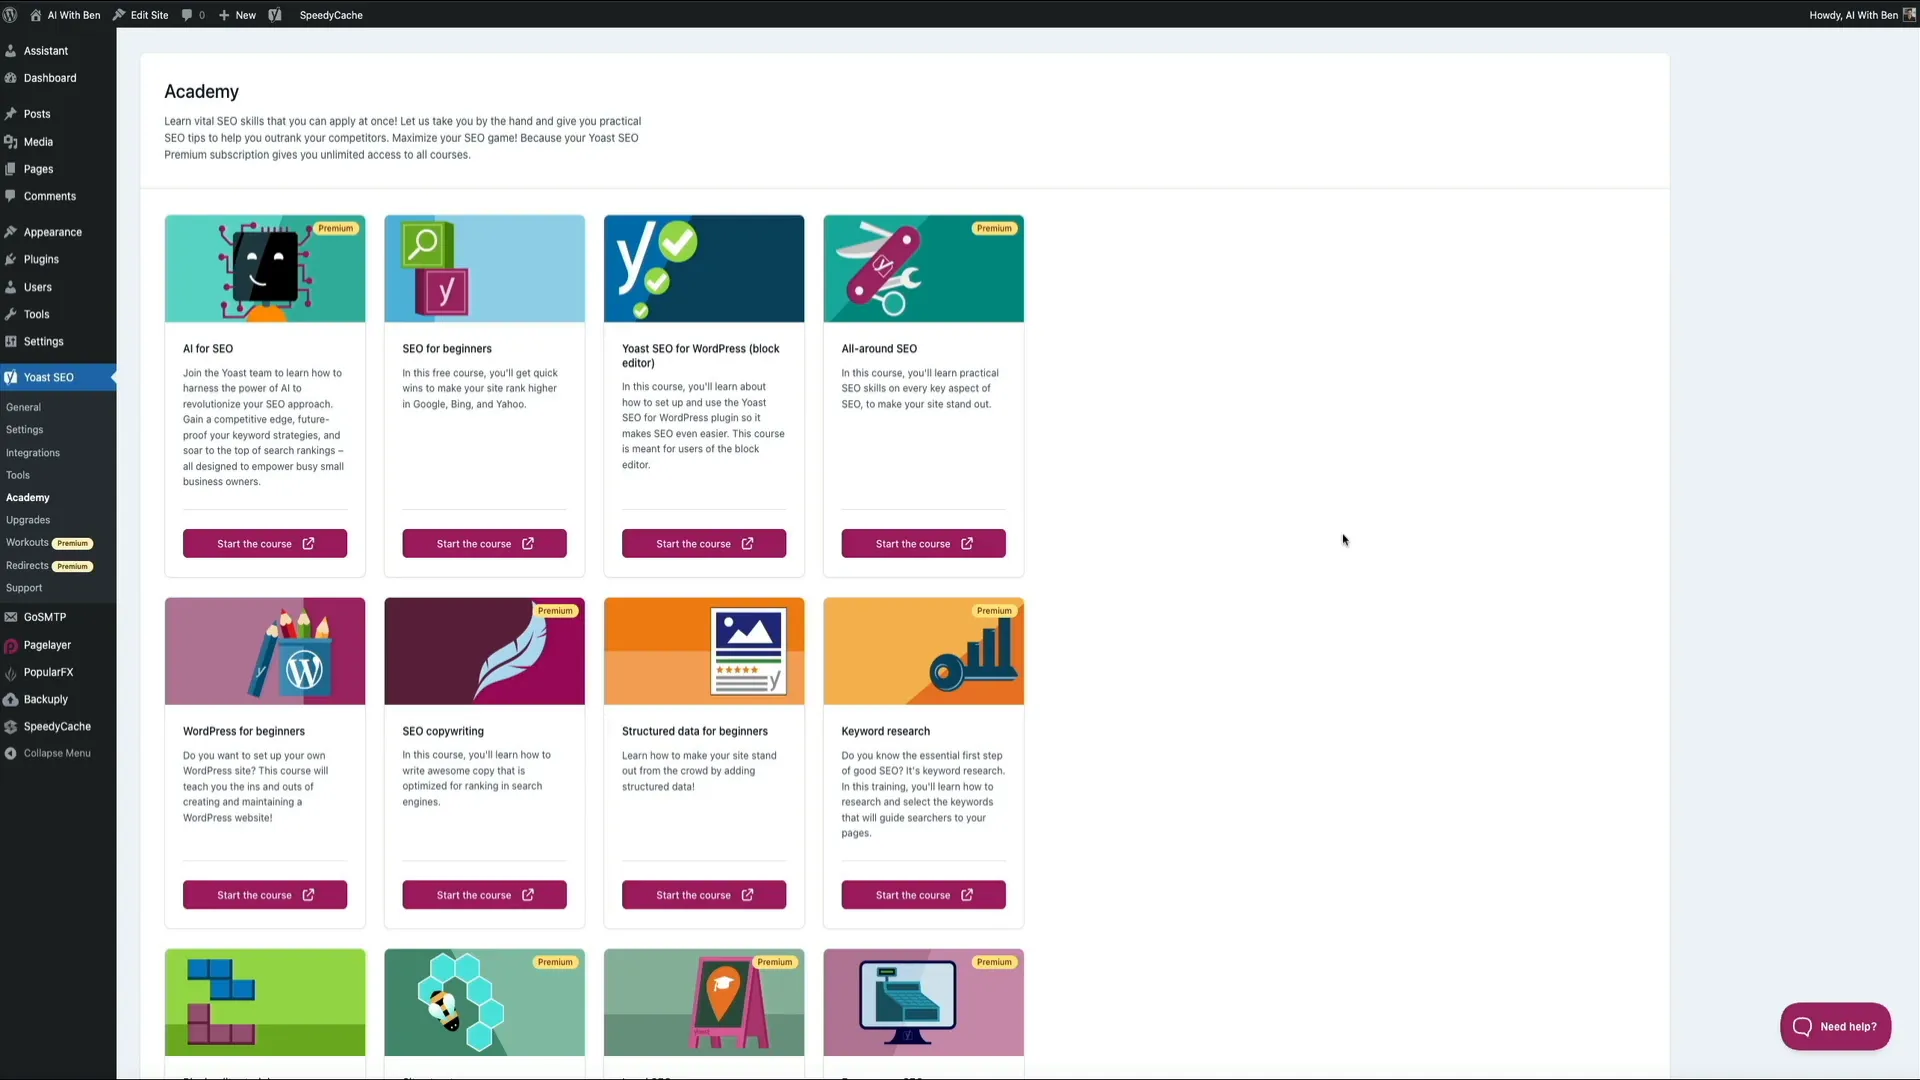
Under the Yoast SEO menu, you’ll find the Academy section offering a rich library of SEO training courses. These cover topics ranging from beginner-friendly SEO and WordPress basics to advanced subjects like AI for SEO, structured data, SEO copywriting, and keyword research.
If you ever get stuck or have questions, use the Need Help button in the lower right corner of your screen. This opens a support window where you can choose live chat or email support options, providing real-time assistance from the Yoast team.
Conclusion: Why Yoast SEO is Essential for WordPress Bloggers
Optimizing your WordPress blog for SEO doesn’t have to be complicated or time-consuming. Yoast SEO’s powerful features, especially in the premium version, provide everything you need to improve your content’s search engine performance and readability, generate sitemaps, add breadcrumbs, manage redirects, and much more—all from within your WordPress dashboard.
From setting your focus keyphrase and crafting AI-assisted meta descriptions to leveraging internal linking suggestions and social previews, Yoast SEO offers an all-in-one solution that saves you time and helps you get more traffic without needing to be an SEO expert.
Whether you’re building a blog from scratch or looking to boost your existing site’s rankings, Yoast SEO is the plugin I trust to make SEO simple and effective.
If you’re ready to take your WordPress SEO to the next level, consider upgrading to Yoast SEO Premium and use the exclusive discount code BLOGWITHBEN15 to save 15% at checkout.
Start optimizing smarter today and watch your blog grow!
When it comes to optimizing your WordPress blog for search engines, few tools are as trusted and powerful as Yoast SEO. As a blogger who has relied on Yoast for years, I want to share a complete, step-by-step tutorial on how to harness the full potential of this plugin—especially the premium version that includes exciting AI-powered features to make SEO easier and more efficient than ever.
Whether you’re just starting out with SEO or looking to sharpen your process, this guide will walk you through everything from installing Yoast SEO to optimizing your blog posts, generating XML sitemaps, enabling breadcrumbs, managing redirects, and more. By the end, you’ll have a solid understanding of how to improve your blog’s search visibility and user experience without any guesswork or technical headaches.
Step 1: Installing and Activating the Yoast SEO Plugin
The first step to improving your WordPress SEO is installing the Yoast SEO plugin. From your WordPress dashboard, navigate to the left sidebar, hover over Plugins, and click Add New. This opens the WordPress plugin directory where you can search for new tools to enhance your site.
In the search bar at the top right, type Yoast. The plugin should appear as the first result, boasting millions of active installations and strong user reviews—always a good indicator of reliability.
Click Install Now. Once the installation is complete, the button will change to Activate. Click it, and Yoast SEO will become active on your site.
After activation, you’ll be greeted with a welcome screen confirming that your site is now more search engine friendly. You’ll also see an option to run the configuration wizard. While this is a helpful tool, in this tutorial, we’ll skip it and dive directly into the plugin’s dashboard to get hands-on.
Once installed, notice the new Yoast SEO menu item in your sidebar and the Yoast icon in the admin toolbar at the top of your dashboard. These shortcuts make accessing Yoast’s powerful features quick and easy from anywhere in your WordPress admin area.
Step 2: Upgrading to Yoast SEO Premium and Unlocking AI Features
While the free Yoast SEO plugin is excellent, the premium version unlocks a suite of powerful features that can significantly speed up and simplify your SEO workflow.
Currently priced at $99 per year, Yoast SEO Premium includes a 30-day money-back guarantee and offers a full year of updates and support. To celebrate Yoast’s 15th anniversary, there’s a special discount for Blog With Ben readers—use the code BLOGWITHBEN15 at checkout to save 15%.
Here are some key benefits of the premium version:
- AI-generated meta descriptions and SEO titles: Save time by letting Yoast’s AI craft compelling meta descriptions and titles that boost click-through rates.
- Multiple keyword synonyms: Target up to five keywords per post to broaden your search reach.
- Automatic redirects: Prevent broken links and 404 errors by managing URL changes effortlessly.
- Real-time internal linking suggestions: Improve site structure and SEO by linking related content with ease.
- Social preview tools: See how your posts will appear on Facebook, LinkedIn, and X (formerly Twitter), and customize social titles and descriptions.
- 24/7 support and access to SEO courses: Stay ahead with expert help and ongoing education.
- Regular plugin updates: Yoast releases updates every two weeks to keep your SEO strategy current.
Once you upgrade to premium, all your existing Yoast settings carry over automatically, and you gain immediate access to these advanced features. It’s a worthwhile investment for bloggers serious about increasing organic traffic.
Step 3: Optimizing a Blog Post Using Yoast SEO
Now that Yoast SEO is installed and activated, let’s walk through how to optimize a WordPress blog post step-by-step.
Navigate to the Posts section in your WordPress dashboard and select the post you want to optimize by clicking Edit. Once the post editor loads, you’ll notice several ways to interact with Yoast SEO:
- A Yoast icon in the top toolbar for quick access to plugin settings.
- An SEO and readability overview in the post settings sidebar on the right.
- The full Yoast SEO panel below the content editor, which is where most of the magic happens.
The Yoast SEO panel features four tabs:
- SEO – Focuses on keyword optimization and search appearance.
- Readability – Analyzes how easy your content is to read.
- Schema – Defines the type of content for search engines.
- Social – Controls how your post looks when shared on social media.
Setting Your Focus Keyphrase
The first step in the SEO tab is to enter your focus keyphrase—the main keyword or phrase you want your blog post to rank for. For example, I’m using chat GPT image generator as my focus keyphrase.
As you enter the keyphrase, Yoast’s real-time analysis updates instantly, changing the color-coded SEO score from red (needs work) to orange (progress made). Our goal is to reach green, indicating optimal SEO alignment.
Customizing Search Appearance
Below the keyphrase field, you’ll find the search appearance preview. This shows how your post will appear in Google search results on both desktop and mobile. You can toggle between these views to ensure your snippet looks clean, clickable, and on brand.
Next, customize the SEO title—the headline that shows up in search results. You can type your own or use Yoast’s variables to automate this. For my example, I’m manually entering: chat GPT's image generator tutorial – AI with Ben. The snippet preview updates accordingly.
The slug is the tail end of your URL and should match your keywords to maintain consistency. You can edit this here if needed.
Crafting Your Meta Description with AI
The meta description is the short summary that appears beneath your title in search listings. If left blank, Google will automatically pull content from your post, which may not always be ideal.
With Yoast SEO Premium, you can use the AI-powered Use AI button to generate several ready-to-use meta descriptions instantly. This feature is a game changer, saving hours of manual writing while creating natural and clickable summaries.
Simply click the AI button, review the options, select the one you like best, and click Apply meta description. Just like that, your post’s meta description is optimized for search engines and users alike.
Evaluating SEO Analysis and Applying AI Suggestions
Scroll down to the SEO analysis section, where Yoast evaluates your content based on the focus keyphrase. It uses a traffic light system:
- Green: Good to go
- Orange: Room for improvement
- Red: Critical issues to fix
One of the coolest premium features is the Optimize with AI button next to red or orange items like keyphrase density. Instead of manually rewriting your content, click the AI icon and let Yoast propose improvements. While this feature is still in beta, it can save you a ton of time.
Note: Each AI suggestion costs “sparks” — you get 100 sparks per month included with your subscription.
You can also edit your SEO title to ensure an exact match with your focus keyphrase, which improves search relevance.
Expanding Your Keyword Reach with Related Keyphrases
Just beneath the focus keyphrase field, click Get related keyphrases to access a list of keyword variations and related phrases powered by SEMrush. This data includes search volume, trends, and keyword difficulty, helping you identify easy-to-rank terms.
Click the plus icon next to any related keyphrase you want to target. This lets you broaden your SEO reach without leaving your WordPress editor.
Improving Readability with AI Assistance
Switch to the Readability tab to see how user-friendly your content is. Yoast flags issues like long sentences, passive voice, or complex wording. For instance, if too many sentences exceed 20 words, readability suffers.
Instead of manually shortening sentences, use the Optimize with AI button here as well. The AI will split or shorten sentences automatically. You can review and tweak these changes after applying them to maintain your unique voice.
With these adjustments, both your SEO and readability scores should turn green, indicating a well-optimized post ready to attract and engage readers.
Defining Schema and Social Sharing Settings
The Schema tab lets you specify the type of content your page represents, such as a standard webpage, contact page, FAQ, blog post, news article, or report. This additional context helps search engines better understand your content and can improve your chances of appearing in rich results or featured snippets.
In the Social tab, you control how your post looks when shared on platforms like Facebook, LinkedIn, and X. Upload custom social images, and even use AI to generate social-specific titles and descriptions that boost clickability.
There’s also a dropdown to customize how your post appears on X specifically, giving you more control over your branding across social channels.
Step 4: Using the Yoast SEO Toolbar Icon for Quick Optimization Overview
While editing a post, you can click the Yoast icon in the top right corner of the editor to open a sidebar overview of your SEO and readability progress. This panel shows your focus keyphrase, scores, and links to key features like keyphrase suggestions, internal linking, search appearance, schema, and social previews.
This quick access lets you monitor and adjust your optimization work without scrolling through the entire post editor.
Step 5: Leveraging Internal Linking Suggestions
Internal linking is critical for SEO and user experience. Yoast’s internal linking tool analyzes prominent words in your post and compares them to other content on your site, recommending relevant links to include.
In the post editor sidebar, under the Internal Linking Suggestions dropdown, you’ll find a list of recommended posts or pages to link to. Simply click the copy-paste icon next to a suggestion to copy the URL to your clipboard, then create a hyperlink in your content.
There’s also a drag-and-drop feature that allows you to place suggested links directly where you want them in your post, making internal linking faster and more intuitive.
Note: If your site is new and has limited content, you might not see suggestions yet. But as your blog grows, this tool becomes invaluable for building a strong interconnected site structure that benefits both SEO and readers.
Step 6: Saving Your Changes
After optimizing your SEO title, meta description, keyphrases, readability, and other settings, don’t forget to click the Save button in the top right corner of the editor. This ensures all your Yoast SEO configurations are applied to the post and will reflect on your live site.
Step 7: Generating an XML Sitemap with Yoast SEO
An often overlooked but essential SEO tool is the XML sitemap. This is a roadmap for search engines like Google, Bing, and Yahoo, listing your site’s most important pages to help them crawl and index your content efficiently.
Without a sitemap, some pages might get missed, especially if they’re not well linked internally. Having a sitemap is crucial for improving your site’s visibility in search results.
Yoast SEO makes generating a sitemap effortless. To check or enable the sitemap:
- Go to the Yoast SEO tab in your WordPress dashboard sidebar and click Settings.
- Scroll down to the Site Structure section and find the XML Sitemaps box.
- Ensure the sitemap feature is toggled on (it usually is by default).
- Click View the XML sitemap button to open your sitemap in a new tab.
The sitemap page lists separate URLs for posts, pages, categories, and authors. The main sitemap index URL at the top is the one you’ll submit to search engines via tools like Google Search Console.
Submitting your sitemap helps search engines discover and index your content more efficiently, boosting your chances of ranking higher. While the submission process is outside the scope of this guide, Yoast provides excellent tutorials to walk you through it.
Step 8: Enabling and Displaying Breadcrumbs
Breadcrumbs are a secondary navigation aid that show visitors their location within your website hierarchy and how to navigate back to previous sections. They improve user experience and help search engines understand your site’s structure, which can positively impact SEO.
There are two main ways to add breadcrumbs: editing code manually or using a WordPress block. The block method is easier and recommended for most users.
To add breadcrumbs using the block editor:
- Open a blog post in the WordPress editor.
- Create a space above your first content block.
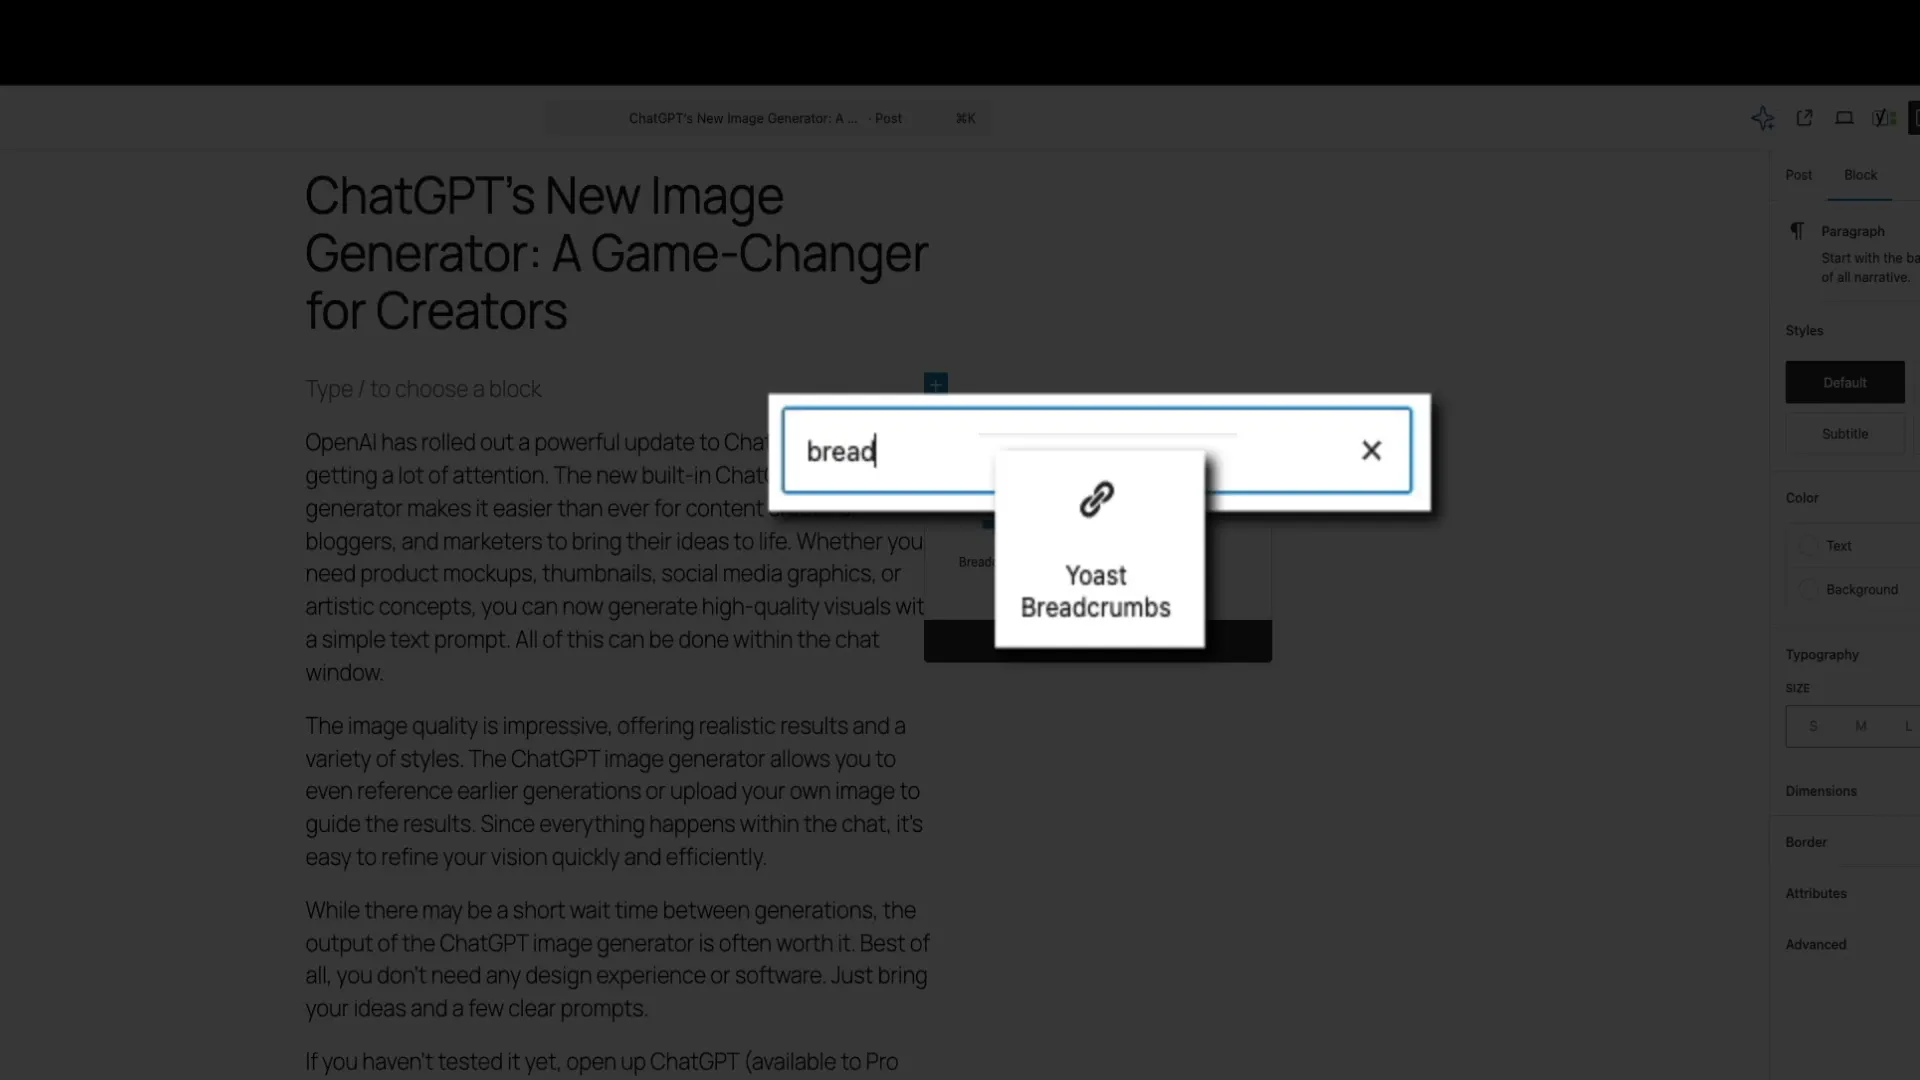
- Click the blue plus icon to add a block.
- Search for Breadcrumbs and select the Yoast Breadcrumbs block.
- The breadcrumb navigation path will appear above your content.
- Save your changes and preview the post on the front end to see the breadcrumbs in action.
If you want to customize breadcrumbs or enable them site-wide, go to:
- Yoast SEO > Settings in your WordPress dashboard sidebar.
- Use the search bar to find Breadcrumbs or navigate to Advanced > Breadcrumbs.
- Customize options such as link separators, homepage anchor text, prefixes for archive/search/404 pages, and whether to bold the current page.
- Toggle breadcrumbs on at the bottom of the settings panel to enable them across your site (theme support required).
Step 9: Managing Redirects with Yoast SEO Premium
The redirect manager is an exclusive feature in Yoast SEO Premium that helps maintain your SEO rankings when you change URLs or delete content.
Instead of visitors hitting a dreaded 404 error page, you can redirect them to a relevant page, preserving user experience and link equity.
To access the redirect manager:
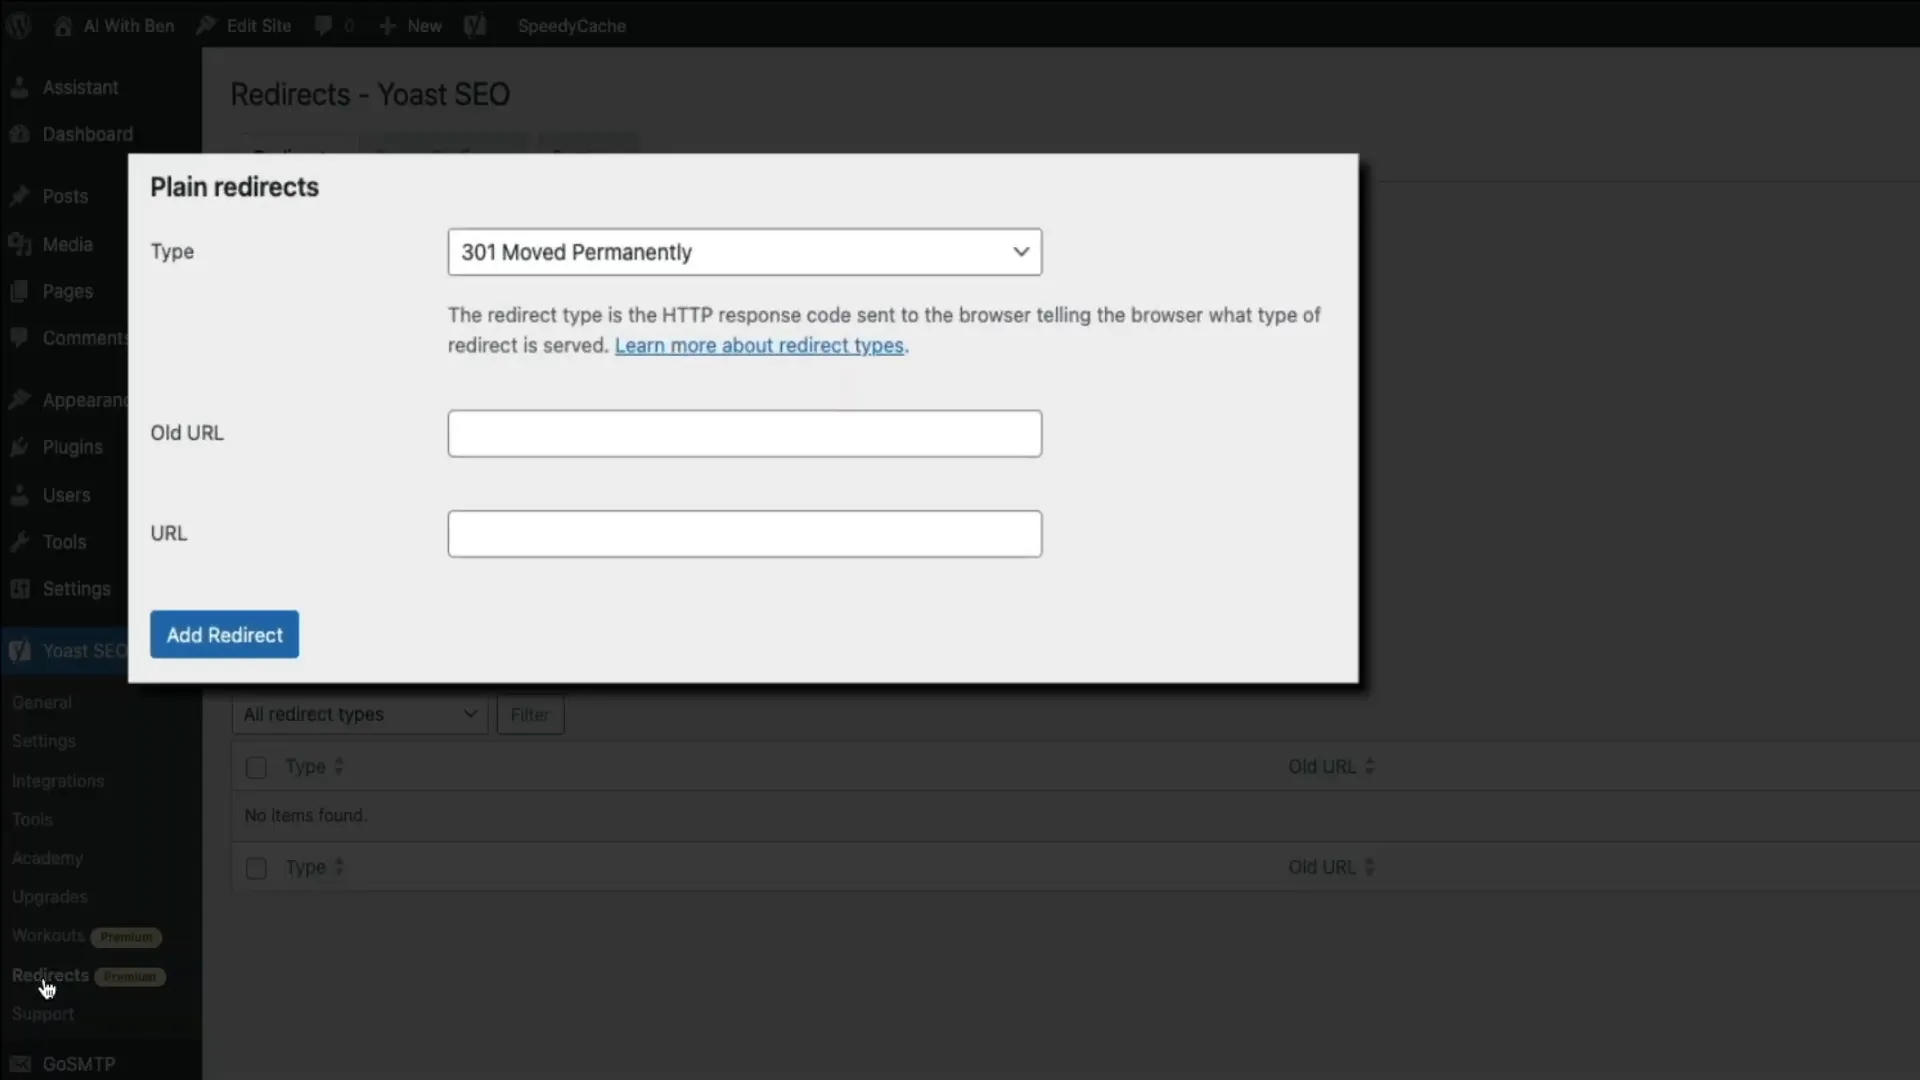
- Go to Yoast SEO > Redirects in your WordPress dashboard.
- Choose the redirect type from the dropdown—typically a 301 permanent redirect.
- Enter the old URL path (the part after your domain name) in the Old URL field.
- Enter the new destination URL path in the New URL field.
- Click Add Redirect to activate it.
If you’re familiar with regular expressions (regex), Yoast also offers a tab to create dynamic redirects for groups of URLs. Use this feature cautiously, as incorrect regex can cause unintended redirect loops.
There’s also a settings tab where you can choose whether redirects are handled via PHP (default and safer) or written directly into your server’s .htaccess file.
Step 10: Accessing Yoast SEO Learning Resources and Support
SEO is an ever-evolving field, and staying updated is essential. Thankfully, Yoast provides excellent learning resources directly within your WordPress dashboard.
Under the Yoast SEO menu, you’ll find the Academy section offering a rich library of SEO training courses. These cover topics ranging from beginner-friendly SEO and WordPress basics to advanced subjects like AI for SEO, structured data, SEO copywriting, and keyword research.
If you ever get stuck or have questions, use the Need Help button in the lower right corner of your screen. This opens a support window where you can choose live chat or email support options, providing real-time assistance from the Yoast team.
Conclusion: Why Yoast SEO is Essential for WordPress Bloggers
Optimizing your WordPress blog for SEO doesn’t have to be complicated or time-consuming. Yoast SEO’s powerful features, especially in the premium version, provide everything you need to improve your content’s search engine performance and readability, generate sitemaps, add breadcrumbs, manage redirects, and much more—all from within your WordPress dashboard.
From setting your focus keyphrase and crafting AI-assisted meta descriptions to leveraging internal linking suggestions and social previews, Yoast SEO offers an all-in-one solution that saves you time and helps you get more traffic without needing to be an SEO expert.
Whether you’re building a blog from scratch or looking to boost your existing site’s rankings, Yoast SEO is the plugin I trust to make SEO simple and effective.
If you’re ready to take your WordPress SEO to the next level, consider upgrading to Yoast SEO Premium and use the exclusive discount code BLOGWITHBEN15 to save 15% at checkout.
Start optimizing smarter today and watch your blog grow!

Written by Ben Cummings
Co-Founder of Sage Wave Media
Ben is the Co-Founder of Sage Wave Media, LLC which is the parent company of Blog With Ben. He enjoys teaching, blogging, startups, a hoppy IPA, and college basketball. Whenever he's not blogging, you can find him cruising around sunny San Diego with his amazing family.
0 Comments