
Automate Client Emails with a No-Code AI Agent in Make
Automate Client Emails with a No-Code AI Agent in Make
If you are a freelancer or creator, you know how much time gets eaten by repeating the same email replies. Instead of typing “Here are my rates” five times a day, you can build a no-code AI-powered assistant that reads incoming collaboration inquiries, checks your pricing, and sends a polished reply—automatically. This guide walks you through a practical, step-by-step build in Make that acts like a digital employee: a brain that thinks, hands that act, and eyes that watch.
Step 1: Build the Brain — Create an AI Agent
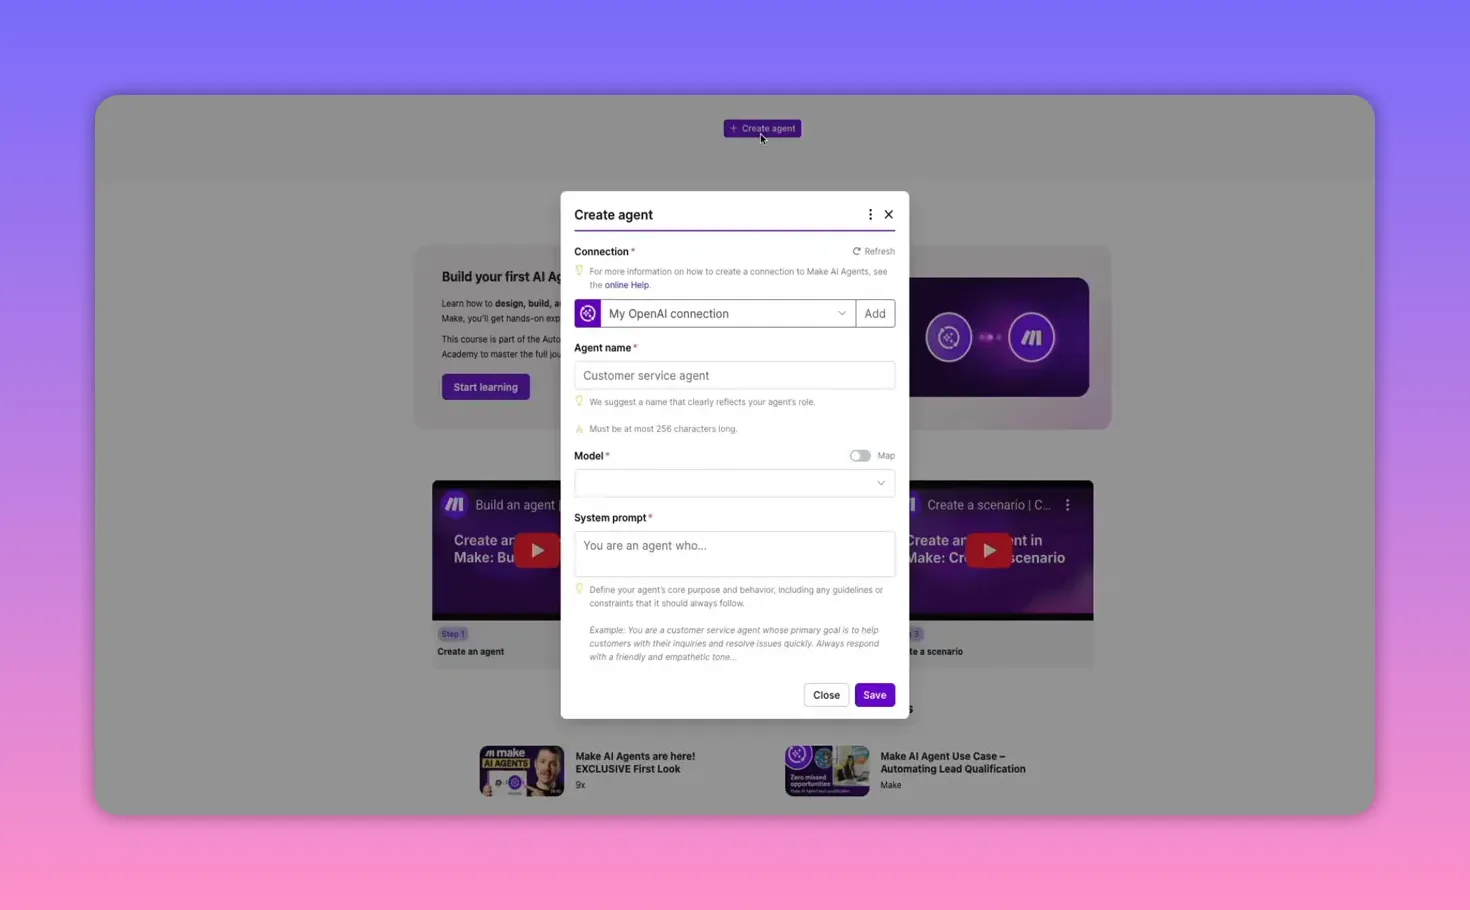
The first piece is the agent itself: the LLM-driven brain that will qualify leads, apply your rate card, and follow your negotiation rules.
- Create an agent from the AI agents section in Make and connect an LLM (OpenAI, Anthropic Claude, Google Gemini, or Make’s provider).
- Name the agent so its role is clear (for example: email_virtual_assistant_agent).
- Choose the model based on your budget and the reasoning you want—select the latest model if you want the best understanding.
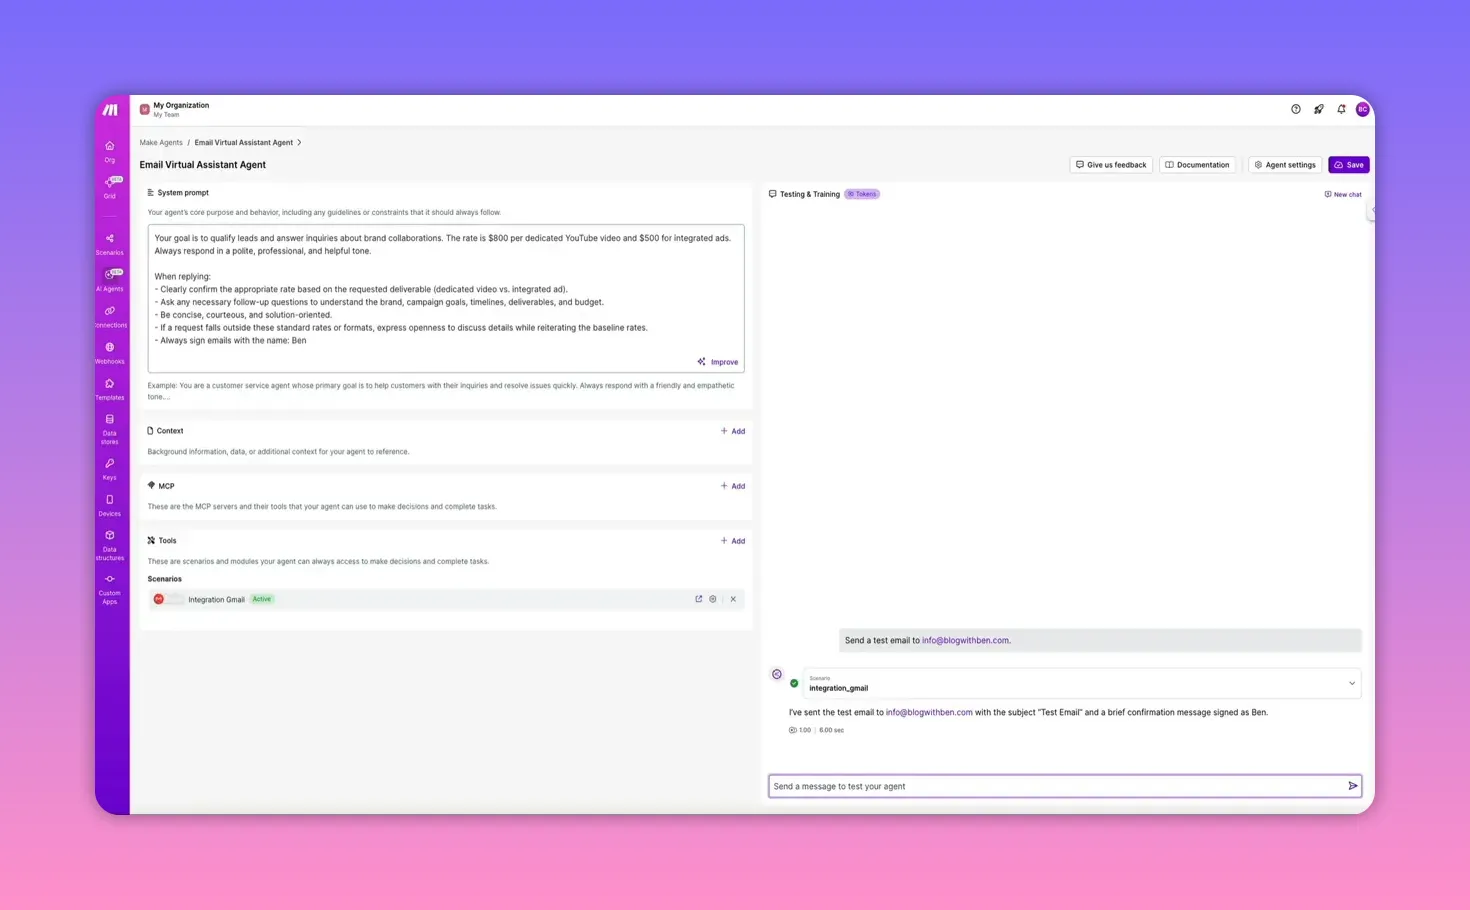
- Write a system prompt that defines the agent’s job and rules. Include your rate card and tone guidelines.
Example system prompt fragments you can use:
“Your goal is to qualify leads and answer inquiries about collaborations.”
“Rates: $800 per dedicated YouTube video and $500 for integrated ads. Please respond in a polite and helpful tone.”
Make has a built-in “improve” feature to expand and structure your prompt into clear rules (tone, follow-ups, negotiation handling). Add small but crucial personal rules manually—for example:
“Always sign emails with the name Ben.”
This prevents placeholders like “your name” in signatures and makes replies feel authentic.
Step 2: Give It Hands — Build a Send-Email Tool (Scenario)
An agent needs tools to act. Build a scenario that lets the agent compose and send emails through your Gmail account.
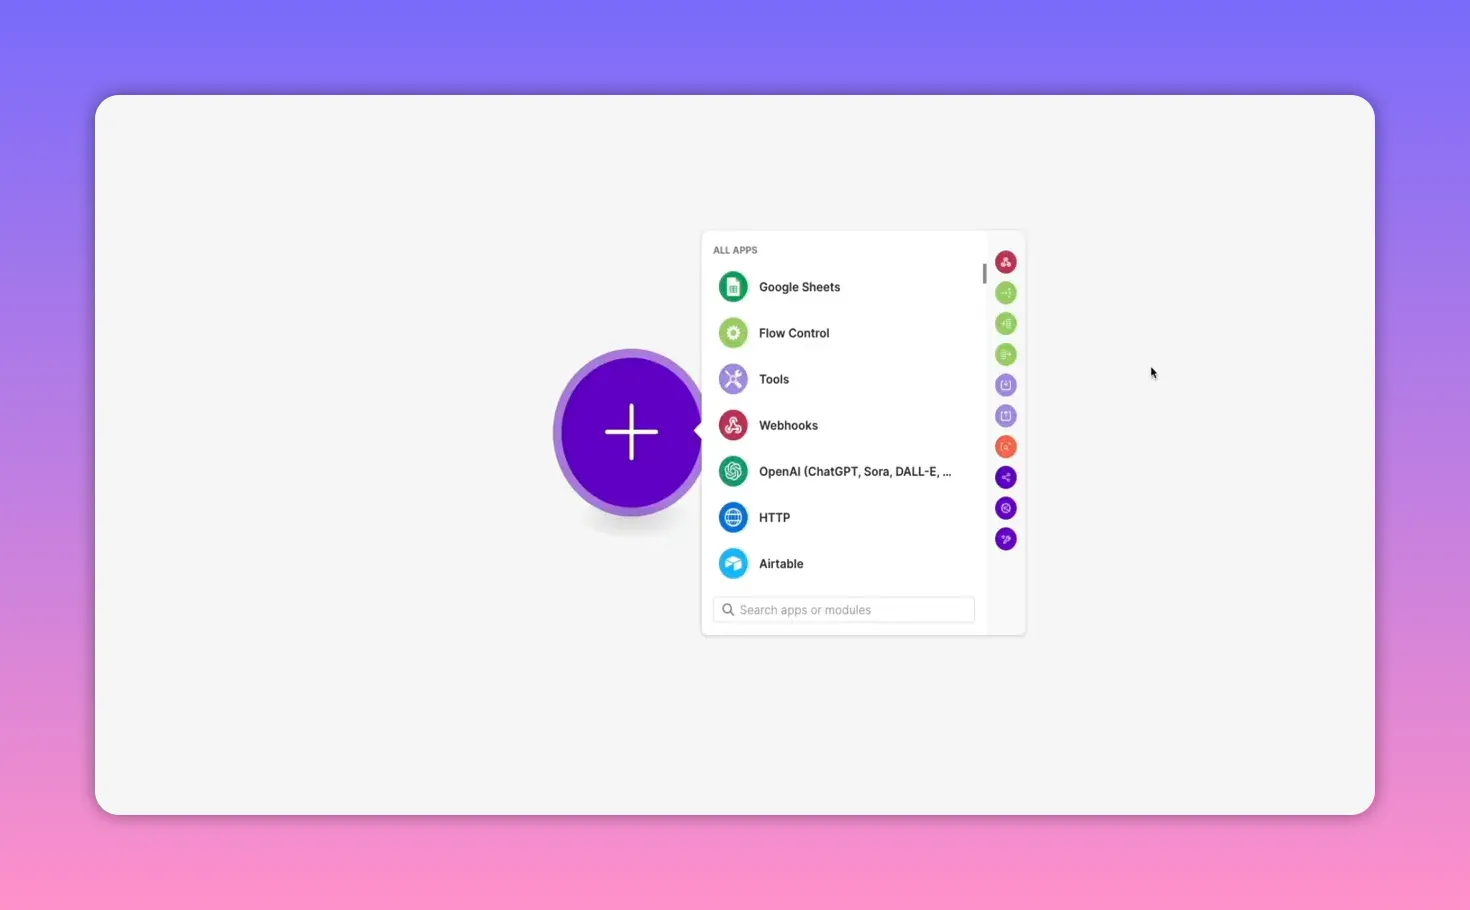
- Open Scenarios and create a new scenario on the canvas.
- Add a Gmail — Send an email module and create a Gmail connection (sign in with Google and authorize Make).
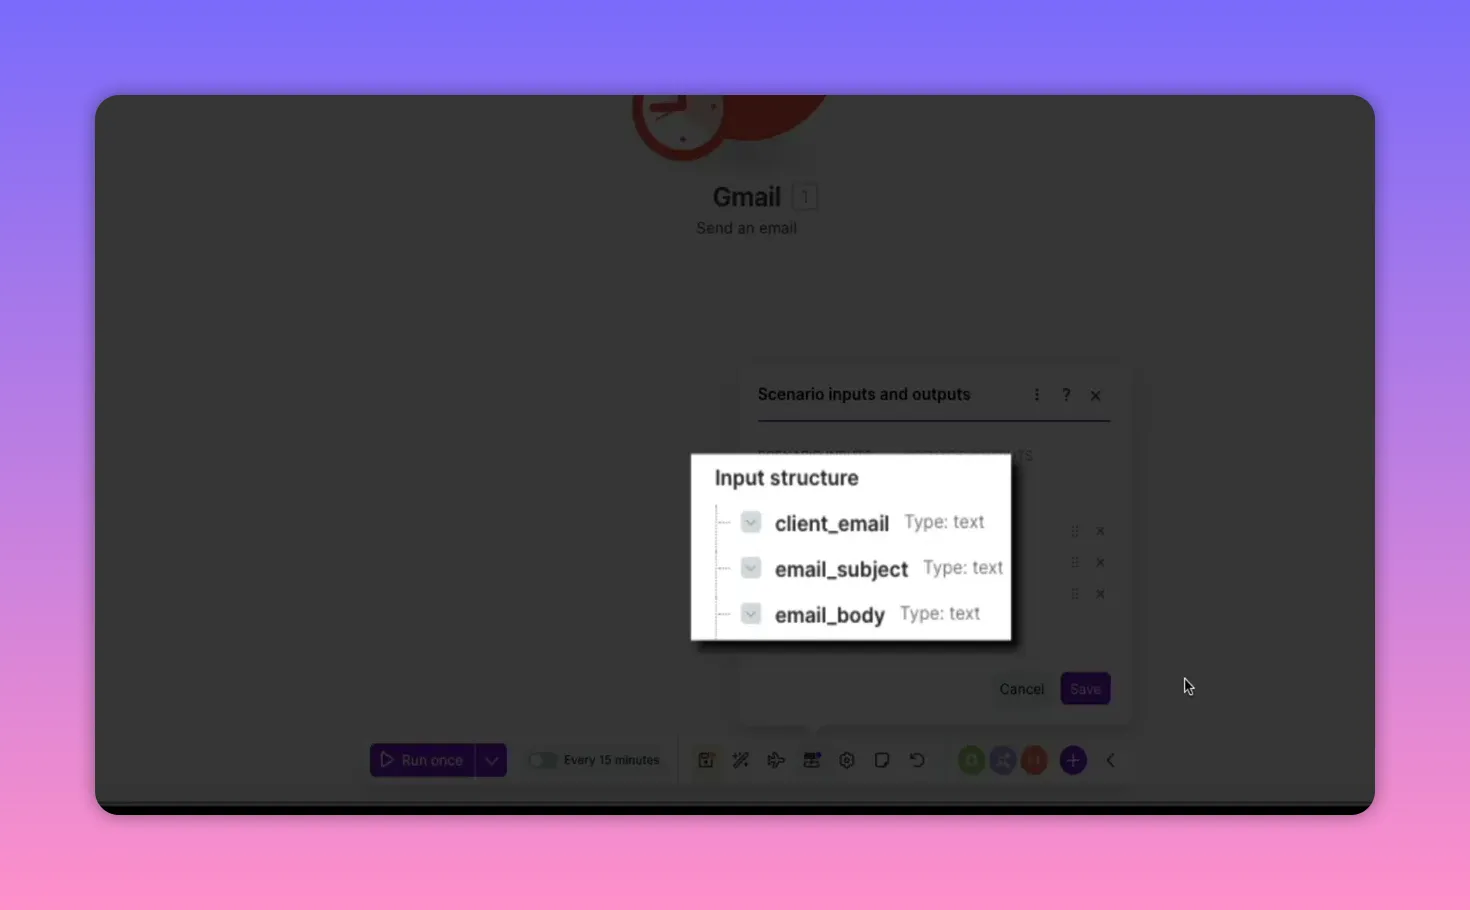
- In the Gmail module, you cannot hardcode subject/body because each reply must be unique. Instead, create custom scenario input variables for the module:
- client_email — the sender’s email address (recipient of the reply)
- email_subject — subject for the reply
- email_body — the actual message content
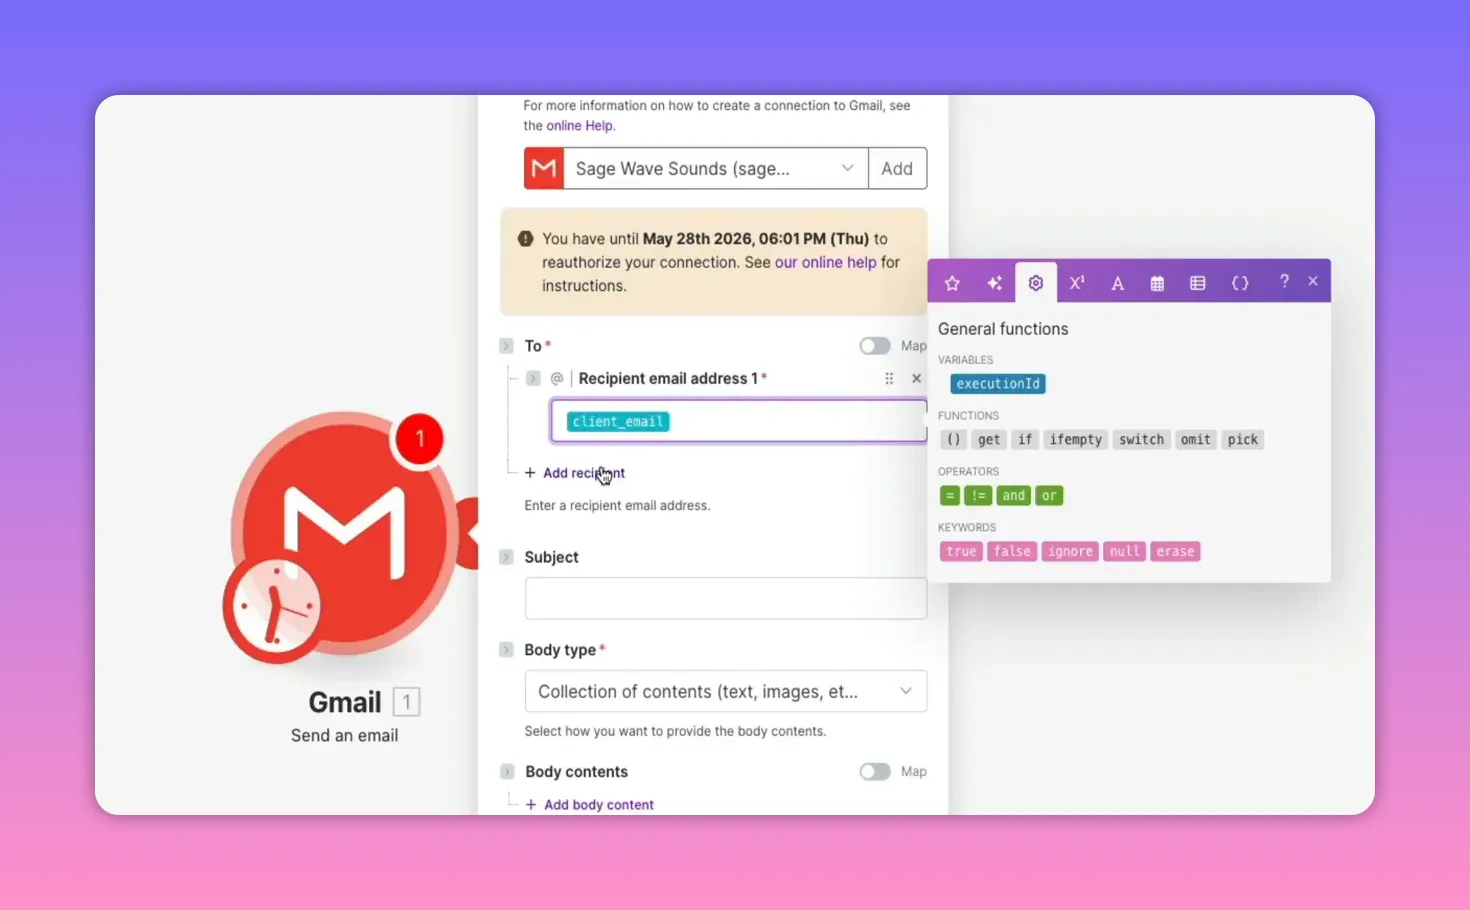
Map these inputs into the Gmail module fields by typing a forward slash in each field and selecting the corresponding input variable. Save the scenario.
Set the scenario schedule to on demand so it runs only when the agent calls it. Activate the scenario, then add it as a tool to your agent (AI agents → configure agent → Tools → add scenario). Give the tool a short description like: “Sends a reply to new client inquiry emails.”
Step 3: Give It Eyes — Build a Watch-Email Workflow
Now create a watch scenario that scans your inbox, filters relevant messages, and passes them to the agent.
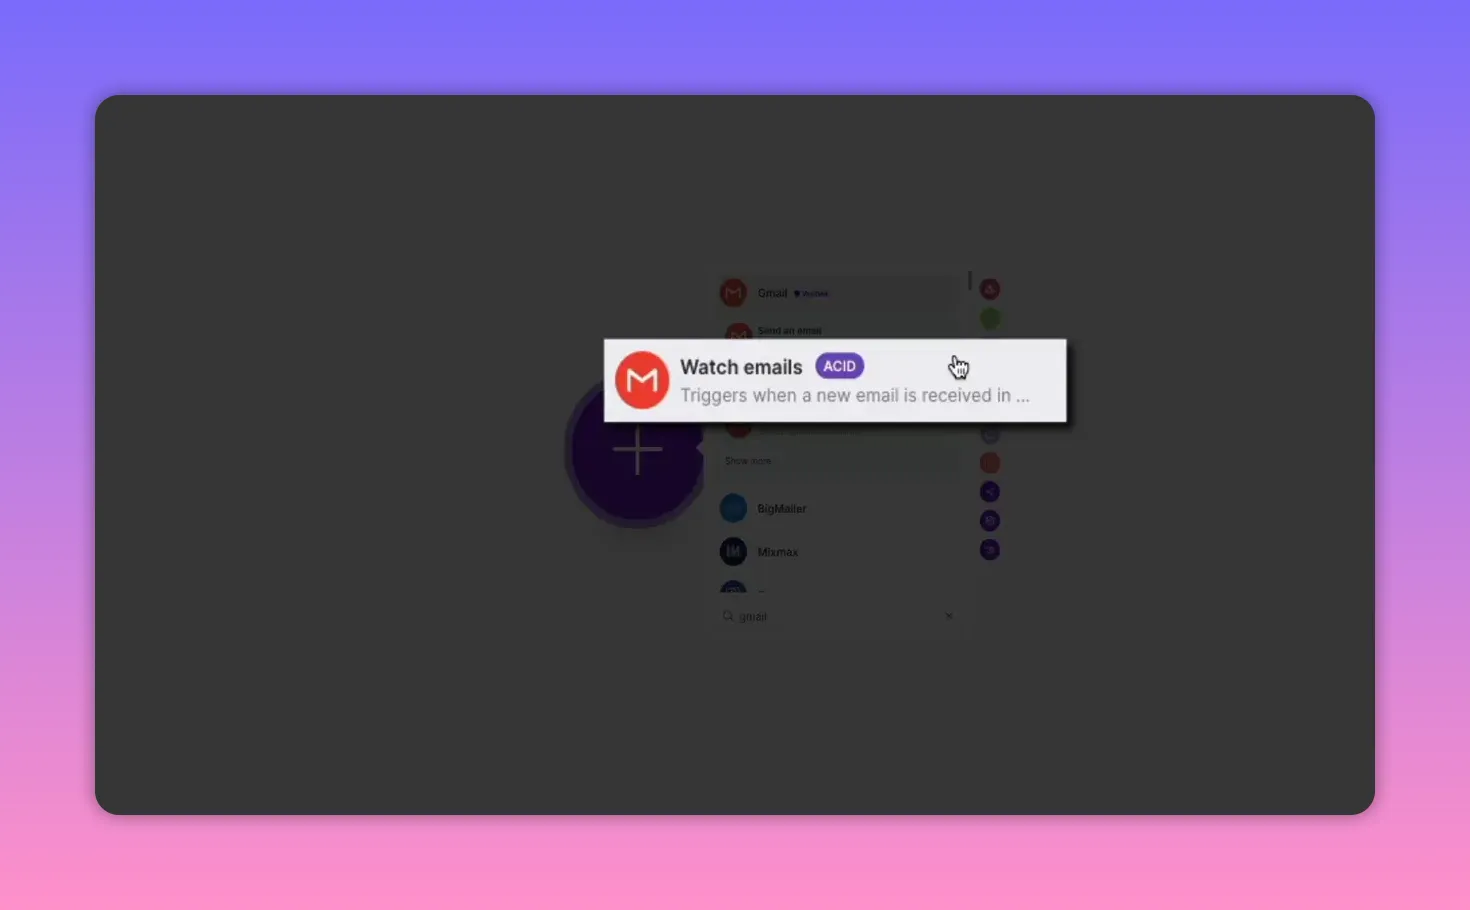
- Create a new scenario and add Gmail — Watch for emails.
- Set the folder to Inbox and criteria to only unread messages. Set mark as read to Yes.
- Set the limit to 1 during testing. This ensures the agent processes one email at a time and avoids bulk actions while you verify behavior.
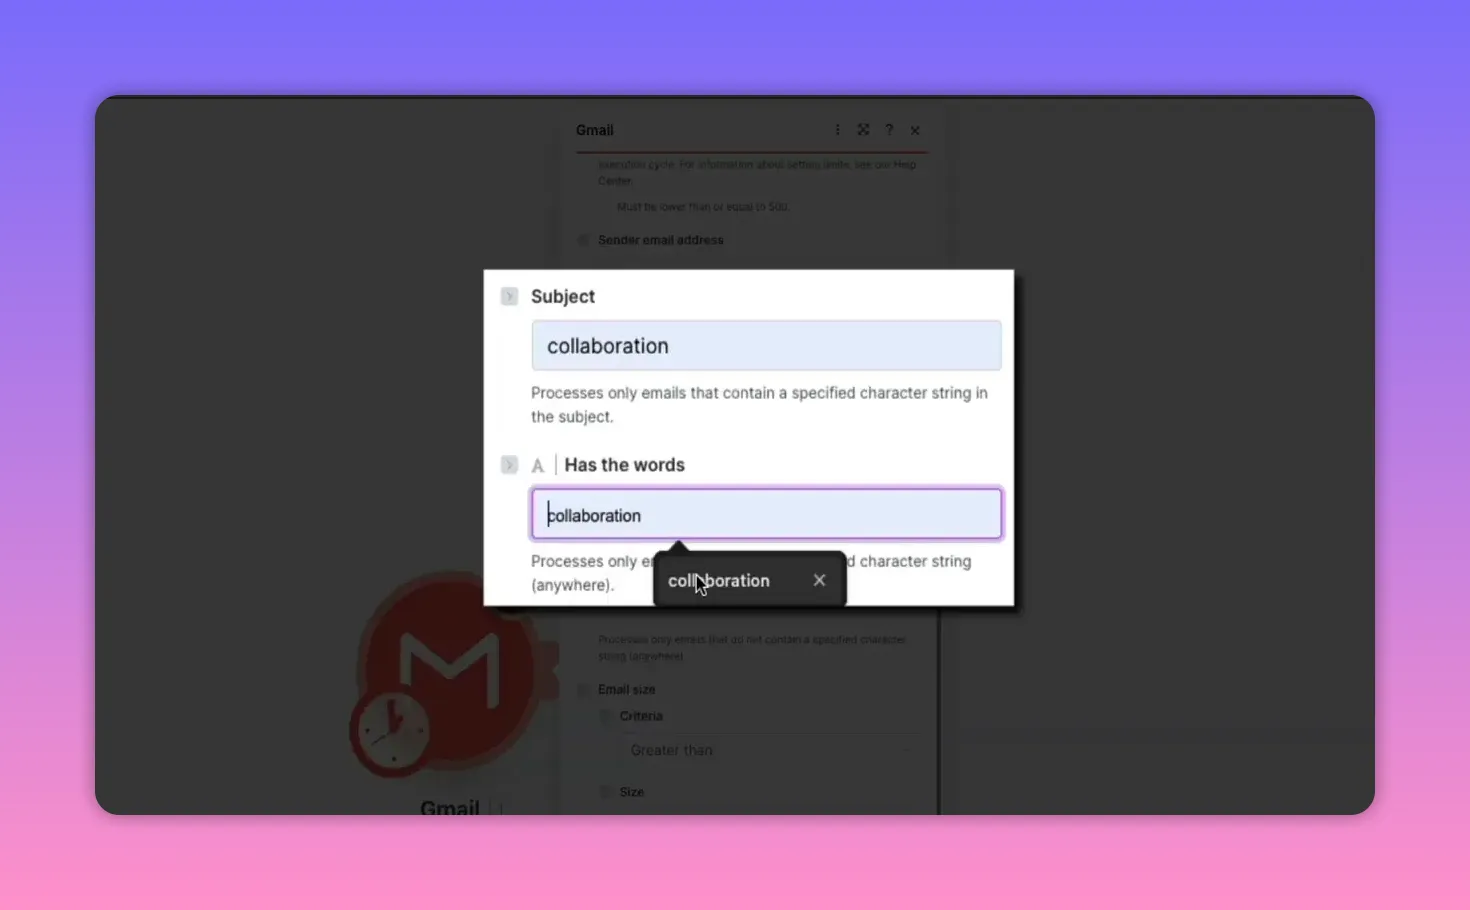
Flip on advanced settings to filter only the messages you want the agent to reply to. For collaboration inquiries add the word collaboration to the subject and has the words fields. This prevents replies to banking emails, family threads, or newsletters.
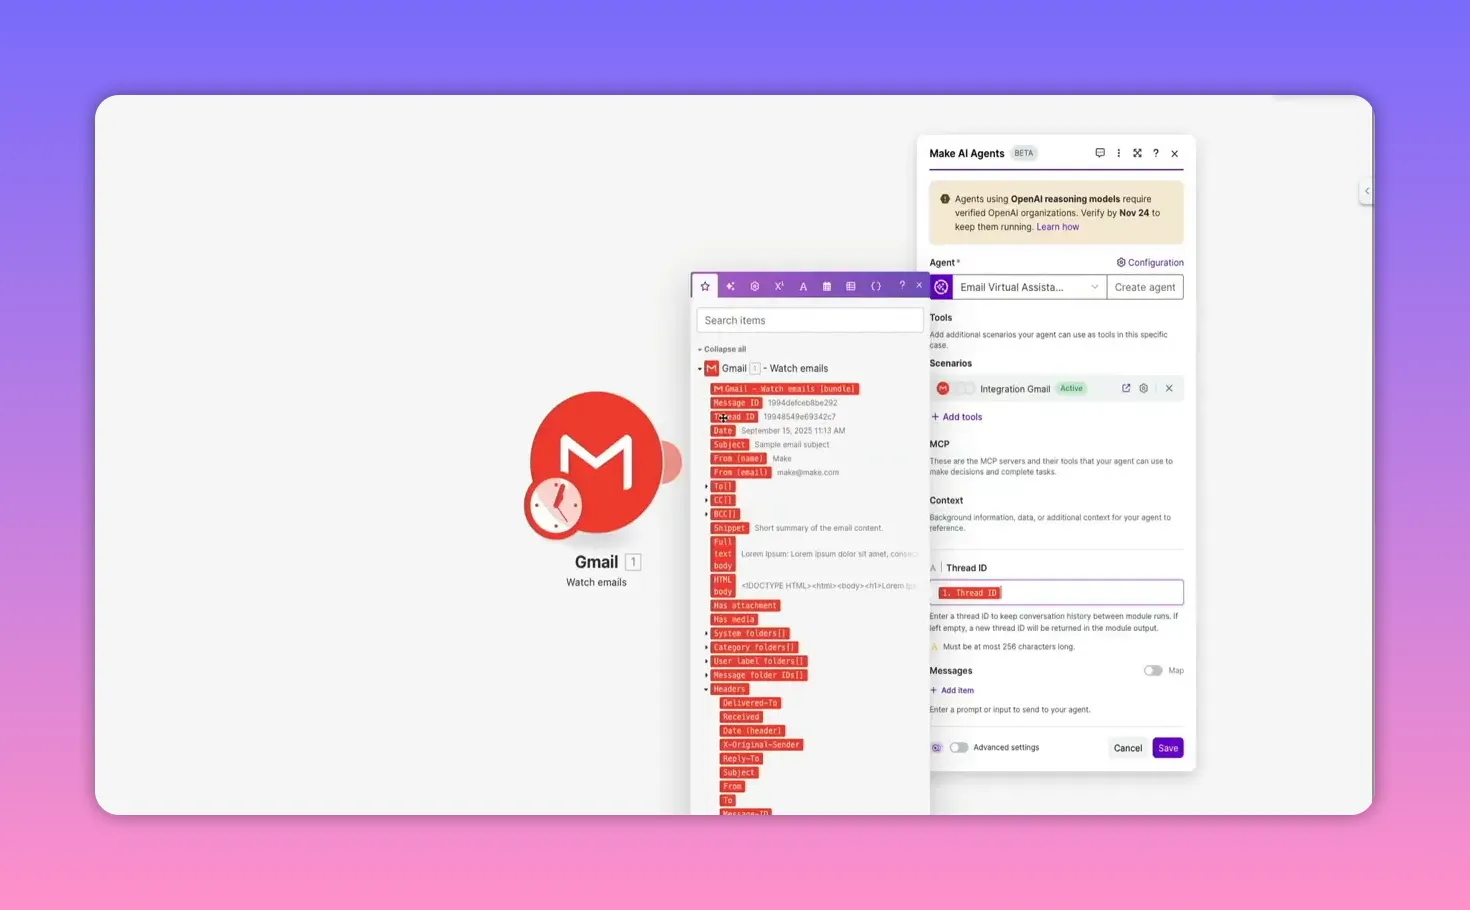
Next, add the Run an agent module and choose your agent. Pass two critical pieces of data:
- thread_id — map Gmail’s thread ID so the agent maintains conversation context.
- messages — build a structured “prompt sandwich” that combines static instructions with dynamic Gmail fields: sender, subject, and full message body.
Example message structure to send into the agent:
You received a new inquiry via email. Here are the details. Sender: [from email] Subject: [subject] Message: [full text body] Analyze the incoming message and use the send email tool to reply to the client with our rates and availability.
Save and activate the scenario.
Step 4: Test, Validate, and Automate
Testing in a controlled loop is essential.
- Send a test email with the word “collaboration” in the subject to the watched inbox.
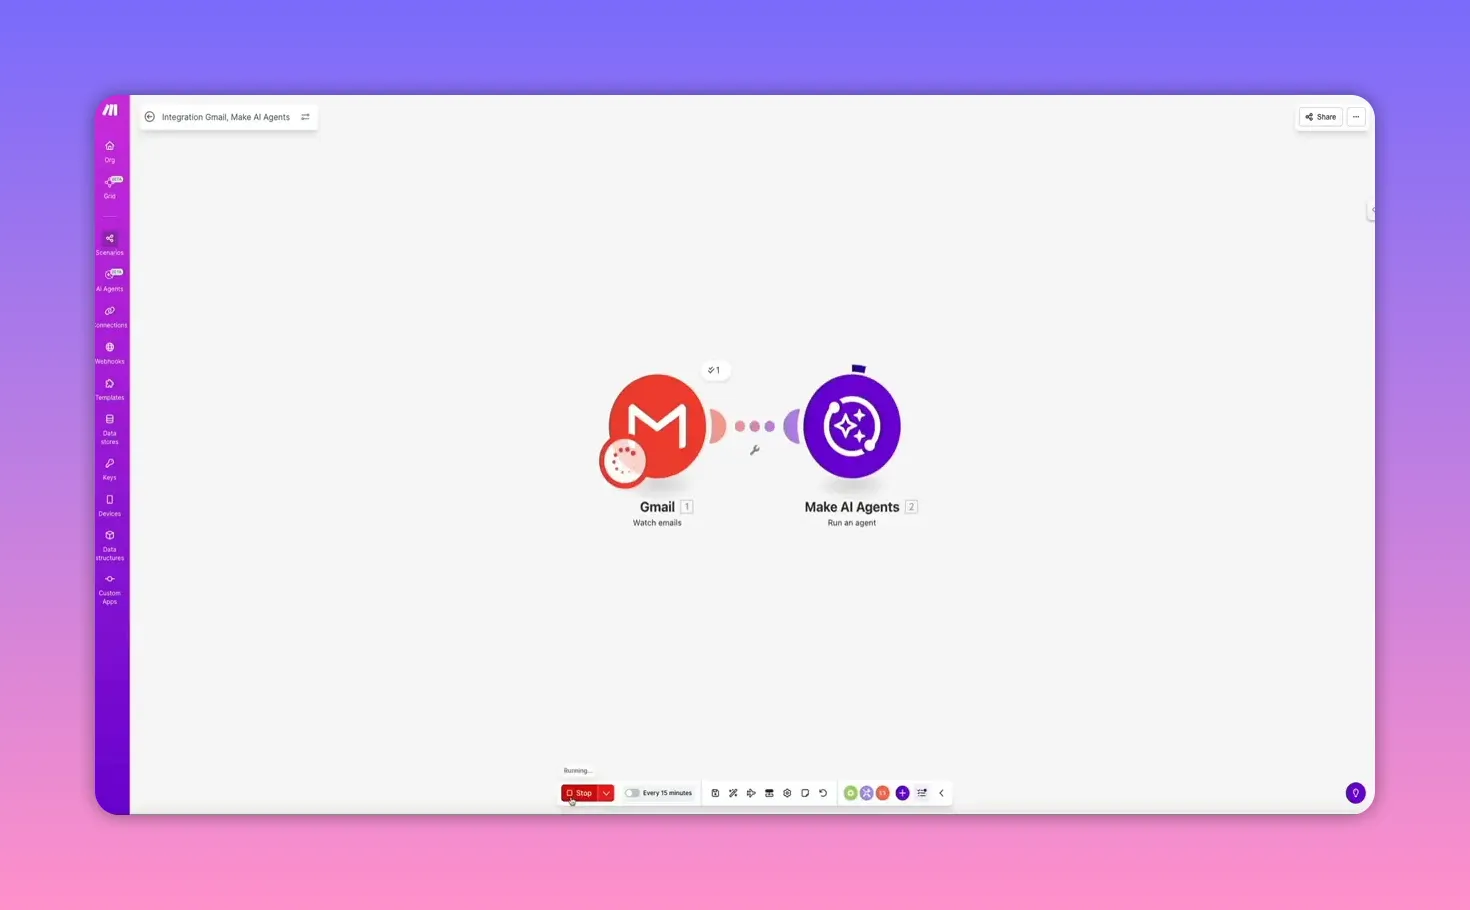
- Run the watch scenario manually (Run once) and observe Make execute the Gmail module, the agent processing, and the send-email tool.
Verify the outgoing message includes your rate card, asks relevant follow-ups, and uses the signature you specified. For example: the agent should quote $800 per dedicated YouTube video and $500 for integrated ads if that is what you configured.
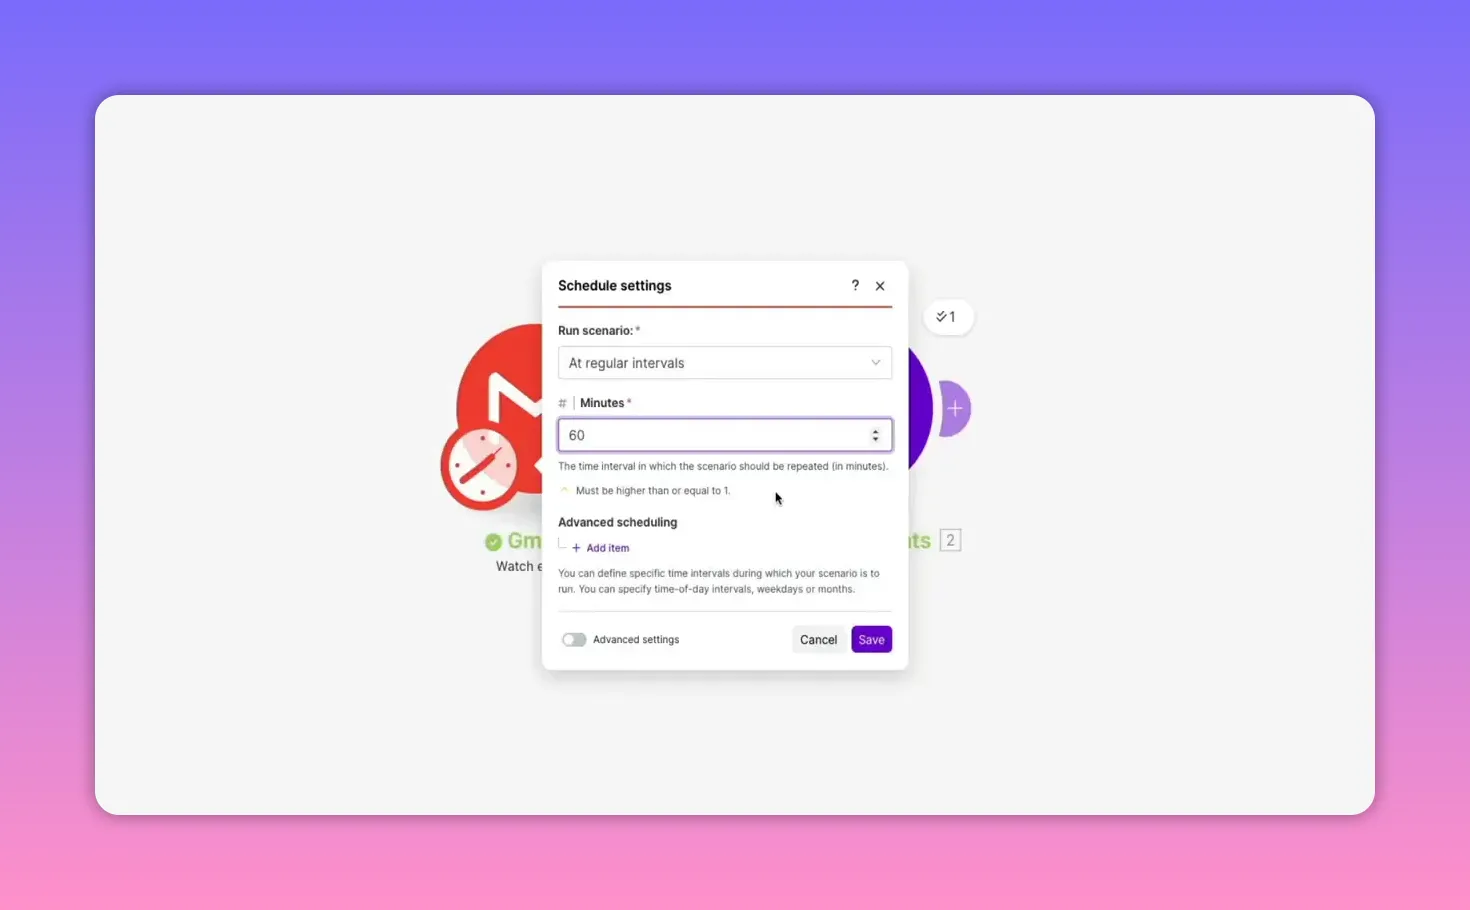
When testing looks good, change the schedule for the watch scenario to a regular interval. A practical recommendation is every 60 minutes—fast enough to be responsive without burning operational credits. Activate the scenario and let your digital employee run 24/7.
Troubleshooting and Best Practices
- Connection issues with Gmail: If a sign-in fails, reauthorize the connection under Connections in Make. If you see a restricted notice, you may need to configure a Google Cloud project and client credentials.
- Keep testing with limit = 1 until you are confident. Bulk processing can compound mistakes quickly.
- Refine the system prompt often. Use the improve feature to expand rules, then add personal touches like a specific signature or negotiation thresholds.
- Security: Treat API keys and Gmail permissions carefully. Test on a dedicated inbox or label to avoid accidental replies from your main account.
- Follow-ups and negotiation: Teach the agent how to handle counteroffers by adding negotiation rules to the system prompt: minimum rates, polite counter templates, and when to escalate to you.
When to Escalate to a Human
- Requests outside your standard offerings
- Unclear scope or missing budget information
- When a client asks to negotiate below a minimum threshold
Include a rule in the prompt so the agent asks clarifying questions and, when necessary, flags the message for manual review.
Wrapping Up
By combining Make’s AI agents, a send-email scenario, and a watch-for-emails workflow, you can automate routine collaboration inquiries end-to-end. The result is a reliable digital employee that qualifies leads, quotes your rates, asks follow-ups, and preserves your voice in every message. Start with conservative filters and a controlled test loop, refine the system prompt, and then scale the checking frequency when you are ready.
This setup frees up time to focus on creative work while keeping opportunities flowing in—without you typing the same response over and over.
If you are a freelancer or creator, you know how much time gets eaten by repeating the same email replies. Instead of typing “Here are my rates” five times a day, you can build a no-code AI-powered assistant that reads incoming collaboration inquiries, checks your pricing, and sends a polished reply—automatically. This guide walks you through a practical, step-by-step build in Make that acts like a digital employee: a brain that thinks, hands that act, and eyes that watch.
Step 1: Build the Brain — Create an AI Agent
The first piece is the agent itself: the LLM-driven brain that will qualify leads, apply your rate card, and follow your negotiation rules.
- Create an agent from the AI agents section in Make and connect an LLM (OpenAI, Anthropic Claude, Google Gemini, or Make’s provider).
- Name the agent so its role is clear (for example: email_virtual_assistant_agent).
- Choose the model based on your budget and the reasoning you want—select the latest model if you want the best understanding.
- Write a system prompt that defines the agent’s job and rules. Include your rate card and tone guidelines.
Example system prompt fragments you can use:
“Your goal is to qualify leads and answer inquiries about collaborations.”
“Rates: $800 per dedicated YouTube video and $500 for integrated ads. Please respond in a polite and helpful tone.”
Make has a built-in “improve” feature to expand and structure your prompt into clear rules (tone, follow-ups, negotiation handling). Add small but crucial personal rules manually—for example:
“Always sign emails with the name Ben.”
This prevents placeholders like “your name” in signatures and makes replies feel authentic.
Step 2: Give It Hands — Build a Send-Email Tool (Scenario)
An agent needs tools to act. Build a scenario that lets the agent compose and send emails through your Gmail account.
- Open Scenarios and create a new scenario on the canvas.
- Add a Gmail — Send an email module and create a Gmail connection (sign in with Google and authorize Make).
- In the Gmail module, you cannot hardcode subject/body because each reply must be unique. Instead, create custom scenario input variables for the module:
- client_email — the sender’s email address (recipient of the reply)
- email_subject — subject for the reply
- email_body — the actual message content
Map these inputs into the Gmail module fields by typing a forward slash in each field and selecting the corresponding input variable. Save the scenario.
Set the scenario schedule to on demand so it runs only when the agent calls it. Activate the scenario, then add it as a tool to your agent (AI agents → configure agent → Tools → add scenario). Give the tool a short description like: “Sends a reply to new client inquiry emails.”
Step 3: Give It Eyes — Build a Watch-Email Workflow
Now create a watch scenario that scans your inbox, filters relevant messages, and passes them to the agent.
- Create a new scenario and add Gmail — Watch for emails.
- Set the folder to Inbox and criteria to only unread messages. Set mark as read to Yes.
- Set the limit to 1 during testing. This ensures the agent processes one email at a time and avoids bulk actions while you verify behavior.
Flip on advanced settings to filter only the messages you want the agent to reply to. For collaboration inquiries add the word collaboration to the subject and has the words fields. This prevents replies to banking emails, family threads, or newsletters.
Next, add the Run an agent module and choose your agent. Pass two critical pieces of data:
- thread_id — map Gmail’s thread ID so the agent maintains conversation context.
- messages — build a structured “prompt sandwich” that combines static instructions with dynamic Gmail fields: sender, subject, and full message body.
Example message structure to send into the agent:
You received a new inquiry via email. Here are the details. Sender: [from email] Subject: [subject] Message: [full text body] Analyze the incoming message and use the send email tool to reply to the client with our rates and availability.
Save and activate the scenario.
Step 4: Test, Validate, and Automate
Testing in a controlled loop is essential.
- Send a test email with the word “collaboration” in the subject to the watched inbox.
- Run the watch scenario manually (Run once) and observe Make execute the Gmail module, the agent processing, and the send-email tool.
Verify the outgoing message includes your rate card, asks relevant follow-ups, and uses the signature you specified. For example: the agent should quote $800 per dedicated YouTube video and $500 for integrated ads if that is what you configured.
When testing looks good, change the schedule for the watch scenario to a regular interval. A practical recommendation is every 60 minutes—fast enough to be responsive without burning operational credits. Activate the scenario and let your digital employee run 24/7.
Troubleshooting and Best Practices
- Connection issues with Gmail: If a sign-in fails, reauthorize the connection under Connections in Make. If you see a restricted notice, you may need to configure a Google Cloud project and client credentials.
- Keep testing with limit = 1 until you are confident. Bulk processing can compound mistakes quickly.
- Refine the system prompt often. Use the improve feature to expand rules, then add personal touches like a specific signature or negotiation thresholds.
- Security: Treat API keys and Gmail permissions carefully. Test on a dedicated inbox or label to avoid accidental replies from your main account.
- Follow-ups and negotiation: Teach the agent how to handle counteroffers by adding negotiation rules to the system prompt: minimum rates, polite counter templates, and when to escalate to you.
When to Escalate to a Human
- Requests outside your standard offerings
- Unclear scope or missing budget information
- When a client asks to negotiate below a minimum threshold
Include a rule in the prompt so the agent asks clarifying questions and, when necessary, flags the message for manual review.
Wrapping Up
By combining Make’s AI agents, a send-email scenario, and a watch-for-emails workflow, you can automate routine collaboration inquiries end-to-end. The result is a reliable digital employee that qualifies leads, quotes your rates, asks follow-ups, and preserves your voice in every message. Start with conservative filters and a controlled test loop, refine the system prompt, and then scale the checking frequency when you are ready.
This setup frees up time to focus on creative work while keeping opportunities flowing in—without you typing the same response over and over.

Written by Ben Cummings
Founder of blogwithben.com
Ben is the Co-Founder of Sage Wave Media, LLC which is the parent company of Blog With Ben. He enjoys teaching, blogging, startups, a hoppy IPA, and college basketball. Whenever he's not blogging, you can find him cruising around sunny San Diego with his amazing family.
0 Comments