HTTP to HTTPS: A Blogger's Guide to Making the Switch
HTTP to HTTPS: A Blogger's Guide to Making the Switch

When it comes to your blog and its users, privacy should be one of your top concerns. Thankfully, the secure protocol known as HTTPS (Hypertext Transfer Protocol Secure) can not only help you protect your blog’s visitors information, but it can thwart off attacks by would-be hackers and identity thieves.
Here’s how it works. Users expect a secure and private online experience when using a website or blog. HTTPS is an internet communication protocol that protects the integrity and confidentiality of data between the user's computer and the site.
What is HTTPS?
Simply put, HTTPS encrypts data traveling between a web browser and a web server. This means that if anyone (hackers, criminals, identity thieves) is watching, the HTTPS protocol disguises user data so that information attached to your blog’s visitors is safe, secure, and undetectable.
Why HTTPS?
Starting in July 2018, Chrome will mark all HTTP pages as “not secure”. This means that if your blog is still showing HTTP, and your visitors are using the Chrome web browser to view your blog, then they’ll see this nice little warning.
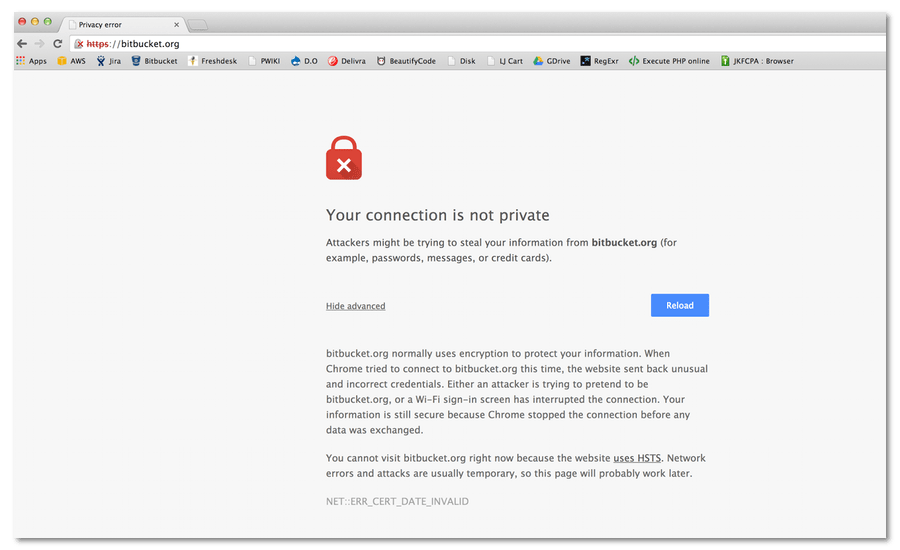
This is a surefire way to scare visitors away from your blog. Not cool! So, that’s why it’s super important to make sure your blog is up to date with HTTPS.
Another reason you should adopt HTTPS is because it enables technologies that speed up the user experience. New performance-enhancing web protocols like HTTP/2 require HTTPS, which is one of the reasons that 81 of the top 100 sites on the web use HTTPS by default.
How to Check if Your Blog Supports HTTPS
If you used any of my blogging tutorials in 2018 to build a blog, then your site will automatically be configured for HTTPS. That’s because you’ll get a free SSL certificate when you sign up for a hosting plan (affiliate link) through my blog. We’ll talk more about SSL certificates a little later on in the post.
However, if you didn’t start your blog this year with Bluehost, there are a few ways to check if your blog supports HTTPS. These tips all are seemingly pretty straightforward, but here’s how you can check.
1. Open a Page in Chrome
If you see a green lock icon to the left of the URL, then your site supports HTTPS. If the lock does not appear, try re-entering your website URL with “https://” instead of “http://”. If the page doesn’t load, then your site does not support HTTPS.
2. Use Why No Padlock?
This free service lets you quickly check for insecure issues on your blog. Simply visit whynopadlock.com and type in the full https address in their search box and you’ll receive a full report on your blog’s insecure items.
How to Enable HTTPS on a WordPress Blog
First things first, in order for your blog to display HTTPS, you’ll need an SSL certificate. If you’re new to the concept, an SSL certificate basically creates a secure path for information and data to be passed back and forth online.
One thing to keep in mind is that the following tips are specific to Bluehost and WordPress users. If you’re not using either one of those services, then your steps to securing your blog will be different than what’s listed below. Just a heads up.
1. Get an SSL Certificate
When your blog is protected with an SSL certificate, a padlock icon, and the https:// prefix will display on your visitor’s browser bar. This not only notifies them that your blog is safe and secure, but it also assures your readers that you take their security seriously.
So, the first thing you’ll need is an SSL certificate (affiliate link). As with anything worth having, an SSL certificate will cost some money (roughly $30 – $50 per year). But again, think of this as an investment in your blog’s future. And like is said, if you use my affiliate link, Bluehost will give you a free SSL Certificate and domain name when you sign up for their WordPress hosting plan.
2. Enable and Activate the SSL Certificate
If you started your blog with Bluehost in 2018, then the next step is for you. But if you purchased your SSL from a 3rd party, then there are some extra steps you’ll need to take in order for your SSL to work properly.
Bluehost now provides free SSL certificates for all assigned and parked domain names set up in your account. In most cases, the SSL will automatically assign and install itself to your new and existing domains; however, some customers may need to manually enable the certificate.
To enable the free SSL certificate:
1. Log into your Bluehost control panel.
2. Click the Addons tab.
3. Locate SSL Certificates, and click on the learn more button.
4. Click the get started button under WordPress Free SSL.
5. Click the Install button.
Once you've turned the SSL on, it can take a few hours to install and activate. In some situations, Bluehost may need you to take action to complete the process. If so, you'll receive an email with instructions.
Migrating from HTTP to HTTPS
If you initially built your blog without an SSL certificate, chances are you’ll need to migrate from HTTP to HTTPS. No worries though, once you have your SSL certificate enabled and activated, migrating from HTTP to HTTPS can easily be done.
1. Force SSL on all Pages
If you’re feeling techy, or if you have some experience with your blog’s file manager, then this step is for you. It requires a little bit of technical know-how, but it’s super easy to do.
When you migrate from HTTP to HTTPS, you are basically creating two separate versions of your blog. This opens the door to the possibility of visitors being able to access the HTTP version of your blog instead of the HTTPS.
One way around this is to redirect all HTTP requests to the HTTPS version of your blog by adding some code to your WordPress .htaccess file.
To force SSL on all pages:
1. Log into your Bluehost control panel.
2. Click the Advanced Tab
3. Click on File Manager
4. Open the .htaccess file
5. Click Edit at the top of the screen to open the code editor
6. Add the following lines to the beginning of the .htaccess file.
RewriteEngine On
RewriteCond %{SERVER_PORT} 80
RewriteRule ^(.*)$ https://example.com/$1 [R=301,L]
Substitute example.com with your domain name.
2. Use the Easy SSL Redirection WordPress Plugin
Another way to make sure your blog is displaying the HTTPS prefix correctly is to use a plugin. The Easy HTTPS Redirection WordPress plugin can help you achieve this with a few short steps.
1. Enable and activate your SSL certificate.
2. Install and activate the plugin.
3. In your WordPress dashboard go to Settings>HTTPS Redirection
4. Enable the following two options from the settings menu: (1. Enable automatic redirection to the HTTPS. 2. Force resources to use HTTPS URL.)
If you’re needing a little extra help with the plugin, I highly recommend reading the Tips and Trick HQ plugin page.
Quick Tips and Resources
There are a lot of things to think about when migrating from HTTP to HTTPS. So, here are some quick tips and resources to help you out if you get stuck.
1. Add Both Versions of Your Blog to Google Search Console
Search Console treats HTTP and HTTPS as two separate properties (or websites). So data for these properties are not shared in Search Console. If you migrated from HTTPS to HTTPS, you must have a separate Search Console property for each one.
2. Check Your SSL Certificate Expiration Date
Don’t fall into the trap of forgetting to renew your SSL certificate. Bluehost will automatically renew your SSL certificate each year, but it’s always a good idea to double check and make sure it renews automatically each year.
3. Don’t Have Mixed Security Elements
After your site is fully migrated, be sure not to embed or add any type of links or content that are HTTP. Only embed HTTPS content on HTTPS pages.
4. Use Bluehost and Chrome Resources
If you’re new to blogging, this whole HTTP to HTTPS thing can get pretty confusing. Trust me, I’ve been blogging for years and it still hurts my brain sometimes. Luckily, Google and Bluehost have some great articles that can help you sort things out if you have any issues with getting things set up.
• Google’s best practices when implementing HTTPS
• Check if a site is secure
• What is mixed content?
• SSL installation of 3rd party certificate
• How to activate Bluehost’s free SSL certificate
• Bluehost Tech Support
Wrapping Up
Having a secure blog will not only protect your visitors, but it will ultimately protect your brand. Now that HTTPS is considered the “norm”, it’s basically a requirement that all of your web properties be configured to display the https:// prefix. Hopefully, this post gave you some insight on what you need to do in order to keep your blog safe and secure.
If you have any questions or need some extra help, feel free to leave a comment below or reach out via my contact page. Thanks!
References
Secure your site with HTTPS – Search Console Help. (n.d.). Retrieved from https://support.google.com/webmasters/answer/6073543

Written by Ben Cummings
Founder of blogwithben.com
Ben is a Digital Marketing and CMS Specialist for Bridgepoint Education who holds an MBA with a specialization in Entrepreneurship. He enjoys teaching, blogging, startups, a hoppy IPA, and college basketball. Whenever he's not blogging, you can find him cruising around sunny San Diego with his amazing family.
0 Comments